
Get your little ones in the holiday spirit with this fun and festive North Pole Clothespin Ornament Craft! With just a few simple materials, your kids can make these adorable crafts in no time.

North Pole Clothespin Ornament Craft For Kids
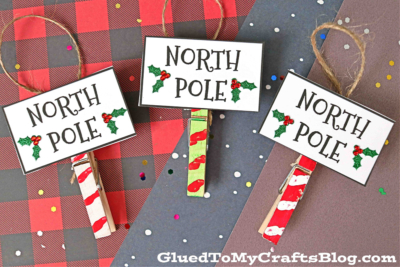
Today’s Paper & Wood North Pole Christmas Ornament craft idea is super easy to make and just as versatile.
You can add these Santa’s workshop clothespin creations to presents to make a cute gift tag holder or hang them on the holiday tree for a fun kid-made ornament. Another awesome idea is to stand these North Pole wood creations up on their own and use them as instant holiday decor in your home {maybe even for your very own Elf on the shelf can play with it too!}
The kids will keep busy for hours and you’ll have a keepsake for many years to come! So keep on scrolling to learn how YOU can your child can recreate it, as well as grabbing our FREE printable to make it even easier to recreate.
Happy crafting, my friends! Be sure when you complete this North Pole inspired Christmas ornament craft, that you come share pictures with us on our Facebook page. I seriously can’t wait to hear from you! BTW – we also want to encourage YOU to give it your own holiday spin, so don’t be shy on changing it up either!
RELATED —> Santa Gnome Keepsake


The holidays are a wonderful time of year, but they can also be stressful, busy and hectic. Here’s an easy craft that you can do with the kids or even on your own!
Craft Supplies:
- North Pole Printable – on our landing page
- White Cardstock Paper
- Scissors
- Wood Clothespins
- Craft Paint
- Paint Brushes
- Large Paper Plate
- Hot Glue Gun
- Twine or Ribbon
Directions:
- First things first – grab your paper plate, one clothespin, your paint brushes and TWO colors of craft paint.
- Squirt the craft paints on one side of the paper plate. You are doing to do your “painting” on the other side of it so leave some blank space for your working area.
- Now lay down your clothespin on the paper plate.
- You are going to paint one side of your clothespin in a stripped pattern. I would do one color all over the clothespin, then add the stripes on top of that. It doesn’t need to be perfect!
- When done with the paint step, set it aside to let it dry completely.
- Next up – if you haven’t already, go ahead and print out our FREE printable listed above in the supply list. One print will give you EIGHT ornaments. I printed ours on white cardstock paper but feel free to change that up as well! You can also have children color in the printable for an extra step.
- Go ahead and trim out ONE of the North Pole rectangles from the printable.
- Set aside the remaining cardstock paper so you can recreate the full eight ornaments later on.
- Now get the glue gun hot and ready.
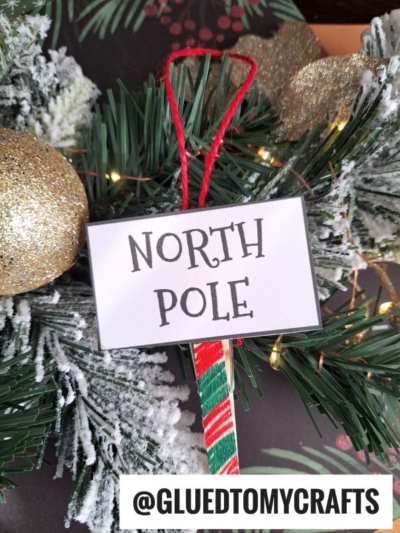
- Hot glue the small North Pole rectangle shape to the front of the painted clothespin. Make sure you don’t cover up too much of the “pole” with the paper.
- The final step is to cut off a small piece of ribbon or twine and hot glue it to the back of the finished clothespin design to make an ornament. Simple cut, tie off and glue down on the back of the paper sign design.
- Now you can either leave it as is or add some small holiday stickers on the sign {like I did} to really pull it together.
- Once the North Pole Christmas ornament is dry enough, go ahead and display it proudly for ALL to see!
RELATED —> Holly Jolly Keepsake
Calling all my crafty friends! Are you looking for even more creative kids craft ideas to recreate this Christmas holiday?
Maybe something to pair with today’s North Pole Christmas Ornament post?
Then be sure to check out our SUPER popular Gingerbread Truck Ornament, Paper Holly Wreath and Paper Plate Santa Belly craft posts!
By the way, did you know we are on Pinterest?! Come see all our favorite crafts, trends and even more fun stuff, by following us there!

Clothespin North Pole Ornament Craft Idea
Here’s your checklist of supplies to bring this craft to life:
Prepare your creative haven by laying down a protective cover before the crafting magic begins!
Directions:
- First things first - grab your paper plate, one clothespin, your paint brushes and TWO colors of craft paint.
- Squirt the craft paints on one side of the paper plate. You are doing to do your "painting" on the other side of it so leave some blank space for your working area.Craft Paint
- Now lay down your clothespin on the paper plate.
- You are going to paint one side of your clothespin in a stripped pattern. I would do one color all over the clothespin, then add the stripes on top of that. It doesn't need to be perfect!Wooden Clothespins
- When done with the paint step, set it aside to let it dry completely.
- Next up - if you haven't already, go ahead and print out our FREE provided printable. One print will give you EIGHT ornaments. I printed ours on white cardstock paper but feel free to change that up as well! You can also have children color in the printable for an extra step.Cardstock Paper
- Go ahead and trim out ONE of the North Pole rectangles from the printable.
- Set aside the remaining cardstock paper so you can recreate the full eight ornaments later on.
- Now get the glue gun hot and ready.
- Hot glue the small North Pole rectangle shape to the front of the painted clothespin. Make sure you don't cover up too much of the "pole" with the paper.
- The final step is to cut off a small piece of ribbon or twine and hot glue it to the back of the finished clothespin design to make an ornament. Simple cut, tie off and glue down on the back of the paper sign design.Twine or Ribbon
- Now you can either leave it as is or add some small holiday stickers on the sign {like I did} to really pull it together.Embellishments
- Once the North Pole Christmas ornament is dry enough, go ahead and display it proudly for ALL to see!


NEED HELP DOWNLOADING OUR FREE PRINTABLES? PLEASE REFER TO OUR FAQ PAGE