Not only is our gnome puppet craft idea super simple, adorable and fun for all ages to recreate - but it's also really inexpensive!

Get crafty and bring your imagination to life with this adorable paper bag gnome puppet! Tag us in your pictures so we can see your creations!

Not only is today’s Paper Bag Gnome craft idea super simple, adorable and fun for all ages to recreate – but it’s also really inexpensive when it comes to the supplies.
We are talking simple art project materials that are easy to find and rather friendly on the wallet too. All you need is brown lunch sacks, paint crayons and cardstock paper to make it happen!
Overall, my favorite element is that you change the colors of your lunch bag gnome to make him perfect for Christmas, Valentine’s Day, St. Patrick’s Day etc.!
So what are you waiting for? Let’s grab our craft supplies and get straight to work on making our own one-of-a-kind gnomes from paper lunch sacks! You can find everything you need to know, in the full step-by-step gnome puppet craft tutorial below and then have you yourself a crafty day making gnome puppets to play with afterwards!

This easy craft idea is perfect for kids of all ages! They can make their very own paper bag gnome puppet in no time.
Craft Supplies:
Before starting any craft project, it’s essential to gather the necessary materials. For the paper bag gnome craft, you’ll need the following items:
- Brown Paper Bag – 1 per craft
- Paint Crayon
- Scrapbook Paper
- Cardstock Paper
- Craft Scissors
- School Glue or Glue Stick
Directions:
A well-organized craft station sets the stage for a successful project. Arrange all materials within easy reach of your child.
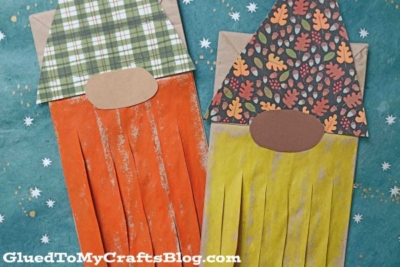
- First things first – lay the paper bag on a flat surface, with the bottom flap facing you. You also want the opening of the paper bag to be facing downward. Just envision that the smaller rectangle area is the face and the larger portion is his beard.
- Now grab your choice of color in paint crayon and paint ONLY the bottom portion of the bag {not that smaller flap!}
- Once done, set aside to let it dry completely.
- Now grab your scissors and two pieces of paper.
- Cut out a large, triangle hat from your scrapbook print and a small oval for the nose, from the solid cardstock paper.
- Now we are ready to finish up the gnome craft. Grab your painted paper bag, all your paper cutouts, the glue and the scissors, once again.
- Go ahead and start off by gluing the triangle hat to the flap of the paper bag.
- Follow that up with the nose in the center of the craft.
- To finish it off, cut the loose portion of the paper bag into thin strips to create the “gnome beard.” Just make sure you don’t go up too high on the paper bag!
- And that’s it on this Paper Bag Gnome craft! Go ahead and add any other embellishments before you display him proudly for all to see!
- BTW – you can stick your hand inside the decorated brown paper bag {with the paper strips hanging over your arm and your hand in the bottom of the bag portion} to make it into a puppet!
RELATED —> Scoop Stick Garden Gnome

Recreating our paper bag gnome idea is a fun, creative, and educational activity that kids will love. It’s a fantastic way to spend quality time together while fostering your child’s creativity and fine motor skills.
The materials are inexpensive and the steps are simple, making it accessible for everyone. Ready to get crafting? Gather your materials and enjoy some imaginative fun with your child today.
BTW – if you are looking for even MORE easy craft ideas that are perfect for an afternoon boredom buster, be sure to check out these fun posts listed below:
- Paper Plate Fall Gnome
- Christmas Tree Gnome
- Popsicle Stick Bunny Gnome
- Leprechaun Gnome Keepsake
- Mushroom Fairy House
- Handprint Gnome Keepsake
- Paper Plate Mushroom
- Paper Bag Unicorn Puppet

Paper Bag Gnome Craft Idea
Not only is our gnome puppet craft idea super simple, adorable and fun for all ages to recreate - but it's also really inexpensive!
Here’s your checklist of supplies to bring this craft to life:
- 1 Paper Bag
- Scrapbook Paper
- Cardstock Paper
- Embellishments
Prepare your creative haven by laying down a protective cover before the crafting magic begins!
Directions:
- First things first - lay the paper bag on a flat surface, with the bottom flap facing you. You want the opening of the paper bag to be facing downward. Just envision that the smaller rectangle area is the face and the larger portion is his beard.
- Now grab your choice of color in paint crayon and paint ONLY the bottom portion of the bag {not that smaller flap!}
- Once done, set aside to let it dry completely.
- Now grab your scissors and two pieces of paper.
- Cut out a large, triangle hat from your scrapbook print and a small oval for the nose, from the solid cardstock paper.
- Now we are ready to finish up the gnome craft. Grab your painted paper bag, all your paper cutouts, the glue and the scissors, once again.
- Go ahead and start off by gluing the triangle hat to the flap of the paper bag.
- Follow that up with the nose in the center of the craft.
- To finish it off, cut the loose portion of the paper bag into thin strips to create the "gnome beard." Just make sure you don't go up too high on the paper bag!
- And that's it on this Paper Bag Gnome craft! Go ahead and add any other embellishments before you display him proudly for all to see!

CLICK HERE TO PRINT THE DIRECTIONS FOR THIS CRAFT
If you've enjoyed our content or have any thoughts to share, we'd love to hear from you! Mention @gluedtomycrafts or tag #gluedtomycrafts on Instagram!