
Autumn days are here again and we have been busy on Glued To My Crafts! Keep scrolling to see our latest Paper Plate Fall Gnome kid craft idea come to life so you can recreate with your child today!

Easy, 10 Minute Paper Plate Gnome Craft For Kids
I’ve always had a love for gnomes. Maybe it’s my German side peeking through…
Recently I was at Home Goods and I came across an adorable stuffed gnome decor piece that I had to “have” for my collection. He’s somewhat of a cross between a gnome and a farmer. Currently he is sitting next to our living room TV. Actually, I’m looking at him right now as I type this very blog post and he’s exactly what inspired today’s latest paper plate kid craft idea. It’s amazing how you can find inspiration anywhere {I highly encourage you to look around your home some time!}
Fall is when nature turns into warm hues and shades of gold. That’s exactly the color scheme you need to complete this paper gnome craft idea. So on that note, all you need is a simple paper plate, some colored cardstock paper, paint and a little school glue to make your own fall gnome friend come to life today. With complete customization at your fingertips, you can make your own pudgy and jolly-looking gnome, look and feel however you like.
So without further ado, I’ll let you get to it. We always try to keep the supply list simple for each of our paper plate crafts so you will probably already have on hand mostly everything you’ll need to make your cute fall inspired paper plate gnomes today! Just keep scrolling to read our simple how-to instructions below for how to create it within minutes!
Happy crafting, my friends! Don’t forget to snap pictures of your paper fall elves and share them with us! I want to see how you give yours that custom autumn feel! You can always find us on Facebook or Instagram using our special branded #gluedtomycrafts hashtag to share with us. It seriously makes my day to see our inspiration come to life in other people’s homes!
RELATED —> Paper Plate Leaf

Get ready to get crafty this fall! Transform a few simple paper plates into the cutest little fall gnomes using our easy tutorial.
Craft Supplies:
- Large or Small Paper Plate – 1 per craft
- Tempera Paint Crayons
- White Cardstock Paper
- Tan Cardstock Paper
- Scrapbook Paper
- Scissors
- School Glue or Glue Stick
- Stapler
Directions:
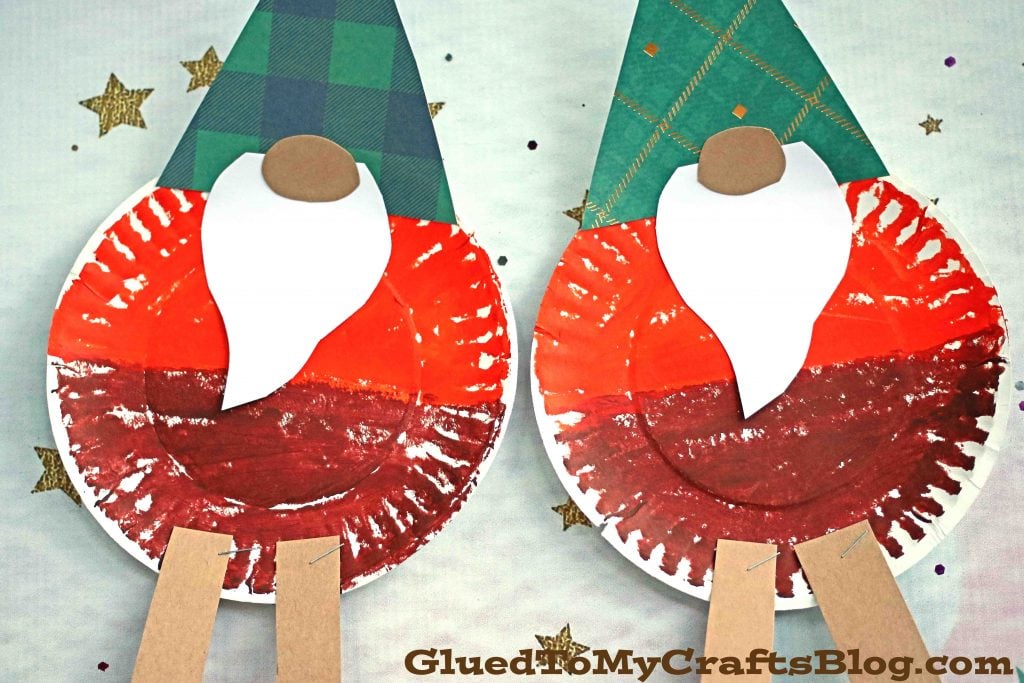
- First things first – painting the paper plate. I personally have fallen in love with the ease of using tempera paint crayons BUT you can also use a simple paint brush & regular craft paint for this craft. Start off by envisioning your paper plate in equal half pieces and painting it with your choice of two choices. I did orange on top and brown on the bottom for his pants.
- When done painting, set aside the paper plate to allow it to dry completely.
- Now grab your sheets of craft paper, along with the scissors.
- Cut out a large triangle hat, a long white beard, stick legs, boots and a button nose. Use our picture for an example.
- When ready – it’s time to assemble! Use your stapler and/or glue to secure the paper pieces in place, on the paper plate. I found that it’s easier to staple the gnome hat and legs in place on the paper plate, while everything else is good with some glue on the back.
- Add any other embellishments you see fit to give your gnome a custom fall look. Make him be dressed to impress!
- Allow everything to dry completely before you display it proudly for all to see.
- Snap a few pictures and share your paper plate gnome craft with us! #gluedtomycrafts
- Remember – you can ALWAYS change up the color pattern to reflect you or a season. If you add some green & red, you will have a Christmas gnome – hint hint! Another tip is to make the gnome’s beard out of hand cutouts. So many ways to change it up!
RELATED —> Popsicle Stick Tractor
We bring a whole new dimension to the world of kids craft tutorials. I really stride EVERYDAY to bring unique and one-of-a-kind ideas to my readers!
Just check out our Farm Truck, Scarecrow and Butterfly In Jar craft posts that are unique to us. Click on through and join the hundreds of people have been recreating them thus far this season!
All of three of these ideas will give you instant creativity at your fingerprints!
Paper Plate Fall Gnome Craft
Here’s your checklist of supplies to bring this craft to life:
Prepare your creative haven by laying down a protective cover before the crafting magic begins!
Directions:
- First things first - painting the paper plate. You will want to paint one half of the plate for his shirt and the other for his pants.
- When done painting, set aside the paper plate to allow it to dry completely.
- Now grab your scrapbook and cardstock paper, along with the scissors.
- Cut out a large triangle hat, a long white beard, stick legs, boots and a button nose. Use our picture for an example.
- When ready - it's time to assemble! Use your stapler and/or glue to secure the paper pieces in place, on the paper plate. I found that it's easier to staple the legs in place on the paper plate, while everything else is good with some glue on the back.
- Add any other embellishments you see fit to give your gnome a custom fall look. Make him be dressed to impress!
- Allow everything to dry completely before you display it proudly for all to see.


Grab our favorite books via our Amazon affiliate link! In our Amazon storefront you will find books, toys and craft supplies we absolutely love using for our Glued To My Crafts tutorials!
