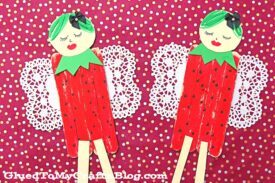
Our red strawberry fairies are waiting for you to recreate them and set them loose in your home today!

Hey there crafty parents and creative kids! Are you ready to enter the whimsical world of fairies? We have an enchanting craft idea that will have your little ones fluttering with excitement.
Get ready to create your very own Strawberry Fairy that will spark your child’s imagination and bring a touch of magic to their playtime.

Do your little ones have a love for all things magical and whimsical? Are they constantly daydreaming about fairies and enchanted forests?
Well, we have the perfect craft idea to indulge their imagination and bring a touch of enchantment into their lives. Introducing the Strawberry Fairy Craft Idea!
Join us as we embark on a journey to create these adorable little fairies using simple materials and lots of creativity. Not only will your children have a blast making these, but they will also love playing with the finished product, reenacting magical stories of their own creation.
So grab your crafting supplies, gather the kids around, and let the magic begin!

This simple project is perfect for a summer day, and the finished product is sure to brighten up any room. So get creative and have some fun!
Craft Supplies:
- Jumbo Popsicle Sticks – 4 per craft
- Mini Popsicle Sticks – 2 per craft
- Low Temp Glue Gun
- Small Paper Plate
- Red Craft Paint
- Black Craft Paint
- Paint Brushes
- Skin-Tone Cardstock Paper
- Green Cardstock Paper
- Scissors
- Markers
- White Heart Doilies – 2 per craft
Directions:
- First get the glue gun hot and ready!
- Assemble the base of your strawberry fairy friend by gluing FOUR jumbo popsicle sticks and TWO mini popsicle sticks together to look like a door {4 next to each other and the mini popsicle sticks across}
- Set aside to let it dry completely.
- Repeat for each fairy craft friend you want to make today.
- Next up – grab your two craft paints, paint brushes and the small paper plate.
- Squirt some red and black craft paint on the paper plate.
- Using the larger paint brush, paint the newly made popsicle stick shape completely red.
- Follow that step up by painting several small black dots {in random order and all over} on the same popsicle stick shape, with the smaller paint brush. This will be the strawberry seeds and what ties the theme together.
- When done painting, set aside the painted wood piece so it can dry completely.
- Now grab ALL your sheets of cardstock paper and scissors.
- Cut out a circular head, a green collar piece, two long legs, boots etc. for your fairy friend.
- Take the various Sharpie markers and draw on eyes, hair, lips etc. on the circle head piece.
- Now go ahead and glue ALL the paper pieces you just made, to the front of the painted popsicle stick shape from earlier.
- Finally – the last step. Go ahead and hot glue TWO paper heart doilies to the back of the finished piece to represent the wings of the fairy. That’s it!
- Add any other embellishments you see fit.
- Then let it dry completely before displaying proudly for all to see!
RELATED —> Chalk Art Fairy Craft

At Glued To My Crafts we bring a whole new dimension to the world of kids craft tutorials. I really stride EVERY DAY to bring one-of-a-kind ideas to my readers so they never miss out!
Just check out our Donut Frame and Chocolate Covered Strawberry craft posts to see what I’m talking about.
These two ideas will give you instant creativity at your child’s fingerprints and pair nicely with today’s fairy craft theme. Not to mention, these ideas are first-seen-here and truly unique to use as well!
FOLLOW US ON PINTEREST SO YOU NEVER MISS A NEW TUTORIAL FROM US!

Popsicle Stick Strawberry Fairy Craft Idea
Our red strawberry fairies are waiting for you to recreate them and set them loose in your home today!
Here’s your checklist of supplies to bring this craft to life:
Prepare your creative haven by laying down a protective cover before the crafting magic begins!
Directions:
- First get the glue gun hot and ready!
- Assemble the base of your strawberry fairy friend by gluing FOUR jumbo popsicle sticks and TWO mini popsicle sticks together to look like a door {4 next to each other and the mini popsicle sticks across}
- Set aside to let it dry completely.
- Repeat for each fairy friend you want to make today.
- Next up - grab your two craft paints, paint brushes and the small paper plate.
- Squirt some red and black craft paint on the paper plate.
- Using the larger paint brush, paint the newly made popsicle stick shape completely red.
- Follow that step up by painting several small black dots {in random order and all over} on the same popsicle stick shape, with the smaller paint brush. This will be the strawberry seeds and what ties the theme together.
- When done painting, set aside the painted wood piece so it can dry completely.
- Now grab ALL your sheets of cardstock paper and scissors.
- Cut out a circular head, a green collar piece, two long legs, boots etc. for your fairy friend.
- Take the various Sharpie markers and draw on eyes, hair, lips etc. on the circle head piece.
- Now go ahead and glue ALL the paper pieces you just made, to the front of the painted popsicle stick shape from earlier.
- Finally - the last step. Go ahead and hot glue TWO paper heart doilies to the back of the finished piece to represent the wings of the fairy. That's it!
- Add any other embellishments you see fit.
- Then let it dry completely before displaying proudly for all to see!

CLICK HERE TO PRINT THE DIRECTIONS FOR THIS CRAFT
If you've enjoyed our content or have any thoughts to share, we'd love to hear from you! Mention @gluedtomycrafts or tag #gluedtomycrafts on Instagram!