Today I’m sharing another first-seen-here HEART-inspired craft tutorial, so you can create something unique this Valentine’s Day with your child!
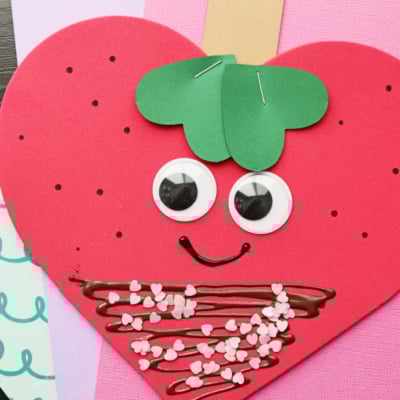
This time we are building PRETEND Chocolate Covered Strawberries, that are simply sweet!
Are you ready to learn the how-to? Keep scrolling for the tutorial to make this Craft Foam Heart Chocolate Covered Strawberry art project within minutes!

Heart Shaped Chocolate Strawberry Craft Idea For Kids
Today’s foam chocolate covered strawberry craft tutorial is another one of those “crazy ideas” that came into my head late one night.
If you have been a long time follower of Glued To My Crafts, you probably know already that I have a crazy LOVE for Tulip Puffy Paint. In the past two years, I’ve done some of the “unthinkable” with this type of craft medium. Like I always say – I STRIVE to share crafty ideas that are outside the traditional. Today’s post is one of those!
Anyways – recently I was brainstorming new tutorials to share with my readers, when I started to think that the brown Tulip puffy paint I had on hand looked pretty close to milk chocolate. One thing led to another and here we are today {and I’m so glad you are here to check it out!}
I repeat – this chocolate dipped strawberry craft idea is just for PRETEND purposes but I think it’s super clever for the Valentine’s Day season. You could even make these as a custom valentines to hand out to friends and family.
To complete these smiling strawberries, all you need is some inexpensive, basic red craft foam heart shapes, chunky glitter for the sprinkles, green cardstock paper and a bottle of brown puffy paint. That’s it!
You can find ALL the details you need to know in the full tutorial below, as well as links to the supplies I used. I really hope you see my vision and are inspired to recreate one with your child today! Happy crafting, my dear friends! #gluedtomycrafts
RELATED: Valentine Camper and Paper Plate Wings

Celebrate Valentine’s day with this sweet and simple chocolate covered strawberry craft for kids!
Craft Supplies:
- Red Craft Foam Heart Shape
- Large Paper Plate
- Brown Tulip Puffy Paint
- Chunky Glitter
- Green Cardstock Paper
- Brown Cardstock Paper
- Heart Paper Craft Punch
- Craft Scissors
- Black Sharpie Marker
- Large Wiggle Eyes
- School Glue
- Stapler
Directions:
- First things first – grab one of your craft foam heart shapes and the brown puffy paint.
- Lay your heart shape down in the center of the paper plate.
- Now take your brown puffy paint and make several thick squiggles on the bottom portion of the craft foam heart shape. You want it to look like the strawberry was dipped in chocolate.
- While the paint is still wet, sprinkle some chunky glitter “sprinkles” on top.
- Now grab your school glue, wiggle eyes and black Sharpie marker.
- Glue on the wiggle eyes and using the black Sharpie marker to draw on a face in the center {and maybe some small dots all over to give the look of a strawberry.}
- Finally – the last step. Grab all your cardstock sheets, scissors and heart paper punch.
- Out of the green cardstock, punch out TWO green heart shapes.
- Out of the brown cardstock, cut out a “stem” for your strawberry.
- Finally, to finish off the Valentine Heart Strawberry project, staple the two paper heart cutouts on the top of the decorated heart shape, along with the stem. This will complete the look of a strawberry.
- And that’s it! You are done. Set aside the paper plate to allow the puffy paint to dry completely {about 2-3 hours}
- When completely dry – display it proudly for ALL to see!
- Don’t forget to share pictures with us, of your finished Valentine’s Day strawberries, on your various social media sites! #gluedtomycrafts
RELATED —> Paper Doily Strawberry Cards

Just like today’s craft foam chocolate covered strawberry art project idea, our Valentine’s Day craft tutorials are SOOOOOO simple to make but really have the wow factor for even the littlest crafter in your home!
On that note, we want YOU to check out our SUPER POPULAR Handprint Owl Hug, Handprint Lift You Up Card and Valentine Gingerbread House craft posts!

Chocolate Covered Strawberry Craft
Here’s your checklist of supplies to bring this craft to life:
- 1 Large Craft Foam Heart
- Tulip Puffy Paint
- Cardstock Paper
- 2 Wiggle Eyes
- Embellishments
- School Glue
- 1 Stapler
Prepare your creative haven by laying down a protective cover before the crafting magic begins!
Directions:
- First things first - grab one of your craft foam heart shapes and the brown puffy paint.1 Large Craft Foam Heart
- Lay your heart shape down in the center of the paper plate.
- Now take your brown puffy paint and make several thick squiggles on the bottom portion of the craft foam heart shape. You want it to look like the strawberry was dipped in chocolate.Tulip Puffy Paint
- While the paint is still wet, sprinkle some chunky glitter "sprinkles" on top.
- Now grab your school glue, wiggle eyes and black Sharpie marker.2 Wiggle Eyes
- Glue on the wiggle eyes and using the black Sharpie marker to draw on a face in the center {and maybe some small dots all over to give the look of a strawberry.}
- Finally - the last step. Grab all your cardstock sheets, scissors and heart paper punch.
- Out of the green cardstock, punch out TWO green heart shapes.
- Out of the brown cardstock, cut out a "stem" for your strawberry.Cardstock Paper
- Finally, to finish off the Valentine Heart Strawberry project, staple the two paper heart cutouts on the top of the decorated heart shape, along with the stem. This will complete the look of a strawberry.Embellishments
- And that's it! You are done. Set aside the paper plate to allow the puffy paint to dry completely {about 2-3 hours}
- When completely dry - display it proudly for ALL to see!


CLICK HERE TO PRINT THE DIRECTIONS FOR THIS CRAFT