
The DIY fun NEVER has to end on Glued To My Crafts! With our latest & greatest craft tutorial, we are encouraging YOU to build your very own lovestruck themed Paper Plate Valentine Camper! It’s a FIRST SEEN HERE craft idea!

Paper Plate Love Camper Craft
BEEP BEEP! We are driving by with ANOTHER first-seen-here craft idea for GTMC!
We are building off of our now VIRAL paper plate Christmas camper tutorial and hoping that everyone will LOVE this latest paper plate vintage caravan craft idea as much as we do!
With our latest tutorial, we want YOU to turn the simplest material into something you would have never imagined before! As you can tell from the title of this very post, this Valentine’s Day holiday themed camper is made from basic, inexpensive paper plate. Probably something you already have on hand if you have been a long time follower of ours.
From there, all you need is a black Sharpie marker, paint crayons and colored cardstock. That’s it! Super simple to make and great for boys & girls of all ages, to recreate this lovestruck season. Plus you can swap out a few of the elements and colors to fit what you have on hand or want to use up {maybe use up some leftover red colored supplies from Christmas!}
So enough chit chat from me! Your whole family is going to love this one. So stop what you are doing and add this to your crafty to-do list right now!
In fact – make sure you bookmark or “pin” this very post, so you have no excuse not to make it happen! Then check out the full paper plate Valentine camper tutorial below and get ready for a fun & extra memorable holiday season!
RELATED —> I Love You Puppets

Looking for a fun and festive craft idea to do with your kids this Valentine’s Day? Look no further than our paper plate camper tutorial!
Craft Supplies:
- Large Paper Plate
- Basic Craft Scissors
- Black Sharpie Marker
- Pink or Red Paint Crayon
- Gray Cardstock Paper
- Black Cardstock Paper
- Red or Pink Cardstock Paper
- Teal Cardstock Paper
- Glue Stick or School Glue
- Pom Pom Ribbon
- Office Stapler
- Embellishments
Directions:
- First grab your paper plate and craft scissors.
- Hold the paper plate in your hand and cut it in half. Straight up the center to make TWO equal pieces.
- Reserve one half for today’s Valentine’s Day camper craft and save the other for a rainy day!
- Now grab your black sharpie marker.
- Draw a straight line across your paper plate piece. This just give it more of a camper look and will help you with the next step.
- Next grab your choice of color in paint crayon.
- Go ahead and color in, below the black line, the bottom half area of the paper plate piece.
- When done, set aside the paper plate.
- Now grab all your cardstock paper and scissors.
- Out of the black and gray cardstock cut out ONE small circular wheel, as well as a small thin rectangle for the “hitch” the camper.
- Out of the teal cardstock cut out a small window.
- Out of your choice of pink or red colored cardstock, cut out a simple door shape for the camper.
- Grab the black sharpie marker again, to draw a small door knob on the paper door piece you just made.
- Now adhere ALL your paper pieces you just made, to the paper plate half from earlier.
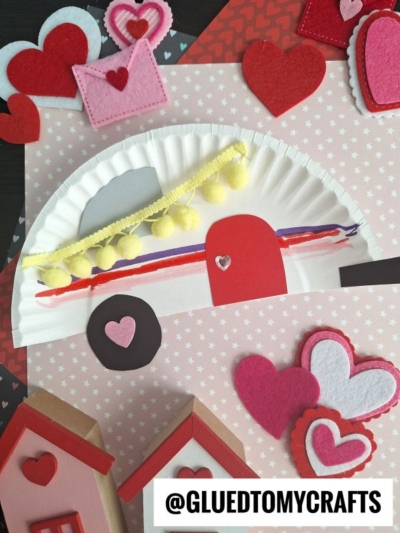
- To finish off the Paper Plate Valentine’s Day Camper craft – cut off a small strip of pom pom ribbon and staple it, in an angle like a banner, to the decorated paper plate piece.
- Add other embellishments to really give it that lovestruck themed look.
- Then display proudly for all to see!
- WOW! What a blast! Now it’s your turn to snap a few pictures to share with us on your social media sites!! #gluedtomycrafts
RELATED —> Happy Camper Keepsake
At Glued To My Crafts we are where the crafty inspiration never stops!
Celebrate ALL month long with our easy step-by-step kids craft tutorials & make memories that will last well past the Valentine’s Day holiday!
Be sure to check out these fun posts, listed below, for even MORE crafty inspiration to unwind with and bring to your kitchen table!
Popsicle Stick Valentine Love Bug Gnome
Conversation Heart Mermaid Tails
Cupcake Liner Valentine Camper Card

Paper Plate Valentine Camper Craft
Here’s your checklist of supplies to bring this craft to life:
- 1 Large Paper Plate
- Pom Pom Ribbon
- Cardstock Paper
Prepare your creative haven by laying down a protective cover before the crafting magic begins!
Directions:
- First grab your paper plate and craft scissors.
- Hold the paper plate in your hand and cut it in half. Straight up the center to make TWO equal pieces.
- Reserve one half for today's Valentine's Day camper craft and save the other for a rainy day!
- Now grab your black sharpie marker.
- Draw a straight line across your paper plate piece. This just give it more of a camper look and will help you with the next step.
- Next grab your choice of color in paint crayon.
- Go ahead and color in, below the black line, the bottom half area of the paper plate piece.
- When done, set aside the paper plate.
- Now grab all your cardstock paper and scissors.
- Out of the black and gray cardstock cut out ONE small circular wheel, as well as a small thin rectangle for the "hitch" the camper.
- Out of the teal cardstock cut out a small window.
- Out of your choice of pink or red colored cardstock, cut out a simple door shape for the camper.
- Grab the black sharpie marker again, to draw a small door knob on the paper door piece you just made.
- Now adhere ALL your paper pieces you just made, to the paper plate half from earlier.
- To finish off the Paper Plate Valentine's Day Camper kid craft – cut off a small strip of pom pom ribbon and staple it, in an angle like a banner, to the decorated paper plate piece.
- Add other embellishments to really give it that lovestruck themed look.
- Then display proudly for all to see!


CLICK HERE TO PRINT THE DIRECTIONS FOR THIS CRAFT