Create spooky Halloween decorations at home with this fun paper plate haunted camper craft! Get your kids crafty this holiday season and let their imaginations run wild!
Haunted Camper Craft Made From A Paper Plate
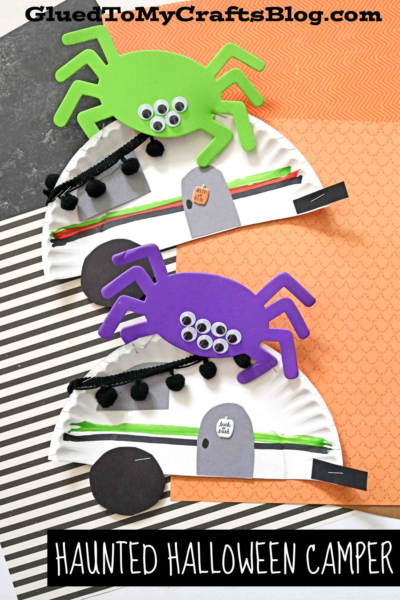
Get everyone in the SPOOKY spirit with our first-seen-here Paper Plate Haunted Halloween Camper kid craft idea!
With our latest tutorial, everybody {and I mean EVERYBODY at any skill lever} will be able to make THEIR own version of what a travel trailer that just so happens to be haunted by HUGE spider. EEEK! That sounds scary but it’s seriously not.
Our unique craft idea is not only super easy but also super fun. You are going to have a blast when you join your child in the fun – I’m sure of it! Keep scrolling for ALL the details! Happy crafting and happy Halloween as well!
Q: Where do ghosts get their candy? A: At the GHOSTERY store!


Get ready for a spooky Halloween by crafting your own decorative haunted camper with just paper plates and a few embellishments!
Craft Supplies:
- Large Paper Plate
- Scissors
- Sharpie Markers
- Gray Cardstock Paper
- Black Cardstock Paper
- Craft Foam Spider Cutouts
- Adhesive
- Wiggle Eye Stickers
- Halloween Stickers
- Pom Pom Garland
- Stapler
Directions:
- First cut your large paper plate in half. Straight up the center to create TWO equal pieces!
- Reserve one half for today’s Halloween camper craft and save the other for a rainy day!
- Now grab your choice of colors in sharpie markers.
- Draw TWO straight lines across the paper plate. This just give it more of a camper look.
- Set aside the paper plate.
- Now grab all your cardstock paper sheets and scissors.
- Out of the black cardstock cut out a small circular wheel, as well as a small, thin rectangle for the “hitch” the camper.
- Out of the gray cardstock cut out a small window and door.
- Use the black sharpie marker to draw a small door knob on the paper door piece you just made.
- Now glue and/or staple ALL your paper pieces {besides the spider} to the paper plate half from earlier.
- To finish off the Haunted Spider Camper craft – add some small Halloween themed stickers and staple the craft foam spider to the top of the decorated paper plate piece. Don’t forget to also add the wiggle eyes at this point as well!
- At this point in time you can also add your pom pom “garland” for some haunted flair!
- Add other embellishments to really give it that Halloween-y look.
- Then display proudly!
- Now snap a few pictures of the completed craft to share with us on your social media sites!! #gluedtomycrafts
RELATED —> Paper Plate Haunted House

Celebrate the Halloween season in an extra crafty way with our easy step-by-step kid craft tutorials! Our DIY’s are unique and are sure to make memories that will last a lifetime!
Be sure to check out these fun posts, listed below, for even MORE crafty inspiration from the Glued To My Crafts website. All of which would pair nicely with today’s paper plate haunted Halloween camper tutorial – hint hint!
And as always – if one {or all!} our crafts inspires you, be sure to share pictures of your completed crafts on our Facebook page. We love seeing our inspiration come to life in your home and can’t wait to see pictures of your paper plate campers that are ready for Halloween!
Popsicle Stick Candy Corn Gnome
Footprint Haunted House Keepsake
Thumbprint Ghost In Haunted House
