
Don’t be afraid to “wander” into our latest and greatest Paper Bag Haunted House kid craft tutorial! It’s one that is not going to disappoint this Halloween season!

Lunch Sack Haunted Witch House Craft
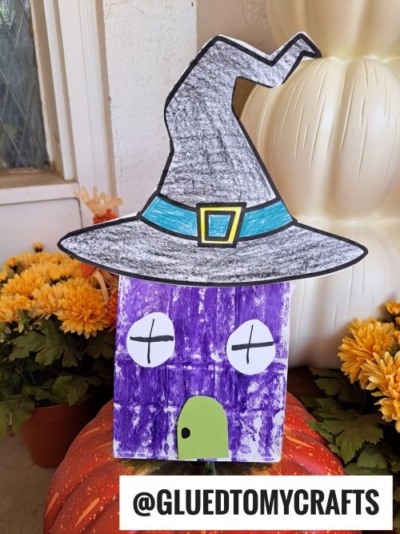
When the Halloween season rolls around, you can add a little spookiness to your home decor, by having children create a one-of-a-kind and custom haunted house piece. All this can be accomplished from a simple & rather inexpensive paper bag!
You guys…. there are no wicked tricks or anything scary to that statement, to prevent YOU from recreating it. I promise you, this is the LEAST scariest craft idea for kids to make today. Just check out our simple paper bag witch house tutorial that is listed below, to see what I’m talking about! I’ve been included a FREE witch hat printable for the roof, to get you started even faster!
As always, happy crafting my dear friends! I hope it’s SPOOK-TACULAR and extra memorable!
Please don’t forget to share pictures of your lunch sack haunted witch house creations! You can ALWAYS tag us on Facebook or Instagram for easy sharing! I seriously can’t wait to see your spooky paper bag Halloween houses! #gluedtomycrafts
RELATED —> Thumbprint Ghost

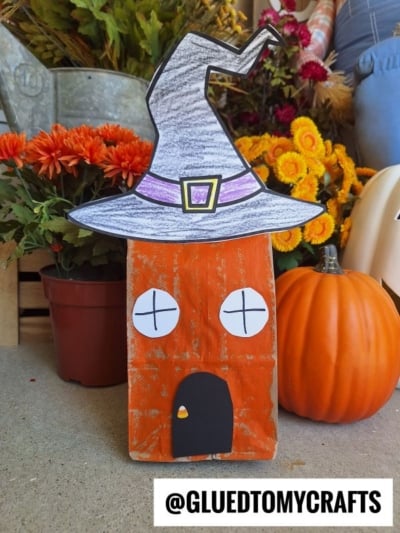
Get creative this Halloween! Create a spooky haunted house out of paper bags with your family and make some spook-tacular memories.
Craft Supplies:
- Large Paper Bag
- Witch Hat Printable – on our landing page
- White Cardstock Paper
- Crayons, Coloring Pencils or Markers
- Shredded Paper or Old Newspapers
- Stapler
- Craft Paint {any color you like!}
- Paint Brush
- School Glue
- Scissors
- Colored Cardstock Paper
- Halloween Stickers
Directions:
- First have your child paint their paper bag however they like {we went with a a shade of purple all over}
- Set aside to let it dry a bit before moving on to the next step.
- Now is the time to decorate the witch hat roof! Take the printable and color it however you like.
- When done, trim out the design and discard excess paper.
- Next stuff their paper bag with shredded paper until it stands nicely on it’s own and looks full.
- Then fold/staple the top of the bag so the shredded paper won’t come out.
- Go ahead and staple the witch hat paper piece in place.
- Next grab your various shades of colored cardstock paper and scissors.
- Out of the cardstock paper, draw/cut out haunted house features – a chimney, windows, a door etc.
- Take your cutouts and staple/glue them to the stuffed paper bag piece.
- To finish off the Paper Haunted House – have children draw/glue on some other house features to the front of the paper bag, as well as some ghost stickers to give it life.
- Then place in an undisturbed area to display proudly all season long!
Book Suggestions:
Here are some recommended books that beautifully complement our craft idea. You can conveniently purchase them through our affiliate links on Amazon.
- Room on the Broom by Julia Donaldson
- The Little Witch Who Lost Her Broom! by Elaine Bickell
- The Witch’s Cat and The Broomstick Blunder by Kirstie Watson
- Ten Flying Brooms by Ilanit Oliver
- How to Catch a Witch by Alice Walstead
- There’s a Witch in Your Book by Tom Fletcher
- It’s Raining Bats & Frogs by Rebecca Colby
RELATED —> Paper Plate Pumpkin Patch
Be sure to also check out our Footprint Haunted House post for even more crafty fun to add to your Halloween plans!

Paper Bag Haunted House Craft
Here’s your checklist of supplies to bring this craft to life:
- School Glue
Prepare your creative haven by laying down a protective cover before the crafting magic begins!
Directions:
- First have your child paint their paper bag however they like.
- Set aside to let it dry a bit.
- Now is the time to decorate the witch hat roof! Take the printable and color it however you like.
- When done, trim out the design and discard excess paper.
- Next stuff their paper bag with shredded paper until it stands nicely on it's own and looks full.
- Then fold/staple the top of the bag so the shredded paper won't come out.
- Go ahead and staple the decorated witch hat paper piece in place.
- Next grab your various shades of colored cardstock paper and scissors.
- Out of the cardstock paper, draw/cut out haunted house features - a chimney, windows, a door etc.
- Take your cutouts and staple/glue them to the stuffed paper bag piece.
- To finish off the Paper Haunted House - have children draw/glue on some other house features to the front of the paper bag, as well as some ghost stickers to give it life.
- Then place in an undisturbed area to display proudly all season long!


NEED MORE HELP DOWNLOADING OUR FREE PRINTABLES? PLEASE REFER TO OUR FAQ PAGE