Your child is going to make a cozy {but somewhat scary} safe-haven for some of their new Halloween friends!


Are you looking for a Halloween activity that’s fun, spooky, and perfect for kids? Today’s “paper plate haunted house” tutorial is the ultimate craft project to entertain your little ones and spark their creativity this Halloween season.
Using affordable materials you probably already have at home, you can help your kids create a spooky masterpiece that doubles as DIY Halloween décor.
Get ready to spookify your Halloween with this fun-filled Paper Plate Haunted House craft! Watch as your little ones bring their ghostly imagination to life and create their very own boo-tiful haunted house from a simple paper plate!

Your little ghouls and goblins can unleash their creativity and create their own mini haunted mansion. Watch their imaginations come alive as they design creepy windows, ghostly doors, and eerie decorations. It’s the perfect way to get into the spooky spirit and create some fang-tastic memories together!
Craft Supplies:
Before you start, gather the following supplies. Most of these are inexpensive materials you can find at a local craft store, dollar store, or right at home:
- Large Paper Plate
- Haunted House Printable – on our landing page
- White Cardstock Paper
- Scissors
- Purple Craft Paint
- Paint Brush
- Stapler
- School Glue or Glue Stick
- Black Cardstock Paper
- Fake Spiderwebs
- Halloween Stickers
Directions:
Step-by-Step Instructions for Creating Your Haunted House:
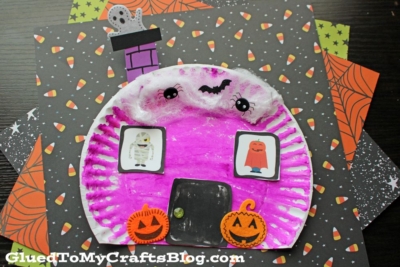
- First things first – cut off a small section of your large paper plate to make the bottom of the haunted house flat.
- Discard the small piece you just cut off.
- Next up – paint the paper plate completely purple {or any other color you like!}
- Set aside to let it dry completely.
- Now print the FREE haunted house printout, listed above in the supply list.
- Print out the file, in color, on a single sheet of white cardstock. You only need to print one per craft.
- Now use your scissors to trim out each section in the printable you just printed.
- Decide which windows you are going to use for your craft {you only need two windows.} There are several different versions of Halloween friends in windows OR you can use the provided blank windows & draw whatever you like inside of them {bonus tip – trim out the center of the blank windows and use your child’s pictures to fill the frames!}
- Use crayons {or any other craft medium} to color in the door cutout.
- Set aside all your small paper pieces.
- Next up – grab the black cardstock and scissors.
- Cut out a long rectangular “chimney” for the haunted house.
- Once the paper plate is dry and you have everything cut out that you want to use for your piece, it’s time to start assembling your Halloween house!
- Start off by gluing a small amount of fake spider webs on top of the paper plate house {or add some any places you like – maybe the chimney too!}
- Finally, glue/staple the other paper embellishments in place on the painted paper plate.
- Your haunted house is complete! This simple yet fun craft is the perfect way to get your kids into the Halloween spirit. It’s cheap, creative, and surprisingly quick to make—although you might get so into it that you end up crafting for hours.
- Add anything else you like for that custom look {like some holiday stickers or glitter!} before displaying proudly for all to see.
RELATED —> Thumbprint Ghost In House

Crafting a paper plate haunted house isn’t just an activity—it’s a wonderful way to build memories, strengthen fine motor skills, and connect with your kids. Plus, these crafts double as personalized Halloween decorations that can be proudly displayed throughout the spooky season.
If you’re looking for more family-friendly projects, be sure to check out other creative Halloween craft ideas on our website. From DIY paper pumpkins to creepy-crawly spider webs, the possibilities are endless!
What will your haunted house look like? We’d love to see it! Share your photos with our community and tag #GluedToMyCrafts for a chance to be featured on our social media channels. Happy Halloween and happy crafting!

Paper Plate Haunted House Craft Idea
Your child is going to make a cozy {but somewhat scary} safe-haven for some of their new Halloween friends!
Here’s your checklist of supplies to bring this craft to life:
- 1 Large Paper Plate
- Craft Paint
- Cardstock Paper
- Halloween Printable - on our landing page
- Fake Spider Webs
- Embellishments
Prepare your creative haven by laying down a protective cover before the crafting magic begins!
Directions:
- First things first - cut off a small section of your large paper plate to make the bottom of the haunted house flat.
- Discard the small piece you just cut off.
- Next up - paint the paper plate completely purple {or any other color you like!}
- Set aside to let it dry completely.
- Now print out our provided printable, in color, on a single sheet of white cardstock paper. You only need one print per craft.
- Use your scissors to trim out each section in the printable you just printed.
- Decide which windows you are going to use for your craft {you only need two windows.} There are several different versions of Halloween friends in windows OR you can use the provided blank windows & draw whatever you like inside of them {bonus tip - trim out the center of the blank windows and use your child's pictures to fill the frames!}
- Use crayons {or any other craft medium} to color in the door cutout.
- Set aside all your small paper pieces.
- Next up - grab the black cardstock and scissors.
- Cut out a long rectangular "chimney" for the haunted house.
- Once the paper plate is dry and you have everything cut out that you want to use for your piece, it's time to start assembling your Halloween house!
- Start off by gluing a small amount of fake spider webs on top of the paper plate house {or add some any places you like - maybe the chimney too!}
- Finally, glue/staple the other paper embellishments in place on the painted paper plate.
- Add anything else you like for that custom look {like some holiday stickers or glitter!} before displaying proudly for all to see.


NEED MORE HELP DOWNLOADING OUR FREE PRINTABLES? PLEASE REFER TO OUR FAQ PAGE
If you've enjoyed our content or have any thoughts to share, we'd love to hear from you! Mention @gluedtomycrafts or tag #gluedtomycrafts on Instagram!