Glued To My Crafts

Join thousands of others who have gotten GLUED to our craft tutorials!

  • Home
  • Privacy Policy
  • Craft Safety Guidelines
  • Seasonal Themes
    • New Years
    • Valentine’s Day
    • St. Patrick’s Day
    • Spring
    • Easter
    • Mother’s Day
    • Summer
    • Father’s Day
    • Patriotic
    • Halloween
    • Thanksgiving
    • Fall
    • Winter
    • Christmas
    • Snowmen
    • Story Time
  • About Us
  • Our Amazon Storefront
  • Monthly Themes
    • January Craft Ideas
    • February Craft Ideas
    • March Craft Ideas
    • April Craft Ideas
    • May Craft Ideas
    • June Craft Ideas
    • July Craft Ideas
    • August Craft Ideas
    • September Crafts
    • October Crafts
    • November Crafts
    • December Crafts

Paper Bag Monster Puppet Craft

When engaging in craft activities, it is important for young children to have adult supervision at ALL times. It is also recommended to use supplies that are suitable for your child's age. Feel free to modify materials or steps to meet your specific requirements. Please refer to our safety guidelines for more information.

As an Amazon Associate I earn from qualifying purchases. This post may contain affiliate links. For more information, please see our disclosure policy.

UPDATE FOR 2026 - To reduce storage costs and download fees, we recently made some changes to our website. The password for all our files this year is GLUEDTOMYCRAFTS2026. No sign-up is required to download our free printables! You can enjoy our printables without creating an account or paying for Box.com. Simply follow the download instructions on our FAQ PAGE.

There are no complicated directions or expectations to "scare" you in recreating this monster craft idea!
SKIP THE FLUFF AND PRINT THE DIRECTIONS
Three colorful paper bag monsters—green, blue, and red—each with big googly eyes, black paper fangs, and glittery antennae, stand on a star-patterned background. Text reads Paper Bag Monster.

Not only does this project allow your child to explore their own creativity, it also requires minimal materials and supplies – so why not give it a try?

With just a few simple steps, your little crafter can have without fail an adorable paper bag monster puppet that will be sure to bring smiles all around.

Three colorful paper bag monsters—green, blue, and red—each with big googly eyes, black paper fangs, and glittery antennae, stand on a star-patterned background. Text reads Paper Bag Monster.

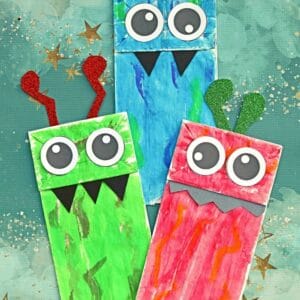
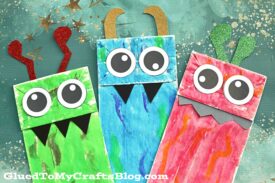
Paper Bag Monster Puppet Craft Idea For Kids

I’m challenging YOU and your child to make a #cutenotscary monster from a paper bag today!

These funny large eyed monster friends are not to be feared but instead played with for ALL to see! Using inexpensive supplies such as paper lunch sacks, cardstock paper and glue – you too can pull this fun monster themed idea together in no time! Plus there’s a FREE eyeball printable that you can find below to make this craft even faster!

So what are you waiting for, my dear friends? Fear not because Glued To My Crafts would not steer you wrong! The full step-by-step monster craft tutorial can be found below and I just know you and your child can pull it off together! Keep scrolling to see what I’m talking about!

Happy crafting my friends and don’t forget to share pictures with us on our Facebook page! I can’t wait to see how you give your paper bag monster it’s own personality! #gluedtomycrafts

RELATED —> Paper Plate Love Monster

Three colorful paper bag monsters—green, blue, and red—each with big googly eyes, black paper fangs, and glittery antennae, stand on a star-patterned background.

With just a few items readily available in your home or classroom, your child can be amazed at how much fun they can have creating one-of-a-kind paper bag puppets – no two monsters alike!

Craft Supplies:

  • White Paper Bag – 1 per craft
  • Craft Paint
  • Foam Paint Brush
  • Small Paper Plate
  • White Cardstock Paper
  • EYEBALL Printable – on our landing page
  • Paper Scraps
  • Scissors
  • Stapler
  • Glue Stick or School Glue

Directions:

  • First have your child paint their paper bag however they like! Simply squirt some paint on the paper plate and hand over the paint brush.
  • Once done, set aside to let it dry completely.
  • Next grab your eyeball printable and scissors.
  • Cut out one or two eyeballs from the printable.
  • Out of the remaining cardstock paper you have, cut out horns, a mouth, antennas, etc. for your monster.
  • To finish off the Paper Bag Monster – simple glue/staple on ALL the cardstock paper pieces to the painted paper bag.
  • Then allow everything to dry completely before you display and/or play with it proudly!

RELATED —> Paper Plate Green Monster

A blue paper bag monster with big googly eyes, black triangular teeth, and glittery gold horns sits on a teal background with star designs. Text reads Paper Bag Monster.

If you are looking for even MORE easy kid craft ideas using paper bags, be sure to check out these fun posts listed below.

And “if” you decide to make this monster paper bag puppet craft, please share a picture on our Facebook page for us to see. We love seeing our inspiration come to life and can’t wait to hear from YOU!

  • Paper Bag Groundhog
  • Paper Bag Mouse
  • Paper Bag Octopus
  • Paper Bag Crow
  • Paper Bag Reindeer
  • Paper Bag Lorax
  • Paper Bag Zebra
  • Paper Bag Gnome
  • Paper Bag Cow
  • Paper Bag Fox

stacey-signature-2023


Three colorful paper bag monsters—green, blue, and red—each with big googly eyes, black paper fangs, and glittery antennae, stand on a star-patterned background. Text reads Paper Bag Monster.
PRINT

Paper Bag Monster Puppet Craft

There are no complicated directions or expectations to "scare" you in recreating this monster craft idea!

Here’s your checklist of supplies to bring this craft to life:

  • 1 White Paper Bag
  • Craft Paint
  • Cardstock Paper
  • Eyeball Printable - Landing Page
  • 1 Foam Paint Brush
  • 1 Small Paper Plate
  • 1 Scissors
  • 1 Stapler
  • Glue Stick or School Glue

Prepare your creative haven by laying down a protective cover before the crafting magic begins!

Directions:

  • First have your child paint their paper bag however they like! Simply squirt some paint on the paper plate and hand over the paint brush.
  • Once done, set aside to let it dry completely.
  • Next grab your eyeball printable and scissors.
  • Cut out one or two eyeballs from the printable.
  • Out of the remaining cardstock paper you have, cut out horns, a mouth, antennas, etc for your monster.
  • To finish off the Paper Bag Monster craft, simple glue/staple on ALL the cardstock paper pieces to the painted paper bag.
  • Then allow everything to dry completely before you display and/or play with it proudly!
    Three colorful paper bag monsters—green, blue, and red—each with big googly eyes, black paper fangs, and glittery antennae, stand on a star-patterned background.
MINI-HEARTS-page-separator-logo-gluedtomycrafts

click-here-to-head-to-our-landing-page-gluedtomycrafts

NEED MORE HELP DOWNLOADING OUR FREE PRINTABLES? PLEASE REFER TO OUR FAQ PAGE

CLICK HERE TO PRINT THE DIRECTIONS FOR THIS CRAFT

If you've enjoyed our content or have any thoughts to share, we'd love to hear from you! Mention @gluedtomycrafts or tag #gluedtomycrafts on Instagram!

Craft Activity Safety Guidelines:

Always Ensure Adult Supervision - Young children should be supervised at all times when engaging in craft activities. This is essential to keep them safe and ensure materials are used correctly. Use Age-Appropriate Supplies - Choose craft supplies that are suitable for your child’s age. Check labels for recommendations and avoid items with small parts or sharp edges for younger children. Modify as Needed - Feel free to adapt materials or steps to meet your child's abilities and safety needs. For example, substitute scissors with safety scissors if necessary. Keep an Eye on Allergies - Be mindful of potential allergens in craft materials like glue, paint, or certain fabrics. Opt for non-toxic and hypoallergenic options whenever possible. Organize and Secure Supplies - Keep all craft tools and materials organized. Store sharp objects, small parts, and potentially hazardous items out of reach when not in use. Following these guidelines will ensure that crafts remain fun, creative, and, most importantly, safe for everyone involved!


OUR PRIVACY POLICY

OUR COPYRIGHT POLICY

  • Email
  • Facebook
  • Instagram
  • Pinterest
  • Twitter
  • YouTube

LOOKING FOR SOMETHING?

EXPLORE OUR SITE:

TRENDING TODAY:

  • A pink hand-shaped bookmark with red heart stickers and star confetti surrounds a round note that reads a heartfelt message about love and reading. The image is from GluedToMyCraftsBlog.com. Handprint Bookmark Keepsake: A Gift That Holds Your Spot
  • A colorful craft project featuring a yellow felt moon, sparkly stars, and heart shapes, with glue and a heartfelt message. Torn Paper Love You To The Moon and Back Card Craft Idea For Kids
  • A handmade card with a rocket drawing, hearts, and messages of love. Felt hearts and an envelope are around it. Handprint Rocket Keepsake - I Love You Because
  • A vibrant Valentine's Day craft showcasing a torn-paper bumblebee with googly eyes on a white sheet, accompanied by the text "MY VALENTINE!" The scene is decorated with felt hearts, heart-shaped gems, and patterned papers, with a glue bottle and crafting supplies adding to the creative atmosphere. Torn Paper Bee My Valentine Card Craft Idea For Valentine's Day
  • Flat lay of a torn paper dandelion craft featuring a white sheet with a black dandelion outline. Torn yellow, pink, and purple paper pieces are glued to the dandelion head, simulating seeds. Surrounding the craft are Elmer's glue, felt hearts, paper flowers, and patterned scrapbook paper. The text 'MAKING WISHES, ONE PIECE OF PAPER AT A TIME.' and 'GluedToMyCraftsBlog.com' are printed on the white sheet. Torn Paper Dandelion Craft: Making Wishes, One Piece at a Time
  • A flat lay of handmade Valentine’s Day cards and decorations, including paper flowers, felt hearts, an envelope, and printed cards with romantic poems, arranged on a gray and pink background. Capture Memories With These 6 Handprint Flower Poems
  • A playful torn paper cactus craft with hearts and flowers. Includes glue and felt hearts. Torn Paper Cactus Card: A Sweet Mother's Day Craft
  • A colorful handprint craft made from purple paper with glitter edges sits on a multicolored polka dot background. A round tag with a poem is attached below, tied with red and white string. Flowers are visible in the corner. Easy Handprint Flower Craft with Poem – Perfect Spring DIY for Kids
  • A purple paper butterfly made from handprint cutouts is decorated with glitter and a smiling face. A round poem about sending love is in the center. The background is colorful and the GluedToMyCraftsBlog.com watermark is visible. Handprint & Popsicle Stick Butterfly Poem Keepsake
  • A craft project with yellow crepe paper fries in a red-striped paper container, a label reading Youre UN-FRY-GETTABLE!, red heart decorations, Elmers glue, and a roll of yellow crepe paper on a purple background. Torn Crepe Paper Fries Craft Idea For Kids

© 2012–2026 Glued To My Crafts
All activities should be supervised by an adult at all times. Please refer to our safety guidelines for more information.


Please note that all the content of the website, including printables, are for classroom and personal use only. This means that any digital item you download from our site can be used for non-commercial use only. We kindly request that you do not reproduce or sell our creations. We appreciate your understanding and cooperation in respecting our content and intellectual property rights.

Accessibility Adjustments

Powered by OneTap

How long do you want to hide the toolbar?
Hide Toolbar Duration
Select your accessibility profile
Vision Impaired Mode
Enhances website's visuals
Seizure Safe Profile
Clear flashes & reduces color
ADHD Friendly Mode
Focused browsing, distraction-free
Blindness Mode
Reduces distractions, improves focus
Epilepsy Safe Mode
Dims colors and stops blinking
Content Modules
Font Size

Default

Line Height

Default

Color Modules
Orientation Modules