
I’m so excited for today’s step-by-step tutorial. Get ready because we are about to create an amazing 3-D daffodil flower masterpieces in no time at all! Just in time for the beautiful springtime weather!

3-D Daffodil Flower Craft Idea
As the days get warmer, it’s time to start thinking about crafting and creative projects that can help your little ones celebrate the spring season!
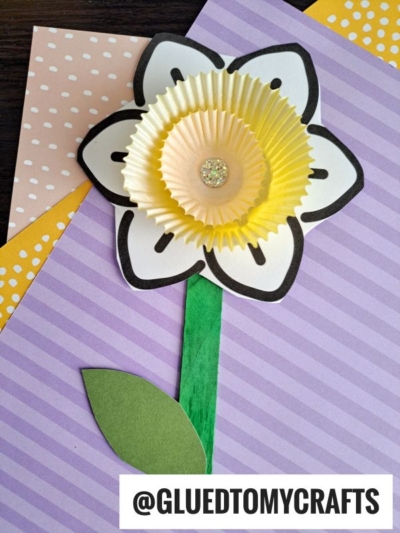
For kids (and adults!) who are looking for something unique to do this season why not try out our latest and greatest 3-D cupcake liner daffodil flower craft? All you need is a few basic art materials from around your house or local craft store to create this three-dimensional flower craft. I’ve even included a FREE daffodil flower printable in the tutorial below to get you started even faster.
With just a few simple steps and minimal supplies, you and your child will have a little bouquet of faux cupcake liner daffodils that you can use as decorations indoors in your home or outside in the garden. You could even gift these paper flowers for Mother’s Day or even Teacher Appreciation week.
On that note, are you ready to make these beautiful spring flowers happen in your home or classroom today? Read on to find out how you and your little one can recreate this beautiful yellow daffodil craft project today! I just know you both are going to make some awesome cupcake liner craft pieces together! Happy crafting, my friends!
RELATED —> Grandma’s Are Like Extra Frosting


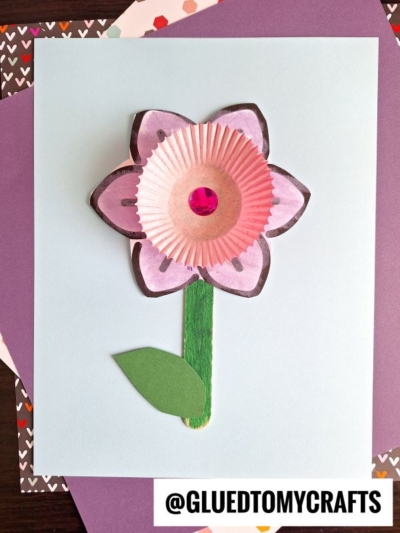
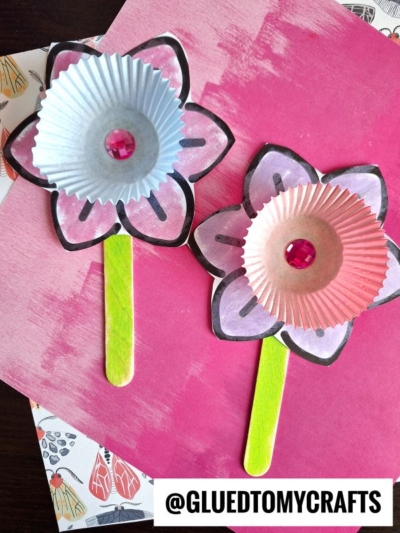
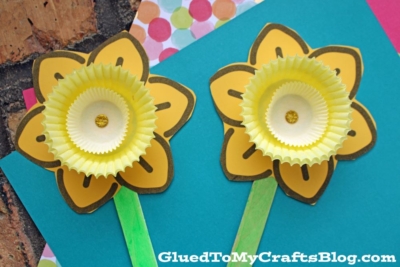
It’s a colorful spring craft that kids of all ages will love recreating! With just cupcake liners, glue and paper – they will be off to make something unique that can be cherished for years!
Craft Supplies:
- DAFFODIL Printable – on our landing page
- Yellow Cardstock Paper
- Large Yellow Cupcake Liners
- Mini Yellow Cupcake Liners
- Jumbo Popsicle Sticks
- Green Craft Paint
- Foam Paint Brush
- Small Paper Plate
- Craft Scissors
- School Glue
- Rhinestone Stickers
Directions:
- First things first – print the free daffodil flower petal template out on some yellow cardstock paper.
- Trim out ONE of the flower designs and set the other aside for later.
- Next up – grab the green craft paint, the small paper plate, paint brush and ONE jumbo popsicle stick.
- Squirt a small amount of craft paint on the small paper plate.
- Use the paint brush to paint ONE side of jumbo popsicle stick, completely green. This is now the stem.
- Set it aside to let it dry completely.
- Now grab your cupcake liners, the painted stick and the flower cutout.
- Start off by gluing the flower petal shape to one end of the painted popsicle stick.
- Now glue down the large cupcake liners {facing outwards} in the center of the flower design.
- Follow that up with the mini cupcake liner, right in the center as well.
- Finally – add a small rhinestone to the inside of all the cupcake liners, to complete the look.
- Set aside to let it dry completely.
- Then display/gift away your yellow cupcake liner daffodil craft proudly!
Customize It Today:
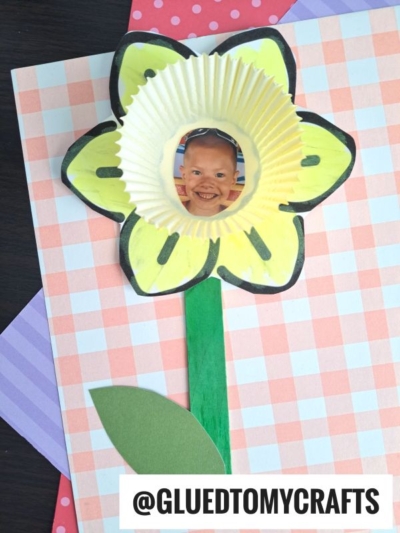
- Instead of rhinestones, you can also use small yellow pom-poms or a button for the center instead.
- I left them off our example pieces but you can of course some flower leaves from green piece of cardstock paper.
- My last suggestion is not to feel obligated by my use of yellow for the paper or cupcake liners in my example photos. Please feel inspired to make your own version of colorful daffodil flowers! Maybe even recreate them using your favorite color instead!
RELATED —> Egg Carton Flowers
If you are looking for even MORE easy kid craft ideas, from Glued To My Crafts, be sure to check out these fun posts listed below! All of which would pair nicely with today’s fun 3-d cupcake liner daffodil art project – hint hint!
- Paper Plate Cookie
- Paper Plate Leopard
- Apple Stamped Flower Craft
- Paper Plate Pigeon
- Paper Plate Cat In The Hat
- Paper Plate Baker
- Paper Doily Flower Cards

Cupcake Liner Daffodil Flower Craft
Here’s your checklist of supplies to bring this craft to life:
- Cardstock Paper yellow
- SPRING PRINTABLE - LANDING PAGE
- 1 Cupcake Liners yellow
- 1 Mini Cupcake Liners yellow
- 1 Jumbo Popsicle Sticks
- Craft Paint green
- Rhinestone Stickers
- School Glue
Prepare your creative haven by laying down a protective cover before the crafting magic begins!
Directions:
- First things first - print the free daffodil flower petal template out on some yellow cardstock paper.Cardstock Paper
- Trim out ONE of the flower designs and set the other aside for later.
- Next up - grab the green craft paint, the small paper plate, paint brush and ONE jumbo popsicle stick.
- Squirt a small amount of craft paint on the small paper plate.
- Use the paint brush to paint ONE side of jumbo popsicle stick, completely green. This is now the stem.1 Jumbo Popsicle Sticks, Craft Paint
- Set it aside to let it dry completely.
- Now grab your cupcake liners, the painted stick and the flower cutout.1 Cupcake Liners
- Start off by gluing the flower petal shape to one end of the painted popsicle stick.
- Now glue down the large cupcake liners {facing outwards} in the center of the flower design.
- Follow that up with the mini cupcake liner, right in the center as well.
- Finally - add a small rhinestone to the inside of all the cupcake liners, to complete the look.Rhinestone Stickers
- Set aside to let it dry completely.
- Then display/gift away your yellow cupcake liner daffodil craft proudly!


NEED MORE HELP DOWNLOADING OUR FREE PRINTABLES? PLEASE REFER TO OUR FAQ PAGE