
You’ll LOVE making this quick-and-easy Valentine’s Day kid craft idea with just a simple paper plate, craft paint and cardstock! Keep scrolling for the full details on this Paper Plate Valentine Candy Dish tutorial!

Paper Plate Candy Dish Craft
Welcome to our latest Valentine’s Day kids craft tutorial! This time we are showcasing a simple mixed media art project idea centered around CANDY!
This brand-new idea using simple supplies like a small paper plate, craft paint and cardstock paper.
I used a medium sized pom pom “pinched” in a simple wooden clothespin for my paint brush but a few good alternatives can be used such as a recycled wine cork, markers, stickers, small potatoes cut in half or even a basic circular craft sponge! The possibilities are endless on what you use to make your “candy” appear in the dish! I highly encourage you to raid your home to get those creative juices flowing so you can make a one-of-a-kind piece with your child today!
On that note, because the possibilities are simply endless on this one, every paper plate candy dish will be different but oh so cute. I think that’s the FUN part of it all! Right?! So let’s get to it! You can find ALL the details you need to know in the full step-by-step tutorial below. Happy crafting and creating the PERFECT paper candy Valentine dish!
RELATED: Handprint LOVE Keepsake and Paper Plate Love Bird


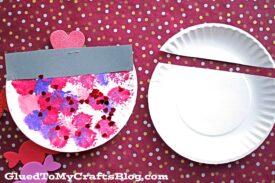
Make a cute candy dish craft using paper plates and craft glue. This is an easy tutorial for kids of all ages!
Craft Supplies:
- Large Paper Plate
- Small Paper Plate
- Paper Craft Scissors
- Craft Paint
- Small Pom Pom
- Wooden Clothespin
- Gray Cardstock Paper
- Stapler
- Valentine Heart Cutouts
- Embellishments
Directions:
- First things first – grab one of your LARGE paper plate and your craft scissors.
- Cut off a small sliver on one side of the paper plate to give a more defined look of a candy dish.
- Discard the small piece you just cut off.
- Now grab the smaller paper plate and all your shades of craft paint.
- Squirt each color on the paper plate.
- Now take your small pom pom and “pinch” it in between the wooden clothespin.
- Use your newly made paint brush to add various “candy” dots on the paper plate piece. Add as many or as little as you like!
- Now the next step is completely optional but while the paint is still wet on the paper plate, sprinkle some loose craft glitter on top of everything, for some extra sparkle.
- When done decorating the paper plate, set it aside to allow the paint to dry completely.
- Now grab your gray colored cardstock and the scissors again.
- Cut out a long, rectangular piece that will become the lid of the candy dish.
- Staple it to the decorated paper plate piece from earlier.
- To finish off the paper plate Valentine candy dish, add a small heart cutout on top of the cardstock lid piece, as a decorative “pull” knob to tie everything together.
RELATED —> Paper Plate Cotton Candy

Here’s just a few of my FAVORITE Valentine’s Day kid craft tutorials on Glued To My Crafts right now!
Click on each link below to be taken to the posts and be inspired to recreate them this February in your home!
Puffy Paint Cotton Candy Craft

Paper Plate Valentine Candy Dish Craft Idea
Here’s your checklist of supplies to bring this craft to life:
- 1 Large Paper Plate
- Craft Paint
- 1 Small Pom Pom
- 1 Wooden Clothespins
- Cardstock Paper
- Valentine Heart Cutouts
- Loose Craft Glitter
Prepare your creative haven by laying down a protective cover before the crafting magic begins!
Directions:
- First things first - grab one of your LARGE paper plate and your craft scissors.
- Cut off a small sliver on one side of the paper plate to give a more defined look of a candy dish.
- Discard the small piece you just cut off.
- Now grab the smaller paper plate and all your shades of craft paint.
- Squirt each color on the paper plate.
- Now take your small pom pom and "pinch" it in between the wooden clothespin.
- Use your newly made paint brush to add various "candy" dots on the paper plate piece. Add as many or as little as you like!
- Now the next step is completely optional but while the paint is still wet on the paper plate, sprinkle some loose craft glitter on top of everything, for some extra sparkle.
- When done decorating the paper plate, set it aside to allow the paint to dry completely.
- Now grab your gray colored cardstock and the scissors again.
- Cut out a long, rectangular piece that will become the lid of the candy dish.
- Staple it to the decorated paper plate piece from earlier.
- To finish off the paper plate Valentine candy dish, add a small heart cutout on top of the cardstock lid piece, as a decorative "pull" knob to tie everything together.

CLICK HERE TO PRINT THE DIRECTIONS FOR THIS CRAFT