
Our latest Craft Stick Cat tutorial is simply PURR-FECT and guaranteed to bring several smiles into your home!
Keep scrolling to see how I made these wow-worthy feline friends come to life within minutes!

This popsicle stick cat puppet craft is so much fun for kids! It’s a great way to get creative and have some fun, too.
The best part is that it’s really easy to make, and you probably have all the supplies you need right at home.
So hurry up and give it a try!
Are you looking for a fun and easy craft project to keep your kids busy? Then look no further than this popsicle stick cat puppet craft!
With just a few simple supplies {and FREE PROVIDED PRINTABLE!} your kids can create a cute and cuddly cat puppet to play with. Best of all, this craft is perfect for both beginners and more experienced crafters. So why not give it a try today? Your kids will love it!
Don’t forget – I wanna admire your popsicle stick cat creations so please be sure to snap a few pictures along the way and tag us on Facebook or use our special branded #gluedtomycrafts hashtag for us to see!
Happy crafting my friends!!! Hopefully your crafty plans are PURR-FECTLY fun because of this amazing art project idea you found on Glued To My Crafts just now!
RELATED —> Paper Plate Black Cat

This popsicle stick cat puppet craft is perfect for kids of all ages, and it’s a great way to use up any extra popsicle sticks you may have lying around.
Not only is this puppet craft super cute, but it’s also really easy to make. Kids will love playing with their new furry friends!
Craft Supplies:
- Jumbo Popsicle Sticks – 3 per craft
- Mini Popsicle Sticks – 2 per craft
- Pipe Cleaner – 1 per craft
- Low Temp Glue Gun
- Craft Paint
- Paint Brush
- Scissors
- CAT Printable – on our landing page
- White Cardstock Paper
- Crayons, Coloring Pencils or Markers
- Medium Sized Wiggle Eyes – 2 per craft
Directions:
- First get the glue gun hot and ready.
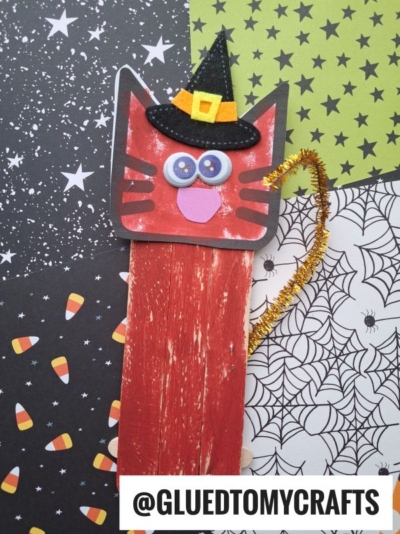
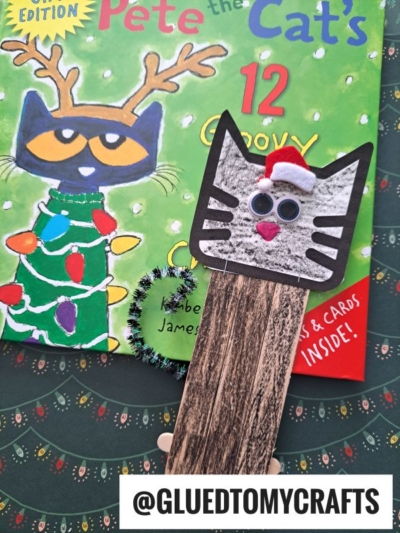
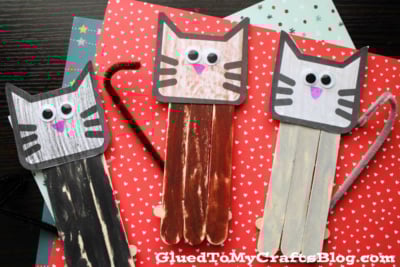
- Assemble the base of your cat friend by gluing THREE jumbo popsicle sticks and TWO mini popsicle sticks together to look like a fence door {3 next to each other and the mini popsicle sticks across to secure in place.}
- At this point in time you should go ahead and hot glue the pipe cleaner “tail” to the back of the wood piece as well.
- Now grab your craft paint, paint brush and the popsicle stick shape you just made.
- Go ahead and paint the popsicle stick shape completely.
- Set aside to allow it to dry completely.
- Now grab your printable, choice of coloring utensils and scissors.
- Go ahead and color in ONE of the head shape designs.
- When done coloring, trim it out and add on the googly eyes.
- The final step is to hot glue the head shape to the wood piece. And that’s it!
- Add any other embellishments you see fit.
- Let it dry completely before displaying proudly!!!
- Don’t forget to snap a few pictures of your finished craft stick cat puppet creations to share with us! #gluedtomycrafts
RELATED —> Tissue Paper Cat Craft

We have the BEST craft tutorials on the internet for kids {if I do say so myself!}
Just check out our Popsicle Stick Unicorn, Craft Stick Monkey and Paper Plate Sloth craft ideas that hundreds of people have been recreating ALL year long! All of which are instant creativity at your fingerprints!

Popsicle Stick Cat Puppet Craft Idea
Here’s your checklist of supplies to bring this craft to life:
Prepare your creative haven by laying down a protective cover before the crafting magic begins!
Directions:
- First get the glue gun hot and ready.
- Assemble the base of your cat friend by gluing THREE jumbo popsicle sticks and TWO mini popsicle sticks together to look like a fence door {3 next to each other and the mini popsicle sticks across to secure in place.}
- At this point in time you should go ahead and hot glue the pipe cleaner "tail" to the back of the wood piece as well.
- Now grab your craft paint, paint brush and the popsicle stick shape you just made.
- Go ahead and paint the popsicle stick shape completely.
- Set aside to allow it to dry completely.
- Now grab your printable, choice of coloring utensils and scissors.
- Go ahead and color in ONE of the head shape designs.
- When done coloring, trim it out and add on the googly eyes.
- The final step is to hot glue the head shape to the wood piece. And that's it!
- Add any other embellishments you see fit.
- Let it dry completely before displaying proudly!!!


NEED HELP DOWNLOADING OUR FREE PRINTABLES? PLEASE REFER TO OUR FAQ PAGE