
Hello my dear crafty friends! Welcome to Glued To My Crafts! I have yet another fall friendly craft idea for you all today and it’s titled Paper Plate Apple Tree.
It in-cooperates some of my favorite craft materials and is perfect for the apple picking season we are currently in!

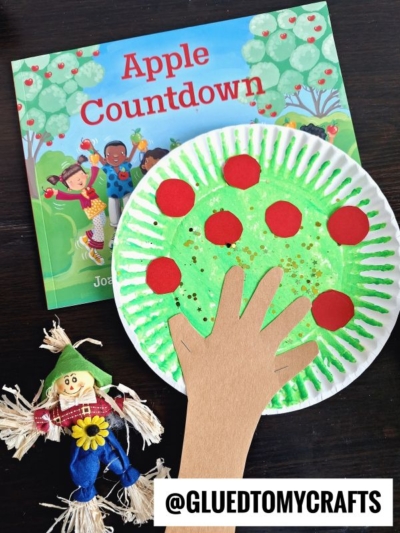
Handprint Apple Tree Craft Idea
This paper plate and craft paint apple tree art project idea is super easy for the littlest crafter in your home to recreate today.
You only need THREE basic materials and you can even in-cooperate your child’s handprint for the tree trunk element {making it an awesome keepsake to display year after year!} If kids can hold a paint brush, they are more than capable to make this DIY come to life within minutes!
Our paper plate & handprint tree trunk craft is perfect to celebrate a trip to the apple orchard, back-to-school season or just because! Heck – you can even tie it in with some epic story time {with some of your favorite apple themed books!}
On that note – I hope our quick post some creativity inside you and your child today! You can find ALL the details you need to know, in the full step-by-step tutorial below! Enjoy!
Happy crafting my friends!!! Don’t forget to snap a few pictures when you are done crafting and share them with us on our Facebook page or tag us on Instagram to see! #gluedtomycrafts
RELATED —> Paper Plate Acorn

It’s super easy, has cheap materials and even has an adorable paper handprint in-cooperated into the trunk!
Craft Supplies:
- Large Paper Plate
- Green Craft Paint
- Foam Paint Brush
- Brown Cardstock Paper
- Scissors
- Pencil
- Stapler
- School Glue
- Red Cardstock Paper
Directions:
- First have children paint their paper plate completely GREEN. Simply squirt the paint in the center and have them go to town with the paint brush.
- When done painting, set aside the paper plate to allow it to dry completely.
- To make the trunk of the tree, have your child lay one hand in the center of the brown cardstock.
- Using a pencil, trace your child’s hand and part of their arm.
- Cut out the traced design with the scissors.
- Go ahead and staple that piece to the paper plate to make the “trunk” of the tree.
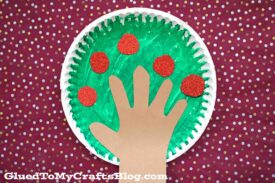
- To finish off the Paper Plate Apple Tree – have children cut out a few circles from the red cardstock, to be the apples of the craft. Five to seven apples is a good amount.
- Use the school glue to glue those in random places on the painted paper plate.
- And that’s it! Now display it proudly for ALL to see!
Book Pairing Ideas:
Looking for the perfect reads to complement our latest craft tutorial? Here are some book suggestions that pair beautifully with your creative journey! Dive into these titles and let your imagination flow while you craft. Happy reading and crafting!
- Sour Apple by Linda Liu
- Little Naturalists: Johnny Appleseed by Kate Coombs
- Goodbye Summer, Hello Autumn by Kenard Pak
- It’s Fall! by Renée Kurilla
- Bad Apple: A Tale of Friendship by Edward Hemingway
- Apple Countdown by Joan Holub
- Halloween in the Orchard by Phyllis Alsdurf
- The Biggest Apple Ever by Steven Kroll
- How to Make an Apple Pie and See the World by Marjorie Priceman
- Winston and the Missing Apples by Simply Country Ranch
RELATED —> “A” is for Apple Craft


Spur-of-the-moment crafty fun below!
If you are looking for even MORE apple themed crafts to do this fall, be sure to check out these past blog posts below from the Glued To My Crafts website! All of which would pair nicely with today’s easy paper plate apple craft!
- Popsicle Stick Apple
- Cupcake Liner Apple Tree
- Coffee Filter Apple
- Paper Bowl Apple
- Felt Apple Trees
- Paper Plate Pie Slice
- Apple Picture Frame
- Paper Plate Candy Apples

Paper Plate Apple Tree w/Handprint Trunk
Here’s your checklist of supplies to bring this craft to life:
- School Glue
Prepare your creative haven by laying down a protective cover before the crafting magic begins!
Directions:
- First have children paint their paper plate completely GREEN. Simply squirt the paint in the center and have them go to town with the paint brush.1 Large Paper Plate, Craft Paint
- When done painting, set aside the paper plate to allow it to dry completely.
- To make the trunk of the tree, have your child lay one hand in the center of the brown cardstock.Cardstock Paper
- Using a pencil, trace your child’s hand and part of their arm.
- Cut out the traced design with the scissors.
- Go ahead and staple that piece to the paper plate to make the "trunk" of the tree.
- To finish off the Paper Plate Apple Tree - have children cut out a few circles from the red cardstock, to be the apples of the craft. Five to seven apples is a good amount.
- Use the school glue to glue those in random places on the painted paper plate.
- And that's it! Now display it proudly for ALL to see!

CLICK HERE TO PRINT THE DIRECTIONS FOR THIS CRAFT