When engaging in craft activities, it is important for young children to have adult supervision at ALL times. It is also recommended to use supplies that are suitable for your child’s age. Feel free to modify materials or steps to meet your specific requirements.
As an Amazon Associate I earn from qualifying purchases. This post contains affiliate links. For more information, please see our disclosure policy.
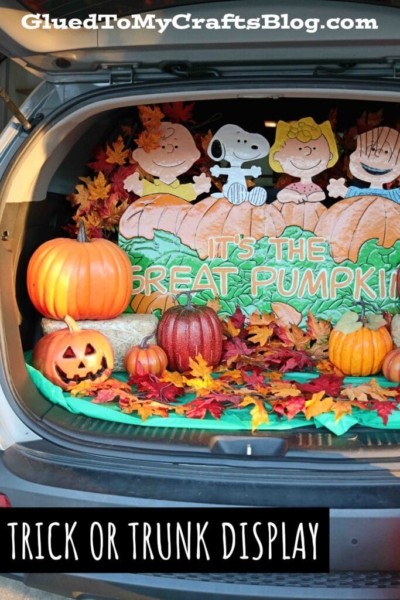
The EASIEST Great Pumpkin Trick or Trunk Display EVER!
Let me start off by saying, although I’m crafty… I’m actually the LAZIEST crafter ever. Just ask my husband.
I “know” there are a lot of awesome crafters out there that can pretty much DIY anything they see or hear. But me? Outside of the kids craft realm and Glued To My Crafts, I’m the crafter that will look at something in the store, know I can make it myself for cheaper but will still end up spending the money on the premade version, just to save myself some time. I would much rather take the easy road out and send my energy elsewhere. Sorry, not sorry! 🙂 This is why I say our tutorials are the easiest because I don’t play around with the hard stuff!
Anyways – this past Halloween, my husband volunteered us for the Trick or Trunk event that was happening on base. Although at first I was pretty annoyed {at first I thought he meant I HAD to run our car booth} I did end up having some fun pulling together my idea. The lazy way though!
On that note, you should know that we are HUGE Peanuts fans in our house. Pretty much a good chunk of our life somehow resolves about the brand. From Christmas decorations to even bed sheets… We have also for the past five years, celebrated my son’s stuffed Snoopy’s birthday. It’s kind-of our “thing” in our home. So that’s what inspired me to do a Great Pumpkin theme for our trunk.
Now without further ado, below you will see how I made our Great Pumpkin Trick or Trunk car display happen with basically FIVE different materials and steps. It was so easy {mostly thanks to Amazon} that even my husband and son were able to put the display together, all by themselves, at the trick or trunk event while I was at home relaxing {classic introvert here – crowds are not my thing either!} I’m telling you, the premade sign I found on Amazon recently {that I will link below} made ALL the difference in pulling this off! If you are lazy like me but still want to have an awesome display, keep scrolling to see what I did!
RELATED —> Paper Plate Snoopy
BUY THE METAL SIGN VIA OUR AFFILIATE LINK HERE!

Here is what I used for our “Great Pumpkin Trunk Display” and where you can find them. I put them in order of how I placed them in my trunk. Hopefully this inspires you!
Keep it nice and clean
To keep my trunk clean and to give the look of pumpkin patch, we added a simple $1 green vinyl tablecloth to the bottom of my trunk. I’ll touch base on it more below but this will make cleanup of your hay barrels so much easier at the end of the night. After the event was over, we carefully wrapped up the tablecloth and threw it away. Easy peasy AND brings some color to your display, as well.
The most important element – the sign! BUY IT HERE!
You can buy it HERE ON AMAZON. Yes, it’s a little pricey for a “metal sign” but seriously, I would do it over and over again.
It’s pretty sturdy, big in size when it’s put together fully and most importantly – folds up nice and flat so you can store it in your car in transit AND after the season. All the characters come off in separate pieces and lay flat with the bottom sign portion.
My biggest take away and push on this sign, is that it filled up so much of my trunk space – in a good way though! {I have a 2013 Kia Sorento.} I originally had planned on taping up a black tablecloth in the background for a night scene, as well as to fill in the voided space in my trunk but we honestly didn’t need it that day {hello one less step and supply!} If you have a smaller SUV, I think the size of this sign is absolutely perfect.
RELATED —> Footprint Ghost Keepsake

It wouldn’t be a pumpkin patch without HAY BAREELS
Like I mentioned above, the metal sign that I bought is really amazing but I do have to add that it has two triangle stakes on the bottom because the sign is actually suppose to go in the ground for displaying. You can’t remove them but no worries! I have a solution for that. I bought HAY barrels and put them in front of the two posts to cover them up. Problem solved.
I originally had plans to buy two larger hay barrels for my display {note to self – if you want to buy hay barrels for Halloween, buy them in August when they first come out, otherwise they will be completely sold out three weeks before hand.} Although I ran into this slight snag of not getting the size I originally wanted at first, it actually worked out in my favor to find the smaller ones in the floral department of Hobby Lobby. I have to say that the smaller ones didn’t overwhelm my display at all and the big ones probably would have. It totally worked out PERFECTLY in my favor and I spent less money too.
Plus we kept the small hay barrels wrapped in the original plastic covering {the plastic labeling is facing the metal sign} so my trunk wouldn’t get messy that day. This tip is also great because now I can use them again next year, since they are fully intact. Simply store them in a large plastic container, in a dry location though!
I just have to add that since this was a drive by trick or trunk event, no one could tell that our hay barrels were still wrapped in plastic. I bet you can’t even tell in the pictures either! I still encourage the green vinyl tablecloth on the bottom of your trunk for easy cleanup because although we kept them wrapped in plastic, they still shredded a small amount of hay here and there.
RELATED —> Thumbprint Wheel Barrel

Now for the next star of the show – the PUMPKINS
Surprisingly, I didn’t have to spend much here since I already had these on hand from years past. Since we lived in Florida prior {hot Halloweens} and now cold Nebraska with lots of wildlife around, buying fake pumpkins for my front porch is the way to go. I typically pick up one or two new ones each year, so I have quite a variety of types and shapes.
So all I did that morning of the trick or trunk, was pull the pumpkins I already had on display on my front porch and placed them in the trunk of the car. Again, easy peasy! I highly suggest the fake pumpkins so you can use them year after year but a few real ones would work too. Two large and a couple small ones in between the spaces and you will be good to go!
RELATED —> Paper Hay Truck

BUY THE METAL SIGN VIA OUR AFFILIATE LINK HERE!
Make The Outside of Your Trunk An Extension of Your Display
Remember how I mentioned above that the sign took up most of my trunk space? That’s actually a good thing because that allowed me to bring some of our “display” to the outside of our car without looking misplaced.
See that giant candy bucket in the picture? I just propped it up on a wood crate that I already had in our house and bam – instant candy display that both my husband and son were able to grab out of, as the cars drove by in the trick or trunk parade.
I’ll sound like a broken record soon but both pieces were also so easy to put back in the car and drive away afterwards.
Fill In Those Blanks Spots With Plastic Leaves
My last addition to the trunk display was the plastic leaves but not just ANY plastic leaves. They were the garland kind.
I found mine at Hobby Lobby but you can also find them on Amazon. I bought five in total {about $10 each when the sale was going on} and just laid them here and there to fill in any gaps or empty spaces there were. Since they were in garland form, I didn’t have to worry about them blowing away that day, although you could use a bag or two of the fake single kind to cover your trunk floor and fill in space.
The nice thing about the leaf garland was that I could prop one of them on the metal sign to look like they were playing in the leaves. Again, broken record, but the garland was also super easy to pull away from the display and store afterwards.
RELATED —> Silly Leaf Hair Craft

And that wraps up this The Great Pumpkin trick or trunk post!
Everything I listed above is what I used and what people saw that day {besides the candy – that is!}
My particular trunk display only needed six basic materials {some of which I already had on hand already} so it was really easy to whip up. From what I “heard” from my husband, it was well received from those who drove by it in the parade. He said he even heard someone mention that is a breathe of fresh air in 2020!
Like I said in the beginning of this post, my husband and son set up the display all by themselves that morning, without me in attendance. I just put the display together really quick in our garage the day before with them, snapped a few pictures on my phone of what I created and sent them to his phone so he could reference it… although it was that easy, I don’t think he needed it.
Anyways – I’m ending this “great pumpkin trick or trunk” post here and I hope if you read the entire thing, you are inspired to recreate your own “It’s the great pumpkin” trick or trunk display! It’s a big investment {the sign is} but I think because of the quality and how easy it is to set up, it’s going to return so much more to you! Charlie Brown and the gang NEVER go out of style – just food for thought!
Happy EASY crafting my friends! May your Halloween plans still go on without a hitch! #gluedtomycrafts
RELATED —> Popsicle Stick Charlie Brown
