
At Glued To My Crafts, we are “yet again” inspired by a favorite dessert commonly found at the Thanksgiving table – APPLE PIE!
With Thanksgiving literally days away, it only seems fitting that we share this Paper Plate Apple Pie Slice craft idea in honor of the iconic baked treat and inspire YOU to get crafty with your child, before the BIG day!

Apple Pie Slice Paper Plate Craft Idea For Kids
It’s as simple as pie – promise! Using just a simple paper plate, tan paint, some craft yarn, paper and a little glue – you too can make it with your child in no time.
Best part of this paper plate apple pie slice craft is that it’s calorie free and you “make” it over & over again – on the fly & cheap without breaking out the mixer or turning on a stove!
And fun fact – my personal favorite embellishment in this apple pie art project idea is the yarn I used because when I first picked it up at Walmart, I instantly thought of a “crust” for what would later become today’s tutorial. Isn’t it crazy how these ideas come to me???
So friends… enough chit chat from me! Let’s bake up some crafty fun with our paper plate apple pie slice tutorial below!
Happy crafting my friends!!! Don’t forget to share pictures of your child’s finished apple pie slice from a paper plate, on our Facebook page for us to admire! #gluedtomycrafts
RELATED: Burlap Pumpkin Pies and Paper Plate Apple Tree


Get the kids busy this weekend with a fun and creative paper plate apple pie slice craft! It’s a perfect way to get their creative juices flowing and have some quality time together.
Craft Supplies:
- Large Paper Plate
- Craft Scissors
- Tan Craft Paint
- Foam Paint Brush
- Loose Orange Craft Glitter
- School Glue
- Thick Tan Craft Yarn
- Brown Cardstock Paper
- White Cotton Balls
Directions:
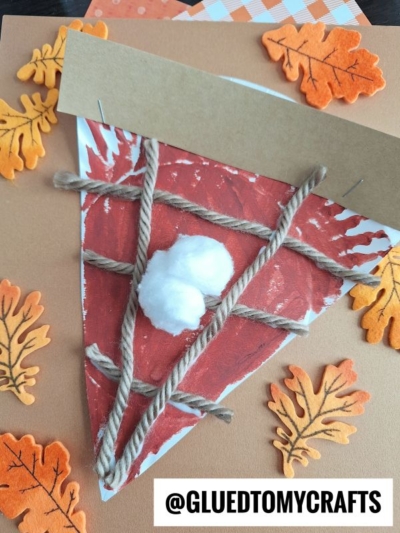
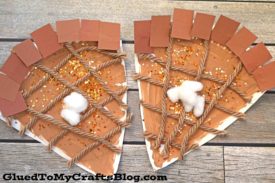
- First cut your paper plate to resemble a pie slice. Think of a pizza slice shape.
- Discard the excess paper plate pieces.
- Now paint the paper plate piece slice completely tan with the craft paint.
- When done, and while the paint is still wet, go ahead and sprinkle some orange “cinnamon” on top.
- Set it aside.
- Next cut several short strands of tan yarn. This will be the “crust” of the piece.
- Put lines of glue on the painted paper plate pie piece, where you want your “crust” to lay.
- Lay the yarn strands on top of the glue.
- Add more glue if need be. Set aside.
- Grab the brown cardstock and scissors.
- Cut out several small squares for the outer rim pie crust.
- Now put a good layer of glue on the rim of the paper plate.
- Place the brown squares on top of the glue, along the rim, until completely covered.
- To finish off the Paper Plate Apple Pie Slice, glue a few white cotton balls in the center of the decorated paper plate {because every pie needs whipped cream!}
- Then let it dry completely in an undisturbed area, before displaying proudly!
Book Pairings:
Here are some recommended books that beautifully complement our craft idea. You can conveniently purchase them through our affiliate links on Amazon.
- The 12 Days of Thanksgiving by Jenna Lettice
- Nothing’s Wrong!: A Hare, a Bear, and Some Pie to Share by
- How to Make an Apple Pie and See the World by Marjorie Priceman
- A Charlie Brown Thanksgiving by Charles M. Schulz
- I Know an Old Lady Who Swallowed a Pie by Alison Jackson
- The Night Before Thanksgiving by Natasha Wing
- I Am Thankful: A Thanksgiving Book for Kids by Sheri Wall
- Porcupine’s Pie by Laura Renauld
- Pookie’s Thanksgiving by Sandra Boynton
- Thanksgiving in the Woods by Phyllis Alsdurf
PRELATED —> Paper Plate Pumpkin Pie
If you are looking for even more Thanksgiving themed kid crafts, be sure to check out Cheerio Corn on the Cob, Stained Glass Turkeys and Paper Plate Turkey craft posts!
And if you decide to make today’s Paper Plate Apple Pie Slice craft idea or any of our inspiring tutorials found on our website, be sure to share a picture on our Facebook page for all of us to see!

Paper Plate Apple Pie Slice Craft Idea For Thanksgiving
Here’s your checklist of supplies to bring this craft to life:
Prepare your creative haven by laying down a protective cover before the crafting magic begins!
Directions:
- First cut your paper plate to resemble a pie slice. Think of a pizza slice shape.1 Large Paper Plate
- Discard the excess paper plate pieces.
- Now paint the paper plate piece slice completely tan with the craft paint.Craft Paint
- When done, and while the paint is still wet, go ahead and sprinkle some orange "cinnamon" on top.Loose Craft Glitter
- Set it aside.
- Next cut several short strands of yarn. This will be the "crust" of the piece.Craft Yarn
- Put lines of glue on the painted paper plate pie piece, where you want your "crust" to lay.
- Lay the yarn strands on top of the glue.
- Add more glue if need be. Set aside.
- Grab the brown cardstock and scissors.Cardstock Paper
- Cut out several small squares for the outer rim pie crust.
- Now put a good layer of glue on the rim of the paper plate.
- Place the brown squares on top of the glue, along the rim, until completely covered.
- To finish off the pie craft, glue a few white cotton balls in the center of the decorated paper plate {because every pie needs whipped cream!}White Cotton Balls
- Then let it dry completely in an undisturbed area, before displaying proudly!

CLICK HERE TO PRINT THE DIRECTIONS FOR THIS CRAFT