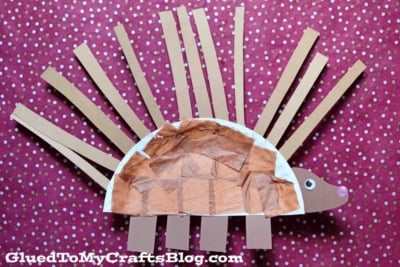
Let your little ones give their imaginations a spiky, creative run with this fun paper plate porcupine craft! Just grab a few paper plates and get crafting with the kids—they’ll have a blast making something they can call their own.
Porcupine Paper Plate Craft
Hi friends! Inspired by a recent children’s book purchase at our local Barnes and Noble store, today’s Paper Plate Porcupine is a fun gluing art project for kids of ALL ages and it goes along PERFECTLY with the book Pins and Needles by Stephen Krensky.
Pins is a porcupine who loves to take chances. Needles is a porcupine who is always scared. But when Pins gets himself into a bit of trouble, will Needles be brave enough to help him out?
Pins and Needles covers the concepts Appreciating Differences and Friendship.
Whether for an animal themed lesson plan or any day of the year craft idea – all you need is a little crafty creativity to make this one-of-a-kind paper plate and tissue paper porcupine piece come to life! So don’t delay – craft it up with your child today!!!
Find all the details in the full tutorial below! Happy crafting, my friends! Don’t forget to share pictures of your creative porcupine made from a paper plate, on our Facebook page to admire! #gluedtomycrafts
RELATED: Paper Plate Wings and Paper Hedgehog

Looking for something fun and creative to keep your little ones occupied? Why not give our Paper Plate Porcupine art project a try today?! Your kids will be delighted with the results, and you’ll have hours of family fun!
Craft Supplies:
- Large Paper Plate
- Brown Tissue Paper
- Brown Cardstock Paper
- Stapler
- Scissors
- School Glue
- Small Googly Eyes
Instructions:
- First cut your paper plate in half. Straight up the center to make TWO equal pieces.
- Reserve one half of the paper plate for today’s craft and save the other for a rainy day.
- Now grab your brown tissue paper and cut it into small squares {let the kids practice their cutting skills} Set aside.
- Next take your paper plate half and put a good amount of glue all over it.
- Have children place the tissue paper on top of the glue, until the paper plate is completely covered.
- While they are working on that, cut out the other porcupine features from the brown cardstock. Think long, skinny needles, four legs and of course – a head!
- To finish off the Paper Plate Porcupine – staple/glue on the cardstock pieces in their designated spots, as well as other embellishments you see fit.
- Don’t forget to also add the wiggle eye so your new friend can see!
- Then display proudly for all to see!
RELATED —> Popsicle Stick Porcupine
If you are looking for even MORE easy kid craft ideas made from paper plates, be sure to check out these fun posts, listed below, from us:
- Paper Plate Seahorse
- Paper Plate Cat
- Paper Plate Dr. Seuss
- Paper Plate Mouse
- Paper Plate Paddington
- Paper Plate Green Monster
- Paper Plate Baseball
- Paper Plate Piggie & Elephant
- Paper Plate Caterpillar
Have something to say? Want to show off your cute paper plate craft creations? Join the conversation on our Facebook page. We love hearing from YOU!
Paper Plate Porcupine Craft Idea For Kids
Here’s your checklist of supplies to bring this craft to life:
Prepare your creative haven by laying down a protective cover before the crafting magic begins!
Directions:
- First cut your paper plate in half. Straight up the center to make TWO equal pieces.1 Large Paper Plate
- Reserve one half of the paper plate for today's craft and save the other for a rainy day.
- Now grab your brown tissue paper and cut it into small squares {let the kids practice their cutting skills} Set aside.Tissue Paper
- Next take your paper plate half and put a good amount of glue all over it.
- Have children place the tissue paper on top of the glue, until the paper plate is completely covered.
- While they are working on that, cut out the other porcupine features from the brown cardstock. Think long, skinny needles, four legs and of course - a head!Cardstock Paper
- To finish off the Paper Plate Porcupine craft – staple/glue on the cardstock pieces in their designated spots, as well as other embellishments you see fit.
- Don't forget to also add the wiggle eye so your new friend can see!1 Wiggle Eyes
- Then display proudly for all to see!

CLICK HERE TO PRINT THE DIRECTIONS FOR THIS CRAFT


