Glued To My Crafts

Join thousands of others who have gotten GLUED to our craft tutorials!

  • Home
  • Privacy Policy
  • Craft Safety Guidelines
  • Seasonal Themes
    • New Years
    • Valentine’s Day
    • St. Patrick’s Day
    • Spring
    • Easter
    • Mother’s Day
    • Summer
    • Father’s Day
    • Patriotic
    • Halloween
    • Thanksgiving
    • Fall
    • Winter
    • Christmas
    • Snowmen
    • Story Time
  • About Us
  • Our Amazon Storefront
  • Monthly Themes
    • January Craft Ideas
    • February Craft Ideas
    • March Craft Ideas
    • April Craft Ideas
    • May Craft Ideas
    • June Craft Ideas
    • July Craft Ideas
    • August Craft Ideas
    • September Crafts
    • October Crafts
    • November Crafts
    • December Crafts

Popsicle Stick Porcupine Craft Idea For Kids

When engaging in craft activities, it is important for young children to have adult supervision at ALL times. It is also recommended to use supplies that are suitable for your child's age. Feel free to modify materials or steps to meet your specific requirements. Please refer to our safety guidelines for more information.

As an Amazon Associate I earn from qualifying purchases. This post may contain affiliate links. For more information, please see our disclosure policy.

UPDATE FOR 2026 - To reduce storage costs and download fees, we recently made some changes to our website. The password for all our files this year is GLUEDTOMYCRAFTS2026. No sign-up is required to download our free printables! You can enjoy our printables without creating an account or paying for Box.com. Simply follow the download instructions on our FAQ PAGE.

This wood porcupine craft is perfect for kids! It's a great way to teach them about animals while having fun crafting.
SKIP THE FLUFF AND PRINT THE DIRECTIONS
Craft Foam & Popsicle Stick Porcupine - Kid Craft

Are you looking for a fun and easy craft project to do with your kids? Then this black and brown porcupine made out of craft foam and popsicle sticks MIGHT be the perfect tutorial for you!

Craft Foam & Popsicle Stick Porcupine - Kid Craft

Crafting is a fantastic way to bond with your children while helping them develop creativity and fine motor skills. Whether it’s a rainy afternoon or a scheduled family craft time, creating a popsicle stick porcupine can be an exciting and educational activity.

This blog post will guide you through the steps to make a delightful porcupine using simple materials like popsicle sticks, glue, and paint. Get ready to transform an ordinary item into an extraordinary piece of art with your kids!

Craft Foam & Popsicle Stick Porcupine - Kid Craft

Crafting a popsicle stick porcupine is a delightful and educational activity that offers numerous benefits for children. From enhancing creativity to improving fine motor skills, this simple craft project is both fun and enriching.

By following the steps outlined in this blog post, you can create a charming porcupine with your child and enjoy quality time together.

Craft Supplies:

Before you begin, gather the following materials:

  • Jumbo Popsicle Sticks – 3 per craft
  • School Glue
  • Brown Craft Paint
  • Paint Brush
  • Paper Plate
  • Black Craft Foam
  • Brown Cardstock Paper
  • Brown Scrapbook Paper
  • Black Cardstock Paper
  • Scissors
  • Small Wiggle Eyes

Directions:

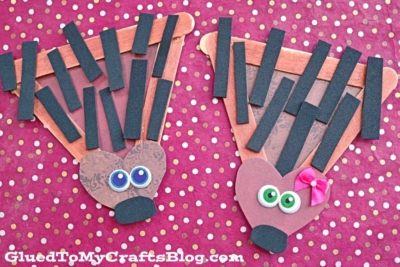
  • Start by taking three popsicle sticks for each porcupine you want to make and glue them together to form a triangle shape.
  • Set the triangle aside and let it dry completely before moving on.
  • Repeat this step for each porcupine you plan to create.
  • Once the triangle has dried, paint it entirely brown and set it aside again to dry thoroughly.
  • While the paint dries, cut out a triangular shape from brown scrapbook paper. This piece will fit inside the popsicle stick triangle and form the porcupine’s body.
  • Next, use brown cardstock to cut out a heart-shaped head and black cardstock to create a small oval-shaped nose.
  • Attach the paper pieces to the painted popsicle stick triangle using glue.
  • Now, grab your black craft foam and cut out small strips to serve as the porcupine’s quills.
  • To bring your Popsicle Stick Porcupine to life, glue the foam quills all over the decorated triangle, and finish it off with wiggly eyes.
  • Let the completed craft dry fully before displaying it proudly!
  • If you are looking for another porcupine craft idea, head on over to our paper plate version!

Book Suggestions:

Here are a few recommended books to complement our craft tutorial:

  • The Prickly Little Porcupine by Jill Horton
  • Penny Lu Porcupine by Katie Gilstrap
  • No Hugs for Porcupine by Zoe Waring
  • Porcupine and Cactus by Katie Frawley
  • Porcupine Hugs by Belle Brown

RELATED —> Crinkle Paper Pet Fish

Craft Foam & Popsicle Stick Porcupine

If you are looking for even MORE easy craft ideas, from Glued To My Crafts, be sure to check out these fun posts listed below.

  • Wooden Spoon Bees
  • Popsicle Stick Birthday Candles
  • Paper Plate Unicorn
  • Thumbprint Dandelion
  • Popsicle Stick Unicorn
  • Strawberry Fairies
  • Handprint Duck
  • Coffee Filter Monsters
  • Craft Foam Snowman
  • Ice Cream Gnome

stacey-signature-2023


Craft Foam & Popsicle Stick Porcupine - Kid Craft
PRINT

Popsicle Stick Porcupine Craft Idea For Kids

This wood porcupine craft is perfect for kids! It's a great way to teach them about animals while having fun crafting.

Here’s your checklist of supplies to bring this craft to life:

  • 3 Jumbo Popsicle Sticks
  • Craft Paint
  • Cardstock Paper
  • Craft Foam
  • Scrapbook Paper
  • 2 Wiggle Eyes
  • School Glue
  • 1 Foam Paint Brush
  • 1 Small Paper Plate
  • 1 Craft Scissors

Prepare your creative haven by laying down a protective cover before the crafting magic begins!

Directions:

  • First grab three popsicle sticks {three per porcupine} and glue them together to look like a triangle.
  • Set aside to let it dry completely.
  • Repeat for each porcupine piece you want to make today.
  • When the triangle shape is dry enough, go ahead and paint it completely brown.
  • Again, set it aside to allow it to dry completely.
  • While that is drying, grab your brown scrapbook paper and cut a triangular shape that will be placed within the popsicle stick design and be body of the porcupine.
  • At this time, you should also cut out a heart shaped head out of the brown cardstock and a small oval nose from the black.
  • Now glue your paper pieces in place, on the painted popsicle stick shape.
  • Now grab your black craft foam and have children cut out small stripes to be the spikes of the porcupine.
  • To finish off the Popsicle Stick Porcupine – have children glue on their black "quills" all over the decorated craft stick piece, as well as the wiggle eyes.
  • Then set aside to let it dry completely before displaying proudly!
    Craft Foam & Popsicle Stick Porcupine
MINI-HEARTS-page-separator-logo-gluedtomycrafts

CLICK HERE TO PRINT THE DIRECTIONS FOR THIS CRAFT

If you've enjoyed our content or have any thoughts to share, we'd love to hear from you! Mention @gluedtomycrafts or tag #gluedtomycrafts on Instagram!

Craft Activity Safety Guidelines:

Always Ensure Adult Supervision - Young children should be supervised at all times when engaging in craft activities. This is essential to keep them safe and ensure materials are used correctly. Use Age-Appropriate Supplies - Choose craft supplies that are suitable for your child’s age. Check labels for recommendations and avoid items with small parts or sharp edges for younger children. Modify as Needed - Feel free to adapt materials or steps to meet your child's abilities and safety needs. For example, substitute scissors with safety scissors if necessary. Keep an Eye on Allergies - Be mindful of potential allergens in craft materials like glue, paint, or certain fabrics. Opt for non-toxic and hypoallergenic options whenever possible. Organize and Secure Supplies - Keep all craft tools and materials organized. Store sharp objects, small parts, and potentially hazardous items out of reach when not in use. Following these guidelines will ensure that crafts remain fun, creative, and, most importantly, safe for everyone involved!


OUR PRIVACY POLICY

OUR COPYRIGHT POLICY

  • Email
  • Facebook
  • Instagram
  • Pinterest
  • Twitter
  • YouTube

LOOKING FOR SOMETHING?

EXPLORE OUR SITE:

TRENDING TODAY:

  • A pink hand-shaped bookmark with red heart stickers and star confetti surrounds a round note that reads a heartfelt message about love and reading. The image is from GluedToMyCraftsBlog.com. Handprint Bookmark Keepsake: A Gift That Holds Your Spot
  • A handmade Valentine’s Day craft featuring a red rose made of torn paper, two green handprint leaves, a glue bottle, heart decorations, and a message: “LOOK WHAT I MADE - A ROSE THAT WON’T FADE! WISHING YOU LOVE THIS VALENTINE’S DAY!”. Torn Paper Rose Card Craft Tutorial for Valentine’s Day
  • A colorful craft project featuring a yellow felt moon, sparkly stars, and heart shapes, with glue and a heartfelt message. Torn Paper Love You To The Moon and Back Card Craft Idea For Kids
  • A handmade card with a rocket drawing, hearts, and messages of love. Felt hearts and an envelope are around it. Handprint Rocket Keepsake - I Love You Because
  • A colorful paper craft featuring a red and pink painted paper plate with yellow circles in the center, green handprint cutouts as leaves, surrounded by craft supplies, heart decorations, and paint bottles. Paint Splat Valentine's Day Flower Craft Idea
  • A vibrant Valentine's Day craft showcasing a torn-paper bumblebee with googly eyes on a white sheet, accompanied by the text "MY VALENTINE!" The scene is decorated with felt hearts, heart-shaped gems, and patterned papers, with a glue bottle and crafting supplies adding to the creative atmosphere. Torn Paper Bee My Valentine Card Craft Idea For Valentine's Day
  • A flat lay of handmade Valentine’s Day cards and decorations, including paper flowers, felt hearts, an envelope, and printed cards with romantic poems, arranged on a gray and pink background. Capture Memories With These 6 Handprint Flower Poems
  • Flat lay of a torn paper dandelion craft featuring a white sheet with a black dandelion outline. Torn yellow, pink, and purple paper pieces are glued to the dandelion head, simulating seeds. Surrounding the craft are Elmer's glue, felt hearts, paper flowers, and patterned scrapbook paper. The text 'MAKING WISHES, ONE PIECE OF PAPER AT A TIME.' and 'GluedToMyCraftsBlog.com' are printed on the white sheet. Torn Paper Dandelion Craft: Making Wishes, One Piece at a Time
  • A playful torn paper cactus craft with hearts and flowers. Includes glue and felt hearts. Torn Paper Cactus Card: A Sweet Mother's Day Craft
  • A colorful handprint craft made from purple paper with glitter edges sits on a multicolored polka dot background. A round tag with a poem is attached below, tied with red and white string. Flowers are visible in the corner. Easy Handprint Flower Craft with Poem – Perfect Spring DIY for Kids

© 2012–2026 Glued To My Crafts
All activities should be supervised by an adult at all times. Please refer to our safety guidelines for more information.


Please note that all the content of the website, including printables, are for classroom and personal use only. This means that any digital item you download from our site can be used for non-commercial use only. We kindly request that you do not reproduce or sell our creations. We appreciate your understanding and cooperation in respecting our content and intellectual property rights.

Accessibility Adjustments

Powered by OneTap

How long do you want to hide the toolbar?
Hide Toolbar Duration
Select your accessibility profile
Vision Impaired Mode
Enhances website's visuals
Seizure Safe Profile
Clear flashes & reduces color
ADHD Friendly Mode
Focused browsing, distraction-free
Blindness Mode
Reduces distractions, improves focus
Epilepsy Safe Mode
Dims colors and stops blinking
Content Modules
Font Size

Default

Line Height

Default

Color Modules
Orientation Modules