
This is our children’s book inspired Paper Plate Little Red Riding Hood craft tutorial! Check it out and recreate it after story time!

Little Red Riding Hood Craft
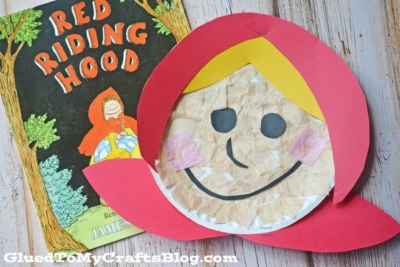
Hi my favorite crafty folks! If you LOVE the classic childhood story of Little Red Riding Hood – you are going to LOVE today’s kid friendly craft idea that is centered around the book, retold by James Marshall.
“A thoroughly modern, thoroughly charming retelling of the old favorite. Witty and direct . . . both Granny and child are swallowed, then rescued intact by the hunter who kills the wolf. . . . A perfect union of words, story, and illustration.”–Kirkus Reviews.
Not only is today’s paper plate kid craft super simple, inexpensive and fun for all ages – but it also ties everything together with the classic “Red Riding Hood” story. You can easily make a full afternoon out of it as you celebrate some crafty time, as well as story time together!
So what are you waiting for? Don’t let the wolf “eat” your creative juices! Grab those simple craft supplies and follow my step-by-step tutorial below, to let the fun begin!
Happy crafting, with your child today! Don’t forget to share pictures of your child’s finished Little Red Riding Hood paper plate craft by tagging us on Instagram when you are done, so we can admire it from a far! I can’t wait to see her come to life and smiling in your home! #gluedtomycrafts
RELATED —> Paper Plate Hot Air Balloon

GRAB THE “RED RIDING HOOD” BOOK VIA OUR AMAZON AFFILIATE LINK
Let your child’s creativity take the lead and make a memorable Little Red Riding Hood craft! All you need is a few paper plates, tissue paper, and some imagination.
Craft Supplies:
- Large Paper Plate – 1 per craft
- Skin-tone Tissue Paper
- Red Cardstock Paper
- Black Cardstock Paper
- Yellow Cardstock Paper
- School Glue
- Scissors
- Stapler
Directions:
- First cut your tissue paper into small squares.
- Take your paper plate and put a good amount of glue all over it.
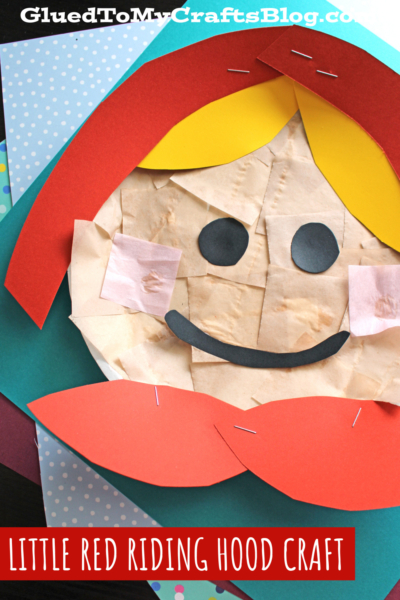
- Have children place the tissue paper on top of the glue, until the paper plate is completely covered. This is Little Red Riding Hood’s face.
- While they are working on that, cut out little girl facial features from the cardstock. Think eyes, nose, hair and of course – that iconic red hood!
- To finish off the Little Red Riding Hood paper plate craft – staple/glue the cardstock paper pieces in their designated spots on the paper plate.
- Then display proudly! {or add other embellishments to really make it your own!}
RELATED —> Handprint Chicken Puppet
If you are looking for even MORE easy kid craft ideas that go along with children’s books, be sure to check out these fun posts:
- Paper Plate Spaghetti
- Paper Plate Muffin
- Paper Plate Taco
- Paper Plate Cookie
- Paper Plate Leopard
- Paper Plate Pancake
- Paper Plate Reindeer
- Paper Plate Paddington

Paper Plate Little Red Riding Hood Craft
Here’s your checklist of supplies to bring this craft to life:
Prepare your creative haven by laying down a protective cover before the crafting magic begins!
Directions:
- First cut your tissue paper into small squares.Tissue Paper
- Take your paper plate and put a good amount of glue all over it.1 Large Paper Plate
- Have children place the tissue paper on top of the glue, until the paper plate is completely covered. This is Little Red Riding Hood's face.
- While they are working on that, cut out little girl facial features from the cardstock paper. Think eyes, nose, hair and of course - that iconic red hood!Cardstock Paper
- To finish off the Little Red Riding Hood craft – staple/glue the cardstock pieces in their designated spots on the paper plate.
- Then display proudly!

Grab our favorite books via our Amazon affiliate link! In our Amazon storefront you will find books, toys and craft supplies we absolutely love using for our Glued To My Crafts tutorials!