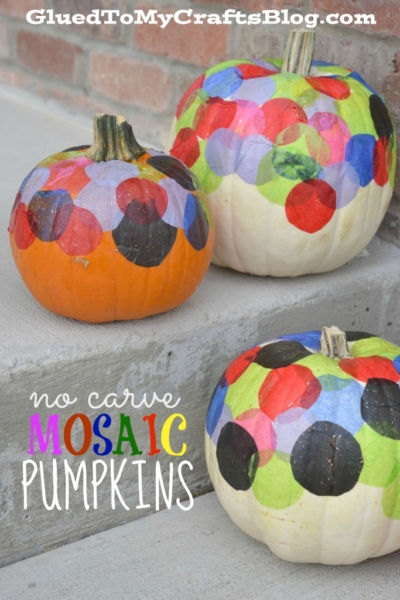
Switching up your Halloween decorations this year? Get in on the trend with some mosaic pumpkins! They’re cute, creative and will give your home an eye-catching look that’ll leave your guests in awe.
Tissue Paper Covered Pumpkins For Halloween Decor
Do you love the idea of decorating pumpkins but hate the messy “guts” part? Well – skip the mess and go for a NO CARVE crafty option this year!
Today’s No Carve Mosaic Pumpkins are as simple as it gets! No need for special tools or designer skills. Just a little creativity and some inexpensive supplies you probably already have in your home. We are talking only a few dollars for a one-of-kind, impressive look!
So what are you waiting for? These colorful polka dot pumpkins are super easy to whip up and I hope you are inspired to make your own today too!
Happy crafting and decorating your home for Halloween, my friends! Don’t forget to snap a few pictures of your finished mosaic tissue paper covered pumpkins and share them on our Facebook page, so we can admire them from a far! #gluedtomycrafts
RELATED —> Mosaic Vase

Get creative this Halloween season and make your own festive mosaic pumpkins – the possibilities are endless!
Craft Supplies:
- Pumpkins {big or small, real or fake}
- Glitter Glue or White School Glue
- Tissue Paper
- Scissors
- Paint Brushes
- Paper Plate
RELATED —> Pumpkin Painting


Directions:
- First cut your tissue paper into small circles {or any shape/design you like}
- Next squirt some glue on a paper plate.
- Grab your paint brush, dip it in the glue and then on the pumpkin. Working in small sections, paint some glue on the pumpkin, then add your tissue paper circles on top and finish off with more glue on top to seal in the tissue paper.
- Repeat until your pumpkin is completely covered or you have the mosaic design you like.
- Once done, set aside to let it dry completely before displaying proudly! {BTW – before the glue dries completely, you also add more glitter on top to really give it flair!}
RELATED —> No Carve Pumpkin Ideas


I hope you are inspired to recreate our no carve pumpkin craft today! We also have our Jack-O-Lantern Pumpkin post for you to check out today!
