It's perfect to recreate ANY day of the year, especially on those days you "might" be stuck indoors!

Learn how to make this fun and easy yellow sunshine craft using a plastic fork and paint!

We are hoping to bring TONS of BRIGHT rays of sunshine into your home, with our easy Paper & Paint Sunshine kids craft tutorial today! It’s perfect to recreate ANY day of the year, especially on those days you “might” be stuck indoors, hoping for better weather.
On that note, it’s the perfect craft for YOU and your child! Just keep scrolling for all the details as well as the FREE sunglasses printable to get you started even faster!
I really do hope you are inspired to make our fun sun craft with your little crafter today! Happy crafting, my friends!!!
Bring some sunshine indoors with this fun and easy craft idea! Make your own fork-painted sun beams and brighten up your day.
Craft Supplies:
- Plastic Fork
- Yellow Craft Paint
- Small Paper Plate
- Large Yellow Cupcake Liner
- Glue Stick
- Dark Blue Cardstock Paper
- Choice of Color Cardstock Paper
- SUNGLASS Printable – on our landing page
- Loose Craft Glitter
- Black Sharpie Marker
Directions:
- First things first – print out the blank SUNGLASSES printable, listed above, on your choice of colored cardstock paper. One print gives you TWO cutouts to use.
- Using your scissors, cut out one of the sunglass shapes from the printable. Set it aside.
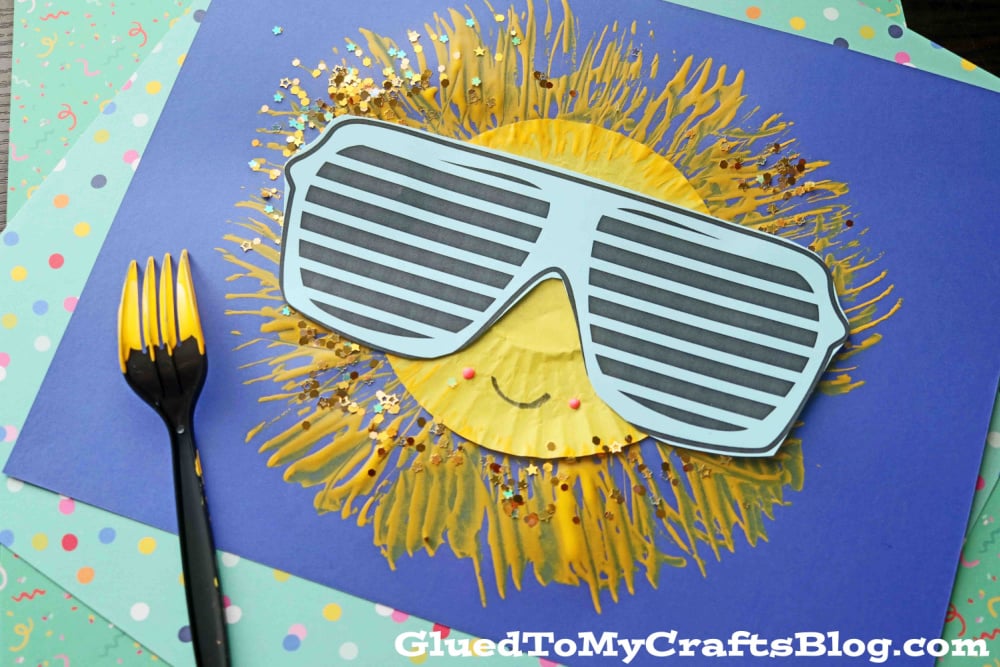
- Next up – grab your yellow cupcake liner, the glue stick and a sheet of dark blue cardstock paper.
- Flatten out the cupcake liner with your hands and glue it down in the center of the blue paper.
- Next squirt some yellow craft paint on the small paper plate.
- Go ahead and dip the plastic fork in the paint.
- Now take the paint covered fork and use it as a paint brush to “paint” rays coming out of the yellow cupcake liner.
- When done adding the yellow fork prints, shake some loose craft glitter on top of the wet paint for some dimension and extra sparkle.
- Finally – the last step of this fork painted sun craft is to glue the sunglasses you cut out earlier, in place, as well as drawing on a simple smile underneath.
- At this point in time you can add other embellishments you see fit.
- When done decorating the paper, set it aside to let it dry completely before displaying proudly!
Pair your finished craft with our Sunglasses Turned Snowman Ornament tutorial.
If you are looking for even MORE fun craft ideas that are perfect for ANY day of the year, be sure to check out these craft projects listed below!
All of which are my personal favorites and would pair nicely with today’s fork painted sunshine craft!!
- Paper Doily Sunshine
- Popsicle Stick Sunshine
- My Sunshine Keepsake
- Chalk Art Sunshine
- Washi Tape Sunshine Card
- Paper Plate Sun
- Mixed Media Sunglasses Craft

Fork Painted Sunshine Craft For Kids
It's perfect to recreate ANY day of the year, especially on those days you "might" be stuck indoors!
Here’s your checklist of supplies to bring this craft to life:
Prepare your creative haven by laying down a protective cover before the crafting magic begins!
Directions:
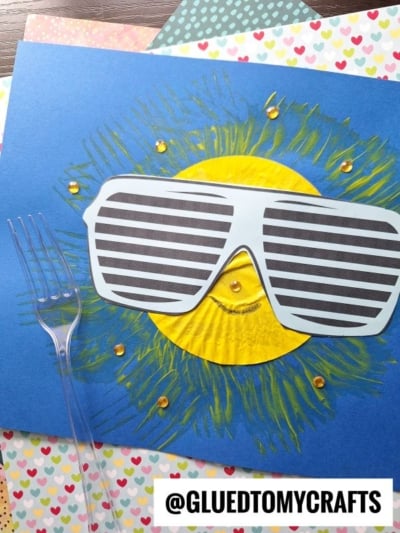
- First things first - print out the blank SUNGLASSES printable, on a single sheet of light blue cardstock paper. One print gives you TWO cutouts to use.
- Using your scissors, cut out one of the sunglass shapes from the printable. Set it aside.
- Next up - grab your yellow cupcake liner, the glue stick and a sheet of dark blue cardstock paper.Cardstock Paper
- Flatten out the cupcake liner with your hands and glue it down in the center of the blue paper.Cupcake Liner
- Next squirt some yellow craft paint on the small paper plate.Craft Paint
- Go ahead and dip the plastic fork in the paint.
- Now take the paint covered fork and use it as a paint brush to "paint" rays coming out of the yellow cupcake liner.
- When done adding the yellow fork prints, shake some loose craft glitter on top of the wet paint for some dimension and extra sparkle.Loose Craft Glitter
- Finally - the last step of this fork painted sun craft is to glue the sunglasses you cut out earlier, in place, as well as drawing on a simple smile underneath.Sharpie Paint Pens
- At this point in time you can add other embellishments you see fit.
- When done decorating the paper, set it aside to let it dry completely before displaying proudly!


NEED MORE HELP DOWNLOADING OUR FREE PRINTABLES? PLEASE REFER TO OUR FAQ PAGE
If you've enjoyed our content or have any thoughts to share, we'd love to hear from you! Mention @gluedtomycrafts or tag #gluedtomycrafts on Instagram!