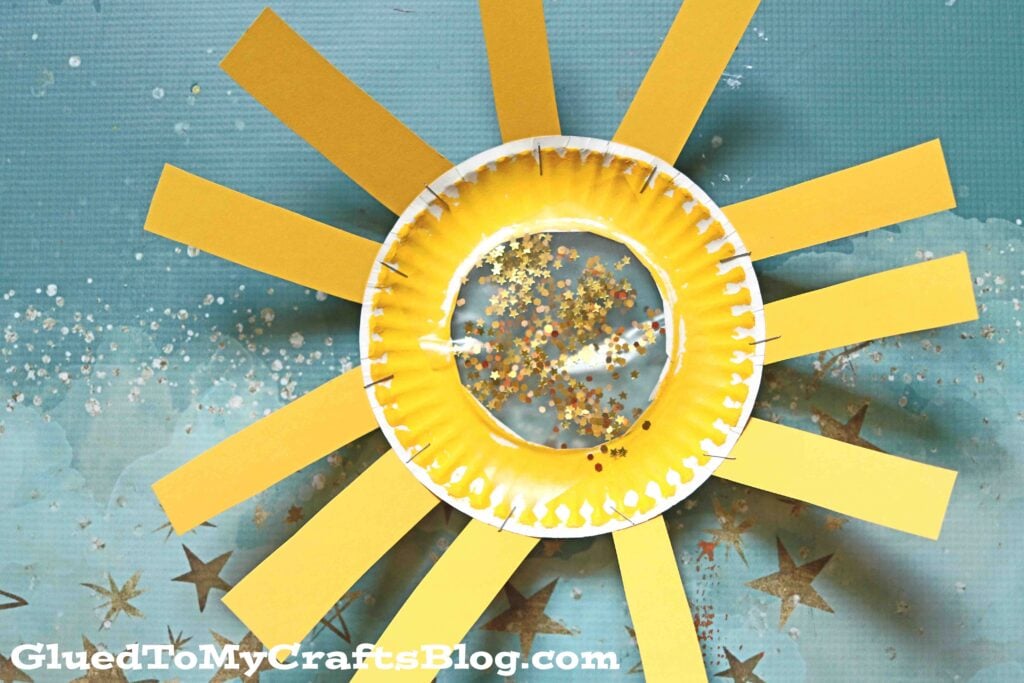
This paper plate sun craft is a perfect way to bring a beautiful ray of sunshine in your home, within minutes!


We are sending YOU and your little crafter at home, some warm sunny rays your way with today’s Paper Plate Suncatcher Sunshine kids craft idea!
Inexpensive paper plates make for the PERFECT canvas to create a beautiful ray of sunshine within minutes! My favorite part though is the “suncatcher” aspect that is made with clear contact paper and loose craft glitter.
Today’s suncatcher tutorial is a brightly colored sun kid craft idea that is absolutely perfect for spring, summer or honestly – ANY day of the year. Make several yellow suns at once in an infinite of colors, sizes and designs. Then display proudly on a window for ALL to see and enjoy!
Super simple to pull together, so you have NO excuse not to recreate it with your child today. So let’s “catch the light” together by following the FULL paper plate sun craft tutorial below! Happy crafting, my friends!!!
Brighten your day with this paper plate suncatcher sunshine craft! A cheerful and easy activity for kids to add a splash of color to any window.
Craft Supplies:
- Large Paper Plate
- Marker or Pen
- Yellow Craft Paint
- Paint Brush
- Clear Contact Paper
- Scissors
- Yellow Cardstock Paper
- Glitter/Sequins
- Stapler
Directions:
- First cut the center area out of your paper plate, leaving the rim intact. Do not cut on the rim of the paper plate. This is VERY important!
- Repeat for each piece you want to make.
- Before you discard the inner paper plate piece – use it as a template to cut your contact paper. You will want to trace/cut your contact paper slightly larger than the inner piece.
- Be sure to cut out TWO pieces of contact paper per paper plate craft.
- Once done, you may discard the inner paper plate piece.
- Now you are ready for paint! Have children paint their paper plate rim piece completely yellow.
- Once done, go ahead and grab your painted paper plate rim and TWO pieces of contact paper.
- Remove the backing off ONE piece of contact paper and place it on the paper plate piece.
- Flip it over and have children add glitter/sequins on top to create the center of their sun.
- Once they are done with that step, go ahead and remove the backing of the other piece of contact paper and place it on top of the glitter/sequins to seal everything in.
- Set everything aside.
- Now grab your cardstock and cut out sunshine rays. Depending on the size you cut, you may need 8-10 pieces.
- To finish off your Paper Plate Suncatcher Sun – have children staple on their cardstock paper rays around the paper plate piece.
- Then add other embellishments they see fit before displaying proudly!
RELATED —> My Sunshine Keepsake
AFFILIATE LINK – PAIR OUR CRAFT IDEA WITH THIS BOOK RECOMMENDATION
Be sure to check out our Suncatcher Snowman post for another fun idea to make this time of year! #gluedtomycrafts

Paper Plate Suncatcher Sunshine
This paper plate sun craft is a perfect way to bring a beautiful ray of sunshine in your home, within minutes!
Here’s your checklist of supplies to bring this craft to life:
Prepare your creative haven by laying down a protective cover before the crafting magic begins!
Directions:
- First cut the center area out of your paper plate, leaving the rim intact. Do not cut on the rim of the paper plate. This is VERY important!1 Large Paper Plate
- Before you discard the inner paper plate piece - use it as a template to cut your contact paper. You will want to trace/cut your contact paper slightly larger than the inner piece. Be sure to cut out TWO pieces of contact paper per paper plate craft. Once done, you may discard the inner paper plate piece.Clear Contact Paper
- Now you are ready for paint! Have children paint their paper plate rim piece completely yellow.Craft Paint
- Once done, go ahead and grab your painted paper plate rim and TWO pieces of contact paper. Remove the backing off ONE piece of contact paper and place it on the paper plate piece.
- Flip it over and have children add glitter/sequins on top to create the center of their sun.Loose Craft Glitter , Craft Sequins
- Once they are done with that step, go ahead and remove the backing of the other piece of contact paper and place it on top of the glitter/sequins to seal everything in. Set everything aside.
- Now grab your cardstock and cut out sunshine rays. Depending on the size you cut, you may need 8-10 pieces.Cardstock Paper
- To finish off your Paper Plate Suncatcher Sun - have children staple on their cardstock rays around the paper plate piece.
- Then add other embellishments they see fit before displaying proudly!


CLICK HERE TO PRINT THE DIRECTIONS FOR THIS CRAFT
If you've enjoyed our content or have any thoughts to share, we'd love to hear from you! Mention @gluedtomycrafts or tag #gluedtomycrafts on Instagram!