With our yellow sunshine craft, you can make some one-of-a-kind pieces that ANYONE will love to get in the mail ANY TIME OF YEAR!

Sending snail mail is always a fun way to let your loved ones know you’re thinking of them, no matter the occasion. And, today’s kids craft idea is the perfect way to do just that!
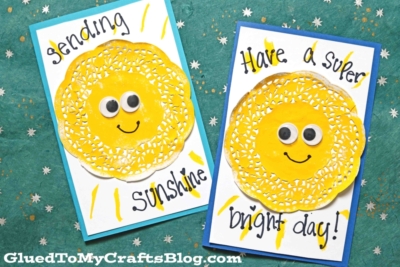
These Paper Doily Sunshine Cards are so easy to make and are super adorable. So, whether you’re wanting to send a “Happy Birthday” card, a “Thinking of You” card or just a “Hey Friend!” card, today’s kids craft is perfect for all of those occasions.
It’s Crafty Fun For Every Skill Level! With today’s Paper Doily Sunshine Cards craft tutorial, you and your child can make some one-of-a-kind sun ray pieces that ANYONE will love to get in the mail any day of the year!
Using simple white or yellow paper doilies {maybe you have some left over from Valentine’s Day} you can create “sunshine faces” with just a matter of a sticky glue stick and a few embellishments. This fast paced DIY is super simple, really inexpensive but “oh so fun” to spread cheer! All skill levels are welcomed here!
Create some crafty memories that are bright and sunny, while sending out some #happymail to friends and family afar, with today’s Paper Doily Sunshine Cards tutorial!
So don’t delay – get the kids {and adults} involved and make some extra special #happymail to send to someone you love today! Maybe they just need some sunshine for a little pick me up! Happy crafting, my friends!!!

All you need are some basic supplies like paper doilies, glue and scissors and you’re good to go! So, what are you waiting for? Get crafting and spread some happiness with today’s Yellow Sunshine Cards craft idea!
Card Supplies:
- White Circular Paper Doilies – 1 per card
- Yellow Crayon or Paint Crayon
- Cardstock Cards
- Cardstock Paper
- Glue Stick
- Small Wiggle Eyes
- Scissors/Paper Trimmer
- Black Sharpie Marker
Directions:
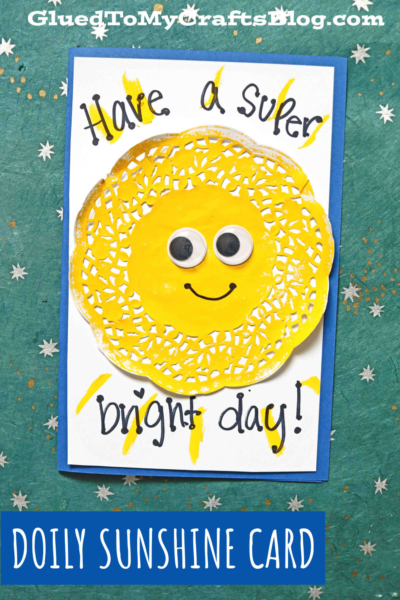
- First trim down a sheet of white cardstock paper to fit to the front of your card front. This will be the “sky” for your sun. You can use scissors or a paper trimmer for this step. You will want the white piece to be slightly smaller than the folded card, so you have some color around the edges.
- Glue the freshly cut piece to the card front. Repeat for each card you are making.
- Next grab ONE paper doily per card and a yellow crayon.
- Color the paper doily carefully, completely yellow. You can also skip this step and buy pre-made yellow paper doilies if desired.
- Next glue your colored paper doily to the center of your cardstock card front.
- Take the yellow crayon and draw lines coming from the sun to make “sun beams.”
- Finish off your Sunshine Cards by gluing on the wiggle eyes and drawing on a mouth with the black Sharpie marker.
- Add other embellishments you see fit.
- Then write a sweet message on the outside {like “sending you some sunshine!” as well as something clever inside, before mailing away!
RELATED —> “My Sunshine” Keepsake
AFFILIATE LINK – PAIR OUR CRAFT IDEA WITH THIS BOOK RECOMMENDATION
If you loved today paper doily sunshine card idea, be sure to also check out our Cupcake Liner Emoji and Paper Doily Cupcake card posts for even more HAPPY MAIL ideas!!!
Both of which would pair nicely with today’s paper sun card tutorial – hint hint!
BE SURE TO FOLLOW US ON PINTEREST SO YOU NEVER MISS A TUTORIAL FROM US!

Paper Doily Sunshine Card Craft Idea
With our yellow sunshine craft, you can make some one-of-a-kind pieces that ANYONE will love to get in the mail ANY TIME OF YEAR!
Here’s your checklist of supplies to bring this craft to life:
Prepare your creative haven by laying down a protective cover before the crafting magic begins!
Directions:
- First trim down a sheet of white cardstock to fit to the front of your card front. This will be the "sky" for your sun. You can use scissors or a paper trimmer for this step. You will want the white piece to be slightly smaller than the folded card, so you have some color around the edges.
- Glue the freshly cut piece to the card front. Repeat for each card you are making.
- Next grab ONE paper doily per card and a yellow crayon.
- Color the paper doily carefully, completely yellow. You can also skip this step and buy pre-made yellow paper doilies if desired.
- Next glue your colored paper doily to the center of your cardstock card front.
- Take the yellow crayon and draw lines coming from the sun to make "sun beams."
- Finish off your Sunshine Cards by gluing on the wiggle eyes and drawing on a mouth with the black Sharpie marker.
- Add other embellishments you see fit.
- Then write a sweet message on the outside {like "sending you some sunshine!" as well as something clever inside, before mailing away!

CLICK HERE TO PRINT THE DIRECTIONS FOR THIS CRAFT
If you've enjoyed our content or have any thoughts to share, we'd love to hear from you! Mention @gluedtomycrafts or tag #gluedtomycrafts on Instagram!