Get ready to glue, cut and design your own popsicle stick BUZZING gnome today!

With just a few simple materials, you and your little ones can create adorable BEE GNOME out of popsicle sticks. In this blog post, we will walk you through step-by-step instructions on how to make these cute creatures using items you may already have at home. Let’s get started!

Spring is abuzz with the vibrancy of life returning to the great outdoors, making it the perfect time to get crafty with your little ones. What’s cuter than a gnome? A bee gnome, of course! This delightful craft fuses the adorability of garden gnomes with the wonderful world of busy bees.
Perfect for a lazy Saturday morning or a creative afternoon after school, bee gnomes crafted from simple popsicle sticks bring a touch of whimsy to any household.
This step-by-step guide is not only about creating whimsical characters but also about encouraging kids to harness their creativity, motor skills, and patience.
So gather up your supplies and get ready to buzz into a world of imagination and adventure with our popsicle stick bumblebee gnome craft!

Looking for a fun and easy craft project to do with your child? Try this popsicle stick bumble bee gnome craft idea! It’s great for preschoolers through elementary students to make this spring season!
Craft Supplies:
- Jumbo Wood Sticks – 3 per craft
- School Glue
- Yellow Craft Paint
- Small Paper Plate
- Paint Brush
- Scissors
- Scrapbook Paper
- White Cardstock Paper
- Black Cardstock Paper
- Tan Cardstock Paper
Directions:
- The fun starts here! First things first – grab three popsicle sticks {three per bee gnome} as well as your painting supplies.
- Squirt your craft paint on the paper plate.
- Grab your paint brush and go ahead & paint the THREE popsicle sticks completely.
- Next up – glue the three painted sticks together to look like a triangle with the school glue.
- Set aside the triangle piece to let it dry completely.
- Repeat for each spring inspired gnome you want to make today.
- While that is drying, grab all your paper sheets and scissors.
- Cut a triangular shape, from the scrapbook paper paper, that will be placed within the popsicle stick design and be the body of the gnome.
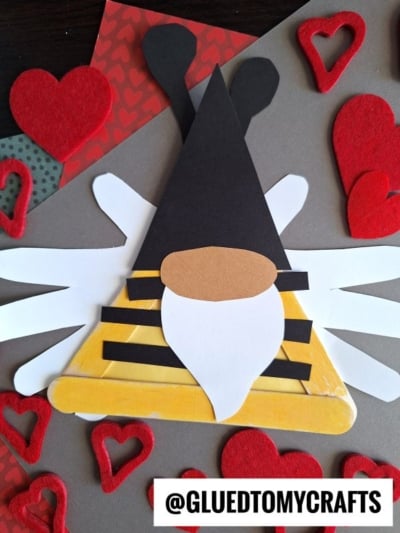
- Out of the remaining cardstock, you want to cut out a long white beard, a triangle hat, antennas, oval shaped nose and of course, two handprint wings.
- To finish off y our Yellow Bumble Bee Gnome – go ahead and glue all your paper pieces in place, with some school glue on the painted popsicle stick shape. The large triangle will go on the back of the popsicle stick shape along with the wings, while all the other pieces go on the front.
- Then add other embellishments they see fit to complete the look.
- Once done, set aside to let it dry completely before displaying proudly!
- Don’t forget to share pictures with us on your social media sites! #gluedtomycrafts
RELATED —> Paper Plate Bee

We got ALL the fun, crafty stuff you love and need! If you are looking for even MORE easy spring themed kid craft ideas, from Glued To My Crafts, be sure to check out these fun posts listed below.
Popsicle Stick Bee Gnome Craft Idea
Get ready to glue, cut and design your own popsicle stick BUZZING gnome today!
Here’s your checklist of supplies to bring this craft to life:
- School Glue
- 1 Scissors
Prepare your creative haven by laying down a protective cover before the crafting magic begins!
Directions:
- The fun starts here! First things first - grab three popsicle sticks {three per bee gnome} as well as your painting supplies.
- Squirt your craft paint on the paper plate.
- Grab your paint brush and go ahead & paint the THREE popsicle sticks completely.
- Next up - glue the three painted sticks together to look like a triangle with the school glue.
- Set aside the triangle piece to let it dry completely.
- Repeat for each spring inspired gnome you want to make today.
- While that is drying, grab all your paper sheets and scissors.
- Cut a triangular shape, from the scrapbook paper paper, that will be placed within the popsicle stick design and be the body of the gnome.
- Out of the remaining cardstock, you want to cut out a long white beard, a triangle hat, antennas, oval shaped nose and of course, two handprint wings.
- To finish off y our Yellow Bumble Bee Gnome – go ahead and glue all your paper pieces in place, with some school glue on the painted popsicle stick shape. The large triangle will go on the back of the popsicle stick shape along with the wings, while all the other pieces go on the front.
- Then add other embellishments they see fit to complete the look.
- Once done, set aside to let it dry completely before displaying proudly!


Grab our favorite books via our Amazon affiliate link! In our Amazon storefront you will find books, toys and craft supplies we absolutely love using for our Glued To My Crafts tutorials!

If you've enjoyed our content or have any thoughts to share, we'd love to hear from you! Mention @gluedtomycrafts or tag #gluedtomycrafts on Instagram!