
Today’s frosted cupcake kids craft tutorial will make your little child’s crafty heart float with happiness!
Come check out and recreate this super sweet Paper Cupcake Hot Air Balloon tutorial that we are sharing today! I even have you covered with a free printable to get you started with ease! Just keep scrolling to grab it!

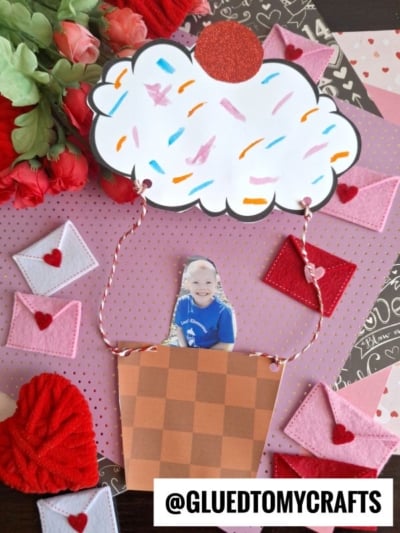
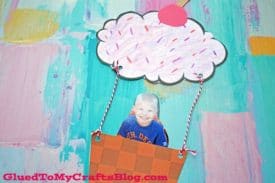
Paper Valentine Hot Air Balloon
You won’t believe how EASY it is to pull together this Frosted Cupcake Hot Air Balloon kid craft idea! It all starts with our FREE printable and a simple 4×6″ picture of your child {so they can fly away in their custom hot air balloon piece!} That’s it!
From there, you can grab ANY type of coloring utensil you might have in your craft stash, to give your paper cupcake hot air balloon that bakery worthy look. From markers to crayons, to breaking out the watercolors, no two pieces will be alike and I think that’s my favorite element of all!
So what are you waiting for?! Make the most of your afternoon by checking out {and recreating} our extra sweet frosted cupcake themed tutorial.
In the details below, you can grab our FREE FROSTING & BASKET PRINTABLE to use in your creation and making it even faster to recreate! Happy crafting, my friends!
RELATED —> Hot Air Balloon Keepsake

A fun and easy Valentine’s Day kids craft idea that will keep them entertained! Includes a free printable to help get you started.
Craft Supplies:
- Cupcake Printable – on our landing page
- White Cardstock Paper
- Scissors
- Crayons, Watercolors or Markers
- Cardstock Paper {red and brown}
- Single Hole Punch
- Twine or Ribbon
- 4×6″ Full Body Picture
- Adhesive or Glue Stick
- Embellishments
Directions:
- First download and print the provided cupcake hot air balloon printable listed above, on white cardstock paper. You only need ONE print per craft.
- Go ahead and color in the empty frosting section in the printable, however you like. Really make it your own!
- Once done, trim out the frosting and basket pieces in the printable.
- Discard the remaining paper.
- Set aside your pieces.
- Next grab your printed picture, colored cardstock and scissors.
- Trim around the “body” of your printed picture, so you can “ride” in the hot air balloon.
- Next, take the colored cardstock and cut out a cherry with a stem, for on top of your cupcake.
- When done with the above steps, you are ready to start assembling your cupcake hot air balloon.
- Grab the hole punch, all your paper pieces, scissors and twine.
- Go ahead and hole punch holes in the provided spots on the two printables.
- Now secure your pieces together with two pieces of long twine. The frosting will be on top and the basket, of course on the bottom.
- Finally, adhere your body picture inside the basket with a little adhesive, as well as the paper cherry to the top of everything.
- And that’s it! Add other embellishments you see fit.
- Then display your cupcake hot air balloon proudly for all to see!
RELATED —> Puffy Paint Cupcake
Get ready to be wowed! Learn how to take inexpensive craft materials and turn them into one-of-a-kind art projects with the help of us!!
At Glued To My Crafts we strive to keep the crafty fun going! Check out these past impressive blog posts from us listed below and add them to your craft plans of recreating of today’s paper cupcake hot air balloon tutorial!
- Sunshine Keepsake
- Handprint Owl Hug
- Flower Crown Llama
- Rainbow Cloud Unicorn
- Cupcake Liner Taco Card
- Easter Egg Hot Air Balloon
- Pom Pom Painted Hot Air Balloon
- Places You’ll Go Keepsake
- Hot Air Balloon Keepsake
FOLLOW US ON PINTEREST SO YOU NEVER MISS A NEW TUTORIAL FROM US!

Paper Cupcake Hot Air Balloon Craft
Here’s your checklist of supplies to bring this craft to life:
Prepare your creative haven by laying down a protective cover before the crafting magic begins!
Directions:
- First print out our provided printable, in color, on a single sheet of white cardstock paper. You only need one print per craft.
- Go ahead and color in the empty frosting section in the printable, however you like. Really make it your own!
- Once done, trim out the frosting and basket pieces in the printable. Discard the remaining paper.
- Set aside your pieces.
- Next grab your printed picture, colored cardstock and scissors.
- Trim around the "body" of your printed picture, so you can "ride" in the hot air balloon.
- Next, take the colored cardstock and cut out a cherry with a stem, for on top of your cupcake.
- When done with the above steps, you are ready to start assembling your cupcake hot air balloon.
- Grab the hole punch, all your paper pieces, scissors and twine.
- Go ahead and hole punch holes in the provided spots on the two printables.
- Now secure your pieces together with two pieces of long twine. The frosting will be on top and the basket, of course on the bottom.
- Finally, adhere your body picture inside the basket with a little adhesive, as well as the paper cherry to the top of everything.
- And that's it! Add other embellishments you see fit. Then display your cupcake hot air balloon proudly for all to see!


NEED MORE HELP DOWNLOADING OUR FREE PRINTABLES? PLEASE REFER TO OUR FAQ PAGE