
Santa has found a NEW way to ride in style on Christmas eve, with our latest Paper Plate Reindeer Hot Air Balloon kid craft idea! Keep scrolling for the full how-to, as well as some tips on getting the fun started today!

Reindeer Hot Air Balloon Craft Idea For Christmas
You won’t believe how easy it is to pull together this craft for the holiday season! Our Reindeer Hot Air Balloon tutorial is just a matter of quick trip to the craft store, followed by some simple cutting and assembling!
It’s super straight-forward steps you will find below – I promise. It’s even perfect for the littlest creators in your home to recreate with their own flair!
Santa will be able to kick the traditional sleigh to the curb and find a new way to “float” through the night with our simple tutorial! All it takes is some inexpensive arts and crafts materials & a crafty sprinkle of imagination to make it happen!
Happy crafting, my dear friends! Now read on to see our simple how-to instructions for making this Christmas hot air balloon craft today. Make sure to also scroll to the bottom of this post for even more holiday crafts for kids to make at home this season!
Don’t forget to snap a few pictures to share with us on our Facebook page! I can’t wait to see the holiday themed hot air balloons you design for your Santa friends! #gluedtomycrafts
RELATED —> Paper Plate Christmas Car

Are you looking for a last minute Christmas craft idea? Why not make this adorable paper plate reindeer hot air balloon!
Craft Supplies:
- Small Paper Plate – 1 per craft
- Brown Craft Paint
- Paint Brush
- Large Wiggle Eyes – 2 per craft
- Gold Pipe Cleaner
- Brown Cardstock
- Red Cardstock Paper
- White Cardstock Paper
- Black Cardstock Paper
- Black Sharpie Marker
- Orange Sharpie Marker
- Single Hand Hole Punch
- School Glue or Stapler
- Yarn or Twine
Directions:
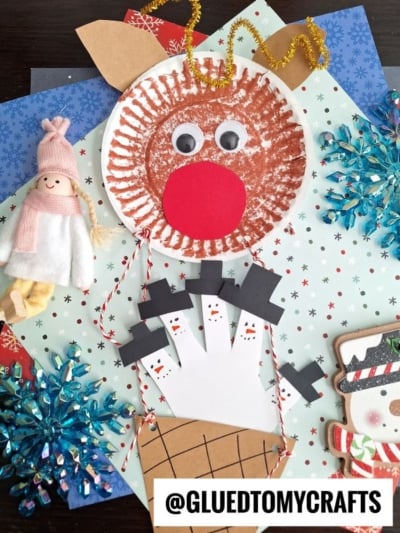
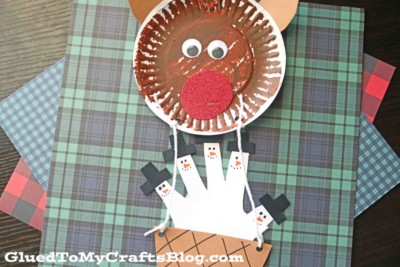
- First things first – paint the small paper plate completely brown.
- Set aside to let it dry completely.
- Now grab ALL your sheets of cardstock paper, along with the scissors and Sharpie markers.
- Out of the white cardstock paper, trace/trim out a handprint shape. This will become snowmen in the next step.
- Out of the black cardstock paper, cut out FIVE tiny hat shapes and glue them to each finger tip of the white handprint cutout.
- Finish that step off by drawing on carrot noses and dotted eyes on each finger tip.
- Set aside the decorated handprint piece for now.
- Out of the red cardstock paper, cut out a circle shape for the reindeer’s nose.
- Out of the brown cardstock paper, cut out TWO petal shapes for the ears and of course – follow that up by cutting out the basket for your snowmen to ride in.
- Now we are heading towards the last few steps!
- Gather all your paper pieces, the painted paper plate, the yarn, scissors and your hole punch.
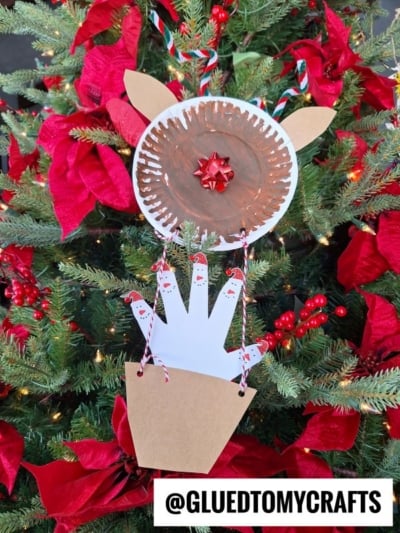
- Take the hole punch and punch two holes in the reindeer head AND the basket cutout you just made, for where the strings will go.
- Now cut TWO long strands of string {about 6 inches, give or take} making sure they are both the same length.
- Go ahead and thread your string through the holes you made in all your pieces, to tie together the hot air balloon {just make sure not to pull too tight or your paper pieces might rip}
- Cut off excess string if need be.
- Now it’s time to assemble the paper plate reindeer head and give it some festive flair!
- Go ahead and glue on the red nose and wiggle eyes onto the center of the paper plate.
- Follow that up by stapling on the pipe cleaner antlers and paper ears.
- FINALLY – secure the snowmen in place, right behind the basket piece.
- Add any other embellishments you see fit.
- Allow it all to dry completely.
- Then display your reindeer head hot air balloon piece proudly for all to see!
- Don’t forget to snap a few pictures to share with us! #gluedtomycrafts
MAKE IT YOUR OWN TODAY: For a fun twist on this craft, you could add a small picture of your child in the basket of the hot air balloon or some other holiday character you like. Maybe a snowman, gingerbread man or even an elf, instead!
RELATED —> Popsicle Stick Reindeer Gnome

Get ready to be wowed this Christmas season and make lasting memories with your child! Learn how to take inexpensive craft materials and turn them into one-of-a-kind art projects with the help of us!!
At Glued To My Crafts we strive to keep the crafty fun going! Check out these past impressive blog posts from us, listed below and recreate them with your child today!
Popsicle Stick Christmas Truck
Paper Gingerbread Man Hot Air Balloon
Paper Plate Reindeer Hot Air Balloon Craft Idea
Here’s your checklist of supplies to bring this craft to life:
- 1 Small Paper Plate
- Craft Paint brown
- 2 Googly Eyes
- 1 Pipe Cleaner gold
- Cardstock Paper brown, red, white and black
- Ribbon or String
Prepare your creative haven by laying down a protective cover before the crafting magic begins!
Directions:
- First things first - paint the small paper plate completely brown.
- Set aside to let it dry completely.
- Now grab ALL your sheets of cardstock paper, along with the scissors and Sharpie markers.
- Out of the white cardstock paper, trace/trim out a handprint shape. This will become snowmen in the next step.
- Out of the black cardstock paper, cut out FIVE tiny hat shapes and glue them to each finger tip of the white handprint cutout.
- Finish that step off by drawing on carrot noses and dotted eyes on each finger tip.
- Set aside the decorated handprint piece for now.
- Out of the red cardstock paper, cut out a circle shape for the reindeer's nose.
- Out of the brown cardstock paper, cut out TWO petal shapes for the ears and of course - follow that up by cutting out the basket for your snowmen to ride in.
- Now we are heading towards the last few steps!
- Gather all your paper pieces, the painted paper plate, the yarn, scissors and your hole punch.
- Take the hole punch and punch two holes in the reindeer head AND the basket cutout you just made, for where the strings will go.
- Now cut TWO long strands of string {about 6 inches, give or take} making sure they are both the same length.
- Go ahead and thread your string through the holes you made in all your pieces, to tie together the hot air balloon {just make sure not to pull too tight or your paper pieces might rip}
- Cut off excess string if need be.
- Now it's time to assemble the paper plate reindeer head and give it some festive flair!
- Go ahead and glue on the red nose and wiggle eyes onto the center of the paper plate.
- Follow that up by stapling on the pipe cleaner antlers and paper ears.
- FINALLY - secure the snowmen in place, right behind the basket piece.
- Add any other embellishments you see fit.
- Allow it all to dry completely.
- Then display your reindeer head hot air balloon piece proudly for all to see!

Grab our favorite books via our Amazon affiliate link! In our Amazon storefront you will find books, toys and craft supplies we absolutely love using for our Glued To My Crafts tutorials!
