Get creative this holiday season with this fun Christmas craft idea!
When I think of Christmas, I instantly think of children writing letters to Santa and running to the mailbox to mail it. So that’s exactly what inspired this Popsicle Stick Christmas Mailbox kid craft idea!
Keep scrolling for the full how-to tutorial from Glued To My Crafts and get ready to recreate your own custom piece with your child today!

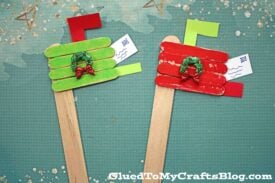
Today’s popsicle stick holiday mailbox tutorial is perfect to use as an ornament on the tree, pretend play in a Christmas town setup or even as a custom gift tag when you add someone’s name to the front of it. I could even see these finished pieces being added to a holiday themed fairy garden!
In fact our Christmas mailbox idea made from popsicle sticks has so many crafty possibilities to it, that you can literally run with this holiday craft idea however you want!
So on that note – what are you waiting for?! Aren’t you excited to recreate one with your child today? Well then – you can find the full tutorial for this popsicle stick mailbox craft below! I can’t wait to see what you both design, so be sure to snap a few pictures of your mailboxes, to share with us on our Facebook page!
Happy crafting, my friends! May your holiday season be extra special with the precious time you spend with your child! We also have our popsicle stick mail truck tutorial that would pair perfectly with today’s idea! #gluedtomycrafts

Get into the holiday spirit and make memories with your kids this year! Our popsicle stick Christmas mailbox craft is a fun way to get creative and keep the holiday cheer alive.
Craft Supplies:
- Mini Popsicle Sticks – 4 per craft
- Jumbo Sized Popsicle Sticks – 1 per craft
- Craft Paint
- Paint Brush
- Paper Plate
- School Glue
- Cardstock Paper
- Craft Scissors
- Embellishments
Directions:
- First pull out your four mini and one jumbo popsicle stick, along with your school glue.
- Assemble the base of your Christmas mailbox by gluing the popsicle sticks together to look like a flag.
- Set aside to let it dry.
- Repeat for each mailbox you want to make today.
- Now grab your craft paint, brushes and paper plate.
- Squirt the craft paint on the paper plate.
- Next, when the popsicle stick shape is dry enough, have children paint the front of it however they like.
- Set aside to let it dry again.
- Now grab the cardstock paper and scissors.
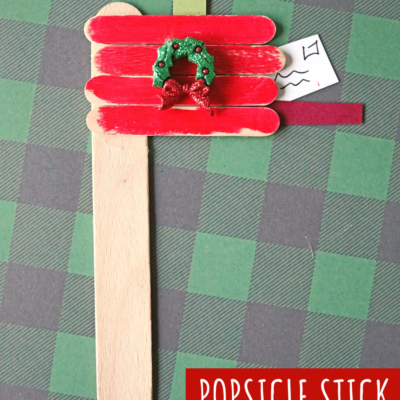
- Cut out a small mailbox flag, door and even a little tiny letter to go inside the mailbox.
- To finish off the Popsicle Stick Christmas Mailbox craft, have children glue their cardstock embellishments to the popsicle stick design.
- Then either decorate your piece with some craft glitter, rhinestones or even more craft paint before displaying proudly for all to see!!!
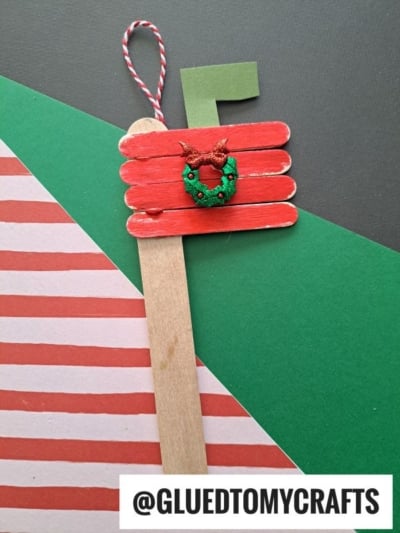
- For easy hanging on the tree – hot glue ribbon to the back!
- Don’t forget to share pictures of your craft stick mailbox creations with us! #gluedtomycrafts
RELATED —> Handprint Christmas Fireplace
Celebrate this festive time of year with our easy step-by-step kid craft tutorials & make memories that will last a lifetime!
Be sure to check out these fun posts, listed below, for even MORE crafty inspiration from Glued To My Crafts!
And as always – if one of our crafts inspires you, be sure to share it on our Facebook page. We love seeing our inspiration come to life! #gluedtomycrafts
Paper Plate Santa
Potato Masher Stamped Joy Craft
Puffy Paint Christmas Wreath
Pom Pom Painted Ugly Sweater
Disguise The Gingerbread Man Project
Popsicle Stick Christmas Trucks
Popsicle Stick Party Hats
Fork Painted Santa Beard

Popsicle Stick Christmas Mailbox Craft
Get creative this holiday season with this fun Christmas craft idea!
Here’s your checklist of supplies to bring this craft to life:
- 4 Mini Popsicle Sticks
- 1 Jumbo Popsicle Stick
- Craft Paint
- Cardstock Paper
- Embellishments
- School Glue
- 1 Scissors
Prepare your creative haven by laying down a protective cover before the crafting magic begins!
Directions:
- First pull out your four mini and one jumbo popsicle stick, along with your school glue.
- Assemble the base of your Christmas mailbox by gluing the popsicle sticks together to look like a flag.
- Set aside to let it dry.
- Repeat for each mailbox you want to make today.
- Now grab your craft paint, brushes and paper plate.
- Squirt the craft paint on the paper plate.
- Next, when the popsicle stick shape is dry enough, have children paint the front of it however they like.
- Set aside to let it dry again.
- Now grab the cardstock paper and scissors.
- Cut out a small mailbox flag, door and even a little tiny letter to go inside the mailbox.
- To finish off the Popsicle Stick Christmas Mailbox craft, have children glue their cardstock embellishments to the popsicle stick design.
- Then either decorate your piece with some craft glitter, rhinestones or even more craft paint before displaying proudly for all to see!!!
- For easy hanging on the tree - hot glue ribbon to the back!

CLICK HERE TO PRINT THE DIRECTIONS FOR THIS CRAFT
If you've enjoyed our content or have any thoughts to share, we'd love to hear from you! Mention @gluedtomycrafts or tag #gluedtomycrafts on Instagram!