
Create a colorful spring scene with the little ones! Grab some paper plates, tissue paper, imagination and join us in making a unique craft masterpiece!

Paper Plate Flower Garden
If you need a last minute craft idea to keep the kids busy when your days aren’t so jammed packed this spring season – look no further because today’s Paper Plate Flowers In Dirt tutorial is super simple, inexpensive AND completely customizable too!
The older kids will enjoy making it and the younger kids will LOVE it too! On that note, it’s great for the WHOLE family! There are honestly no real rules when it comes to this kid friendly craft – just simple fun as you grow your own garden on a paper plate! That’s it!
So let’s grab those craft supplies and get to work on making a beautiful spring scene everyone will love! Find ALL the details you need to know, in our full tutorial below! I just know you are going to love GROWING your own flowers in this unique way!
Happy crafting my friends!!! Don’t forget to share pictures with us when you are done! Come find us on Instagram for easy tagging. We can’t to see what flower colors you choose for your paper plate flowers in the garden scene! #gluedtomycrafts
RELATED —> Handprint Flower Bouquet

Celebrate the arrival of spring with this easy paper plate craft idea for kids! This planting flowers art project is perfect for a classroom or at-home activity.
Craft Supplies:
- Large Paper Plate – 1 per craft
- Brown Tissue Paper
- Mini Popsicle Sticks
- Green Craft Paint
- Small Paint Brush
- Small Paper Plate
- Green Cardstock Paper
- Craft Scissors
- Basic Craft Glue
- Large Flower Stickers
Directions:
- First have children grab a small amount of brown tissue paper and cut it into small squares.
- Cover half of the paper plate with school glue.
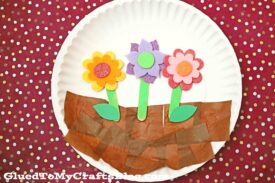
- Have children lay the tan tissue paper on top, until the glue is completely covered. This is the “dirt” for the spring flowers to grow from.
- Now grab your mini popsicle sticks and the paint supplies.
- Paint the sticks completely green.
- Now glue those painted sticks onto the decorated paper plate. This will be the start of your flowers, growing fromt the “dirt.”
- To finish off the spring themed paper craft, simply have children add their flower stickers on top of the painted popsicle sticks, as well as any other embellishments they see fit.
- Go ahead and also cut out a few flower leaves from the green cardstock paper and glue those in place as well.
- Then, when you are done, set it all aside to let it dry completely.
- Finally – display proudly for ALL to see!
RELATED —> Paper Plate Easter Scene
Customize It:
- Don’t have craft foam flower stickers like I used? No worries! You can easily swap those out and hand cut your own beautiful flowers from cardstock paper instead. Maybe even pull out your stash of buttons for the centers.
- You can also pull out your Cricut machine and do flowers that way – hint hint!
RELATED —> Dirt Pudding Cups
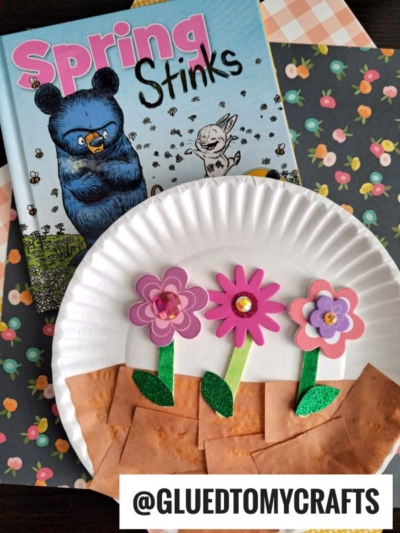
AFFILIATE LINK – PAIR OUR CRAFT IDEA WITH THE “SPRING STINKS” BOOK
If you love this paper plate and tissue paper spring scene craft, be sure to check out our spring craft roundup for tons of inspiration from Glued To My Crafts! My personal favorite is our Craft Stick Bunny Gnome tutorial!

Paper Plate Spring Scene Craft Idea For Kids
Here’s your checklist of supplies to bring this craft to life:
- School Glue
Prepare your creative haven by laying down a protective cover before the crafting magic begins!
Directions:
- First have children grab a small amount of brown tissue paper and cut it into small squares.
- Cover half of the paper plate with school glue.
- Have children lay the tan tissue paper on top, until the glue is completely covered. This is the “dirt” for the spring flowers to grow from.
- Now grab your mini popsicle sticks and the paint supplies.
- Paint the sticks completely green.
- Now glue those painted sticks onto the decorated paper plate. This will be the start of your flowers, growing fromt the "dirt."
- To finish off the spring themed paper craft, simply have children add their flower stickers on top of the painted popsicle sticks, as well as any other embellishments they see fit.
- Go ahead and also cut out a few flower leaves from the green cardstock and glue those in place as well.
- Then, when you are done, set it all aside to let it dry completely.
- Finally - display proudly for ALL to see!

CLICK HERE TO PRINT THE DIRECTIONS FOR THIS CRAFT