Are you looking for a simple craft idea that the whole family can take part in? Here’s an easy potato stamp card. This is great to celebrate Christmas and it’s also the perfect excuse to get kids crafty today!

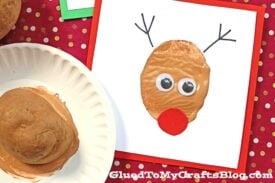
Looking for a fun and easy Christmas craft to make with the kids? This potato stamped reindeer card is a simple holiday project that turns an everyday kitchen item into something extra special. It’s budget-friendly, kid-approved and perfect for making festive handmade cards in no time.
Sometimes the best craft supplies are the ones you already have at home, and this idea is the perfect example of that. With just a potato, a little paint and a few basic craft materials, kids can create an adorable reindeer design that’s great for gifting to friends, family or teachers during the holiday season.
This reindeer card craft is also a great way to keep little hands busy while you’re working around the house. Just set everyone up at the table, pull out the supplies and let the Christmas creativity begin. And if you want to take it a step further, you can even turn the finished reindeer design into a sweet ornament for the tree.
Keep scrolling for the full tutorial and get ready to make an adorable handmade Christmas card with your child today!

Making a handmade potato stamped reindeer card is the perfect last-minute Christmas gift idea. This project is fun and easy enough for kids to do too!
Craft Supplies:
- White Cardstock Paper
- Red Cardstock Paper
- Pre-Folded Cardstock Card
- Adhesive
- Scissors
- 1 – Large Raw Potato
- Knife – adult supervision ALWAYS!
- Brown Craft Paint
- Small Paper Plate
- Large Wiggle Eyes
- Black Sharpie Marker
- Embellishments
Directions:
- First things first – if you haven’t made your card yet, go ahead and do that. I made mine a basic square shape but yours can be any shape or size you like!
- Go ahead and also cut out a piece of white cardstock, that will fit to the front of your card. This is where we will be making our stamped reindeer design on.
- Secure the white cardstock piece to the front of the card with a glue stick.
- Now grab your potato and knife.
- Cut your potato in half. You only need ONE potato half for your craft. This is your stamp for the reindeer’s head.
- Squirt some brown craft paint on your paper plate.
- Rub your potato half in the brown paint, until it’s completely covered.
- Next take the potato half and stamp it in the center of the white cardstock.
- Lift up the potato half and set it on the paper plate.
- Set aside the card to allow it to dry completely.
- Now grab your red cardstock paper and scissors.
- Cut out an oval nose piece for the reindeer.
- When the stamped design from earlier is dry enough, go ahead and grab it, along with the glue stick.
- Secure the nose paper piece to the stamped design.
- Add on the wiggle eyes.
- To finish off the potato stamped reindeer card, use the Sharpie marker to draw on antlers to tie it all together.
- Add any other embellishments you see fit, before gifting away your stamped potato reindeer card proudly!
- Discard the used potato afterwards {please do not attempt to eat it afterwards.}
- Don’t forget to share pictures with us on your social media sites! #gluedtomycrafts
RELATED —> Potato Stamped Bear Cards

So what do you think of our potato stamped reindeer card idea? Super creative, am I right?
By chance, are you looking for more fun Christmas themed kid crafts from Glued To My Crafts? Check out these past posts, listed below, for some inspiration!
Be sure to also follow on Pinterest for more fun ideas!
Paper Plate Reindeer
Paper Plate Ornament
Marbled Paper Trees
Reindeer Frame
No Cook Peppermint Playdough
Paper Plate Snow Globe
Christmas Canvas Ideas
Paper Plate Santa
Paper Plate Gingerbread Man

Potato Stamped Reindeer Card Craft Idea
It's a great to celebrate the Christmas season and it’s also the perfect excuse to get kids crafty today!
Here’s your checklist of supplies to bring this craft to life:
- Large, Raw Potato
- Kitchen Knife - adult supervision ALWAYS!
Prepare your creative haven by laying down a protective cover before the crafting magic begins!
Directions:
- First things first - if you haven't made your card yet, go ahead and do that. I made mine a basic square shape but yours can be any shape or size you like!
- Go ahead and also cut out a piece of white cardstock, that will fit to the front of your card. This is where we will be making our stamped reindeer design on.
- Secure the white cardstock piece to the front of the card with a glue stick.
- Now grab your potato and knife.
- Cut your potato in half. You only need ONE potato half for your craft. This is your stamp for the reindeer's head.
- Squirt some brown craft paint on your paper plate.
- Rub your potato half in the brown paint, until it’s completely covered.
- Next take the potato half and stamp it in the center of the white cardstock.
- Lift up the potato half and set it on the paper plate.
- Set aside the card to allow it to dry completely.
- Now grab your red cardstock paper and scissors.
- Cut out an oval nose piece for the reindeer.
- When the stamped design from earlier is dry enough, go ahead and grab it, along with the glue stick.
- Secure the nose paper piece to the stamped design.
- Add on the wiggle eyes.
- To finish off the potato stamped reindeer card, use the Sharpie marker to draw on antlers to tie it all together.
- Add any other embellishments you see fit, before gifting away your stamped potato reindeer card proudly!
- Discard the used potato afterwards {please do not attempt to eat it afterwards.}


Grab our favorite books via our Amazon affiliate link! In our Amazon storefront you will find books, toys and craft supplies we absolutely love using for our Glued To My Crafts tutorials!

If you've enjoyed our content or have any thoughts to share, we'd love to hear from you! Mention @gluedtomycrafts or tag #gluedtomycrafts on Instagram!