Glued To My Crafts

Join thousands of others who have gotten GLUED to our craft tutorials!

  • Home
  • Safety Guidelines
  • Seasonal Themes
    • New Years
    • Valentine’s Day
    • St. Patrick’s Day
    • Spring
    • Easter
    • Mother’s Day
    • Summer
    • Father’s Day
    • Patriotic
    • Halloween
    • Thanksgiving
    • Fall
    • Winter
    • Christmas
    • Snowmen
    • Story Time
  • About Us
  • Amazon Storefront
  • Monthly Themes
    • January Craft Ideas
    • February Craft Ideas
    • March Craft Ideas
    • April Craft Ideas
    • May Craft Ideas
    • June Craft Ideas
    • July Craft Ideas
    • August Craft Ideas
    • September Crafts
    • October Crafts
    • November Crafts
    • December Crafts
  • Collection Posts
    • 20+ Creative Paper Bag Craft Ideas for Kids to Enjoy Today
    • 20+ Plastic Egg Stamp Crafts for Spring Fun
    • 30+ Creative Thumbprint Craft Ideas for Spring Fun
    • Craft Ideas for Kids Using Egg Stickers
    • Thumbs Up! 50+ Creative Thumbprint Crafts for Kids
    • 40+ Insect Craft Ideas For Kids
    • 50+ Craft Ideas For Kids Using A Plastic Fork As A Paint Brush
    • 30+ Puffy Paint Craft Ideas For Kids To Try Today!
    • 20+ Fun and Easy Paper Bowl Crafts for Kids
    • Pete The Cat Craft Ideas: Fun & Easy Projects for Kids
    • Transform Coffee Filters into 40+ Stunning DIY Projects
    • Transform Crepe Paper Streamers into 60+ Stunning Crafts
    • Pie Server Stamped Craft Ideas Kids Will Adore
    • Paint Splat Pie Craft Idea For Kids

Muffin Cup Flower Craft Idea For Spring

When engaging in craft activities, it is important for young children to have adult supervision at ALL times. It is also recommended to use supplies that are suitable for your child's age. Feel free to modify materials or steps to meet your specific requirements. Please refer to our safety guidelines for more information.

As an Amazon Associate I earn from qualifying purchases. This post may contain affiliate links. For more information, please see our disclosure policy.

UPDATE FOR 2026 - To reduce storage costs and download fees, we recently made some changes to our website. The password for all our files this year is GLUEDTOMYCRAFTS2026. No sign-up is required to download our free printables! You can enjoy our printables without creating an account or paying for Box.com. Simply follow the download instructions on our FAQ PAGE.

Unleash your child's creativity with our simple Paper Muffin Cup Flower Craft! Perfect for young crafters, this fun DIY guide offers step-by-step instructions to create vibrant paper blooms. Start crafting delightful flowers today!
SKIP THE FLUFF AND PRINT THE DIRECTIONS
A craft project featuring a cupcake liner flower made with a child's photo in the center, green paper stem and leaves, and heart decorations on a white background with a red polka dot border.

A craft project featuring a cupcake liner flower made with a child's photo in the center, green paper stem and leaves, and heart decorations on a white background with a red polka dot border.

This easy muffin cup flower craft is perfect for a rainy day! All you need are some cupcake liners to get started!

Our simple to recreate activity encourages little ones to use their imaginations as they build custom blooms with endless combinations of color and petal shapes – let them go wild!

Get ready to have some crafty fun with this simple yet impactful project that will spark creativity while keeping the mess at a minimum – win-win!

A handmade card features a cupcake liner flower with a child's photo at the center, green paper stem and leaves, and red sparkly hearts on a polka dot background.

Today we’re going to be making an adorable muffin cup flower craft. It is perfect for both young and older children alike, requires minimal supplies and brings out their creative spirit.

Craft Supplies:

  • Large Cupcake Liners
  • Cardstock Paper
  • School Glue or Glue Stick
  • Scissors
  • Printed Picture
  • optional – Paper Craft Punch

Directions:

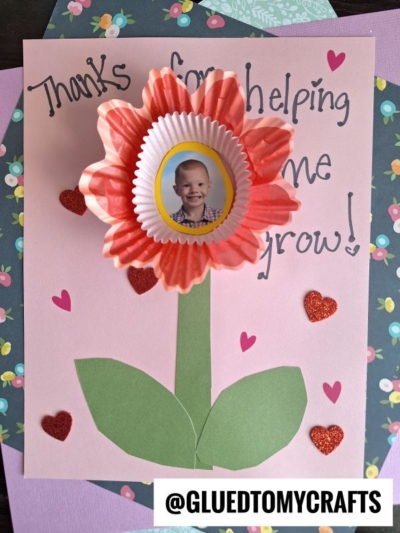
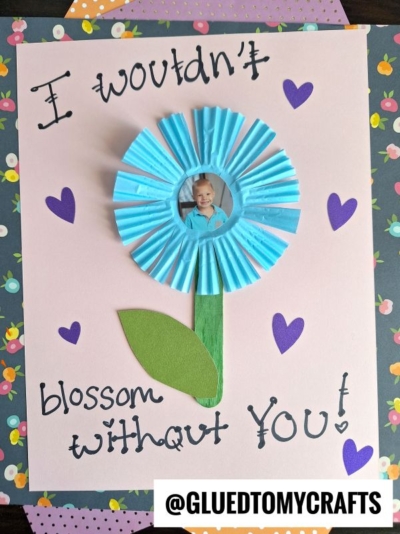
  • First pick out a few muffin cups you want to use for the flower part. You can use as many as you like. I decided to use four, different colored cups for mine. Just make sure they all stack together nicely.
  • Then if you like, flatten them slightly with your hand and secure them all together with a little bit of glue, in between each. This is the flower bud of the craft.
  • Next up – cut out a flower stem and leaves out of your green cardstock paper.
  • Secure those pieces to another piece of different colored cardstock.
  • Now secure the stacked muffin cup piece from earlier, to the top of the flower stem piece.
  • Next grab your large paper punch or craft scissors & cut your child’s face out of the printed picture. You want it to fit nicely in the circle part of the muffin cup. Go ahead and secure it in place.
  • Finally – add a few heart stickers around the finished cupcake liner flower piece and maybe write a sweet message around it as well. Wouldn’t this be great to add the date in the corner, along with you child’s age & height to go with the saying “They grow like weeds!“

RELATED —> Paint Splat Tulip

The cover of The Tiny Seed by Eric Carle features a large, colorful cupcake liner flower with red and orange petals and a green stem and leaves, placed on red and pink patterned papers.

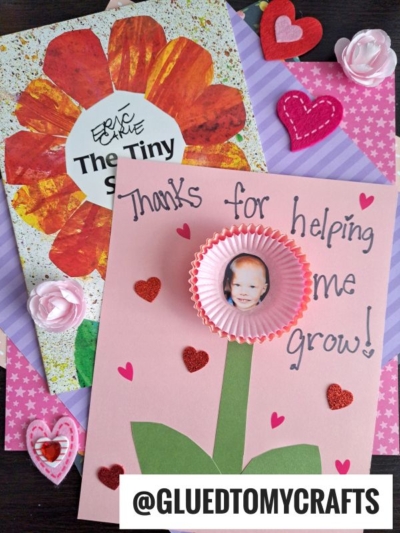
AFFILIATE LINK – PAIR OUR CRAFT IDEA WITH THIS BOOK RECOMMENDATION

And that’s it for today’s muffin cup flower post! Like I said above, it’s really easy and can be customized as well! I really hope our quick tutorial inspired you! We also have our Flower Bouquet, Handprint Muffin and Paper Plate Turtle craft posts for you to check out today!!

stacey-signature-2023

A craft project featuring a cupcake liner flower made with a child's photo in the center, green paper stem and leaves, and heart decorations on a white background with a red polka dot border.
PRINT

Paper Muffin Cup Flower Craft for Kids

Unleash your child's creativity with our simple Paper Muffin Cup Flower Craft! Perfect for young crafters, this fun DIY guide offers step-by-step instructions to create vibrant paper blooms. Start crafting delightful flowers today!

Here’s your checklist of supplies to bring this craft to life:

  • Cardstock Paper
  • Cupcake Liners
  • Printed Picture
  • 1 Scissors
  • School Glue
  • Spring Book Recommendations - link to our Amazon shop

Prepare your creative haven by laying down a protective cover before the crafting magic begins!

Directions:

  • First pick a few muffin cups you want to use for the flower part. You can use as many as you like.
  • Then if you like, flatten them slightly with your hand and secure them all together with a little bit of glue, in between each. This is the flower bud of the craft.
  • Next up - cut out a flower stem and leaves out of your green cardstock paper.
  • Secure those pieces to another piece of different colored cardstock.
  • Now secure the stacked muffin cup piece from earlier, to the top of the flower stem piece.
  • Next grab your large paper punch or craft scissors & cut your child's face out of the printed picture. You want it to fit nicely in the circle part of the muffin cup. Go ahead and secure it in place.
  • Finally - add a few heart stickers around the finished flower piece and maybe write a sweet message around it as well.
MINI-HEARTS-page-separator-logo-gluedtomycrafts

CLICK HERE TO PRINT THE DIRECTIONS FOR THIS CRAFT

If you've enjoyed our content or have any thoughts to share, we'd love to hear from you! Mention @gluedtomycrafts or tag #gluedtomycrafts on Instagram!

Craft Activity Safety Guidelines:

Always Ensure Adult Supervision - Young children should be supervised at all times when engaging in craft activities. This is essential to keep them safe and ensure materials are used correctly. Use Age-Appropriate Supplies - Choose craft supplies that are suitable for your child’s age. Check labels for recommendations and avoid items with small parts or sharp edges for younger children. Modify as Needed - Feel free to adapt materials or steps to meet your child's abilities and safety needs. For example, substitute scissors with safety scissors if necessary. Keep an Eye on Allergies - Be mindful of potential allergens in craft materials like glue, paint, or certain fabrics. Opt for non-toxic and hypoallergenic options whenever possible. Organize and Secure Supplies - Keep all craft tools and materials organized. Store sharp objects, small parts, and potentially hazardous items out of reach when not in use. Following these guidelines will ensure that crafts remain fun, creative, and, most importantly, safe for everyone involved!


OUR PRIVACY POLICY

OUR COPYRIGHT POLICY

  • Email
  • Facebook
  • Instagram
  • Pinterest
  • Twitter
  • YouTube

LOOKING FOR SOMETHING?

EXPLORE OUR SITE:

TRENDING TODAY:

  • A pink hand-shaped bookmark with red heart stickers and star confetti surrounds a round note that reads a heartfelt message about love and reading. The image is from GluedToMyCraftsBlog.com. Handprint Bookmark Keepsake: A Gift That Holds Your Spot
  • A colorful craft project featuring a yellow felt moon, sparkly stars, and heart shapes, with glue and a heartfelt message. Torn Paper Love You To The Moon and Back Card Craft Idea For Kids
  • A handmade card with a rocket drawing, hearts, and messages of love. Felt hearts and an envelope are around it. Handprint Rocket Keepsake - I Love You Because
  • A vibrant Valentine's Day craft showcasing a torn-paper bumblebee with googly eyes on a white sheet, accompanied by the text "MY VALENTINE!" The scene is decorated with felt hearts, heart-shaped gems, and patterned papers, with a glue bottle and crafting supplies adding to the creative atmosphere. Torn Paper Bee My Valentine Card Craft Idea For Valentine's Day
  • Flat lay of a torn paper dandelion craft featuring a white sheet with a black dandelion outline. Torn yellow, pink, and purple paper pieces are glued to the dandelion head, simulating seeds. Surrounding the craft are Elmer's glue, felt hearts, paper flowers, and patterned scrapbook paper. The text 'MAKING WISHES, ONE PIECE OF PAPER AT A TIME.' and 'GluedToMyCraftsBlog.com' are printed on the white sheet. Torn Paper Dandelion Craft: Making Wishes, One Piece at a Time
  • A flat lay of handmade Valentine’s Day cards and decorations, including paper flowers, felt hearts, an envelope, and printed cards with romantic poems, arranged on a gray and pink background. Capture Memories With These 6 Handprint Flower Poems
  • A colorful handprint craft made from purple paper with glitter edges sits on a multicolored polka dot background. A round tag with a poem is attached below, tied with red and white string. Flowers are visible in the corner. Easy Handprint Flower Craft with Poem – Perfect Spring DIY for Kids
  • A purple paper butterfly made from handprint cutouts is decorated with glitter and a smiling face. A round poem about sending love is in the center. The background is colorful and the GluedToMyCraftsBlog.com watermark is visible. Handprint & Popsicle Stick Butterfly Poem Keepsake
  • A craft project with yellow crepe paper fries in a red-striped paper container, a label reading Youre UN-FRY-GETTABLE!, red heart decorations, Elmers glue, and a roll of yellow crepe paper on a purple background. Torn Crepe Paper Fries Craft Idea For Kids
  • A spring-themed craft featuring pink and purple paper flowers, small decorative bees, and a “Spring has sprung, so let’s get our creativity blooming!” sign on a blue background—perfect for pairing with Spring Printables. Crepe Paper & Fingerprint Daisy Spring Paint Brush Craft

© 2012–2026 Glued To My Crafts
All activities should be supervised by an adult at all times. Please refer to our safety guidelines for more information.


Please note that all the content of the website, including printables, are for classroom and personal use only. This means that any digital item you download from our site can be used for non-commercial use only. We kindly request that you do not reproduce or sell our creations. We appreciate your understanding and cooperation in respecting our content and intellectual property rights.

Accessibility Adjustments

Powered by OneTap

How long do you want to hide the toolbar?
Hide Toolbar Duration
Select your accessibility profile
Vision Impaired Mode
Enhances website's visuals
Seizure Safe Profile
Clear flashes & reduces color
ADHD Friendly Mode
Focused browsing, distraction-free
Blindness Mode
Reduces distractions, improves focus
Epilepsy Safe Mode
Dims colors and stops blinking
Content Modules
Font Size

Default

Line Height

Default

Color Modules
Orientation Modules