Glued To My Crafts

Join thousands of others who have gotten GLUED to our craft tutorials!

  • Home
  • Privacy Policy
  • Craft Safety Guidelines
  • Seasonal Themes
    • New Years
    • Valentine’s Day
    • St. Patrick’s Day
    • Spring
    • Easter
    • Mother’s Day
    • Summer
    • Father’s Day
    • Patriotic
    • Halloween
    • Thanksgiving
    • Fall
    • Winter
    • Christmas
    • Snowmen
    • Story Time
  • Favorite Craft Materials
    • Cupcake Liners
    • Torn Paper Crafts
    • Paper Plates
    • Popsicle Sticks
    • Sidewalk Chalk
    • Clothespin Crafts
    • Tulip Puffy Paint
    • Paper Bags
    • Craft Foam Hearts
    • Puffy Paint
  • About Us
  • Monthly Themes
    • January Craft Ideas
    • February Craft Ideas
    • March Craft Ideas
    • April Craft Ideas
    • May Craft Ideas
    • June Craft Ideas
    • July Craft Ideas
    • August Craft Ideas
    • September Crafts
    • October Crafts
    • November Crafts
    • December Crafts

“M” is for Popsicle Stick Moose Craft

When engaging in craft activities, it is important for young children to have adult supervision at ALL times. It is also recommended to use supplies that are suitable for your child's age. Feel free to modify materials or steps to meet your specific requirements. Please refer to our safety guidelines for more information.

As an Amazon Associate I earn from qualifying purchases. This post may contain affiliate links. For more information, please see our disclosure policy.

This Popsicle Stick Moose craft is easy & customizable too! And it's just that - an "M" that we turned into our very own one-of-a-kind MOOSE!
SKIP THE FLUFF AND PRINT THE DIRECTIONS
"M" is for Popsicle Stick Moose Craft

"M" is for Popsicle Stick Moose Craft

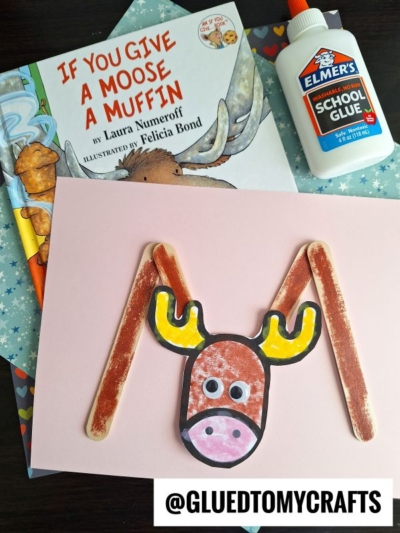
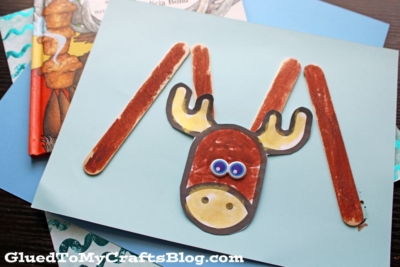
Unleash your child’s inner artist and help them put together this adorable popsicle stick moose craft!

The letter “M” is for moose and today’s popsicle stick craft idea from us is the PERFECT way to reinforce that idea! Especially for the youngest crafters in your home!

Inspired by the adorable book “If You Give A Moose A Muffin” {affiliate link on Amazon} by Laura Numeroff & Felicia Bond, this DIY brown moose craft idea is perfect for craft time AND story time!!!

If a big hungry moose comes to visit, you might give him a muffin to make him feel at home. If you give him a muffin, he’ll want some jam to go with it. When he’s eaten all your muffins, he’ll want to go to the store to get some more muffin mix.

In this hilarious sequel to If You Give a Mouse a Cookie, the young host is again run ragged by a surprise guest. Young readers will delight in the comic complications that follow when a little boy entertains a gregarious moose.

This popsicle stick moose craft is pretty easy AND completely customizable too! And it’s just that – an “M” that we turned into our very own one-of-a-kind MOOSE! Looks super fun – right?!

Now let’s grab our craft supplies and get to work! Don’t forget to read the book in honor of your creation!!! Happy crafting my friends!!! Don’t forget to share pictures of your finished craft stick brown moose by tagging us on Instagram. We can’t wait to hear from YOU! #gluedtomycrafts

RELATED —> Paper Bag Moose

"M" is for Popsicle Stick Moose Craft

Your kids will love this fun and easy popsicle stick moose craft that’s perfect for any time of year!

Craft Supplies:

  • Jumbo Popsicle Sticks – 4 four per craft
  • Brown Craft Paint
  • Paint Brush
  • Brown Cardstock Paper
  • White Cardstock Paper
  • Small Moose Head Printable – Landing Page
  • Large Wiggle Eyes
  • School Glue
  • Scissors

Directions:

  • First grab your FOUR popsicle sticks.
  • Glue your popsicle sticks together in an “M” shape in the center.
  • Set aside to let it dry completely.
  • Once dry, grab your craft paint and paint your newly made popsicle stick “M” completely brown.
  • Set aside again to let it dry completely.
  • Next grab your choice of coloring material and the printable.
  • Color in ONE of the moose head shapes.
  • Trim it out with scissors.
  • To finish off your Craft Stick Moose art project – have children glue their cardstock piece and wiggle eyes on, along with any other embellishments on the popsicle stick “M.”
  • Then let it all sit aside to let it dry completely before displaying proudly!!!

RELATED —> Cupcake Liner Moose

"M" is for Popsicle Stick Moose Craft

Love this Popsicle Stick Moose craft idea from Glued To My Crafts? Be sure to check out our popular “U” is for Universe and “M” is for Monster kid craft ideas as well! They would pair nicely with today’s MOOSE craft idea – hint hint!

stacey-signature-2023

"M" is for Popsicle Stick Moose Craft
PRINT

"M" is for Popsicle Stick Moose Craft

This Popsicle Stick Moose craft is easy & customizable too! And it's just that - an "M" that we turned into our very own one-of-a-kind MOOSE!

Here’s your checklist of supplies to bring this craft to life:

  • 4 Jumbo Popsicle Sticks
  • Craft Paint
  • Cardstock Paper
  • Small Moose Head Printable - Landing Page
  • Large Wiggle Eyes
  • Paint Brush
  • School Glue
  • Scissors

Prepare your creative haven by laying down a protective cover before the crafting magic begins!

Directions:

  • First grab your FOUR popsicle sticks.
  • Glue your popsicle sticks together in an "M" shape in the center.
  • Set aside to let it dry completely.
  • Once dry, grab your craft paint and paint your newly made popsicle stick "M" completely brown.
  • Set aside again to let it dry completely.
  • Next grab your choice of coloring material and the printable.
  • Color in ONE of the moose head shapes.
  • Trim it out with scissors.
  • To finish off your Craft Stick Moose art project – have children glue their cardstock piece and wiggle eyes on, along with any other embellishments on the popsicle stick "M."
  • Then let it all sit aside to let it dry completely before displaying proudly!!!
    "M" is for Popsicle Stick Moose Craft
MINI-HEARTS-page-separator-logo-gluedtomycrafts

click-here-to-head-to-our-landing-page-gluedtomycrafts

NEED HELP DOWNLOADING OUR FREE PRINTABLES? PLEASE REFER TO OUR FAQ PAGE

CLICK HERE TO PRINT THE DIRECTIONS FOR THIS CRAFT

If you've enjoyed our content or have any thoughts to share, we'd love to hear from you! Mention @gluedtomycrafts or tag #gluedtomycrafts on Instagram!

Craft Activity Safety Guidelines:

Always Ensure Adult Supervision - Young children should be supervised at all times when engaging in craft activities. This is essential to keep them safe and ensure materials are used correctly. Use Age-Appropriate Supplies - Choose craft supplies that are suitable for your child’s age. Check labels for recommendations and avoid items with small parts or sharp edges for younger children. Modify as Needed - Feel free to adapt materials or steps to meet your child's abilities and safety needs. For example, substitute scissors with safety scissors if necessary. Keep an Eye on Allergies - Be mindful of potential allergens in craft materials like glue, paint, or certain fabrics. Opt for non-toxic and hypoallergenic options whenever possible. Organize and Secure Supplies - Keep all craft tools and materials organized. Store sharp objects, small parts, and potentially hazardous items out of reach when not in use. Following these guidelines will ensure that crafts remain fun, creative, and, most importantly, safe for everyone involved!


OUR PRIVACY POLICY

  • Email
  • Facebook
  • Instagram
  • Pinterest
  • Twitter
  • YouTube

LOOKING FOR SOMETHING?

EXPLORE OUR SITE:

© 2012–2025 Glued To My Crafts
All activities should be supervised by an adult at all times. Please refer to our safety guidelines for more information.


Please note that all the content of the website, including printables, are for classroom and personal use only. This means that any digital item you download from our site can be used for non-commercial use only. We kindly request that you do not reproduce or sell our creations. We appreciate your understanding and cooperation in respecting our content and intellectual property rights.