Craft a fun torn paper chick with your kids! This creative and easy spring DIY project sparks imagination and adds charm to seasonal crafting fun.


Easter is just around the corner—what better way to welcome the season of renewal than with a fun and creative craft activity for kids? This Torn Paper Easter Chick Craft is the perfect blend of playful creativity and simplicity.
Whether you’re a parent, teacher, or childcare provider, this craft isn’t just easy to make but also brimming with opportunities to teach kids about fine motor skills, color coordination, and springtime themes!

This torn paper and paper plate hatching Easter chick craft idea is particularly unique because of its versatility. Unlike traditional crafts that rely on precise cuts or drawings, this one thrives on imperfections. The finished product will have its own quirks and charm, making each chick as unique as the child who makes it!
The best part? It requires just a handful of materials—most of which you probably already have at home. It’s budget-friendly, engaging, and celebrates the cheerfulness of spring.
Craft Supplies:
Gather these simple materials before you start:
- “EASTER CHICK” PRINTABLE – from our landing page
- Choice of Color Cardstock Paper
- Yellow Construction Paper
- Orange Construction Paper
- Large White Paper Plate
- Large Wiggle Eyes – two per craft
- School Glue or Glue Stick
- Embellishments
These materials are inexpensive and readily available. If you don’t have construction paper, feel free to use magazine pages, gift wrapping paper, or even old catalogs. Mix and match textures for extra fun!
Directions:
Now, let’s get to the fun part—the step-by-step guide!
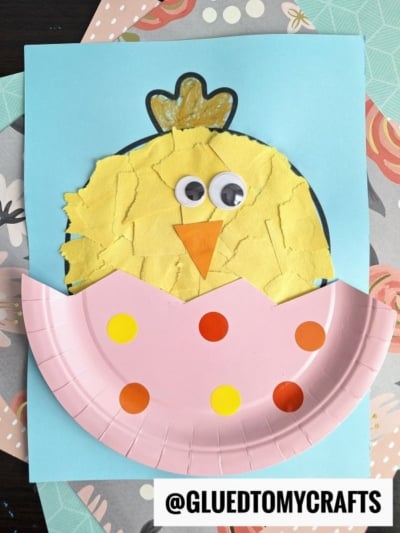
- First download and print out the FREE blank chick printable listed above, on a single sheet of cardstock paper. You can do any color of cardstock paper but I highly suggest a nice pastel color so the white paper plate really POPS from the scene.
- Next help your child cut/tear their YELLOW construction paper into small pieces.
- Grab the school glue and help them put a good amount inside the circle design.
- Have children place their paper pieces on top of the glue {adding more if needed} until it’s is completely filled in.
- Now grab the paper plate and cut it in half, like a broken egg shell. Set one of the pieces aside for repeating the craft later.
- Assist your child on gluing the paper plate piece, towards the bottom of the torn paper design to give the look of the chick breaking out of it’s “shell.”
- The final step is to add TWO wiggle eyes and a triangle nose to bring it to life.
- And just like that, your Torn Paper Yellow Chick craft is complete! Set aside to let it all dry completely before displaying your child’s hatching baby chick craft proudly to all see!
Take a photo of their finished masterpiece and share it on social media to spread the creative spirit!
RELATED —> Tissue Paper Baby Chick Craft
Craft projects like this torn paper hatching Easter chick are a wonderful way to celebrate the spring season and spark creativity in children. Whether you add it to your holiday prep, make it part of a classroom activity, or simply enjoy it with your kids at home, the fun new tradition is bound to bring smiles and happy memories.
Gather those supplies and give it a try—you might just want to make your own chick to join the fun! Happy crafting, my friends!

Torn Paper Chick Craft Idea For Spring
Craft a fun torn paper chick with your kids! This creative and easy spring DIY project sparks imagination and adds charm to seasonal crafting fun.
Here’s your checklist of supplies to bring this craft to life:
Prepare your creative haven by laying down a protective cover before the crafting magic begins!
Directions:
- First download and print out the FREE blank chick printable listed above, on a single sheet of cardstock paper. You can do any color of cardstock paper but I highly suggest a nice pastel color so the white paper plate really POPS from the scene.
- Next help your child cut/tear their YELLOW construction paper into small pieces.
- Grab the school glue and help them put a good amount inside the circle design.
- Have children place their paper pieces on top of the glue {adding more if needed} until it's is completely filled in.
- Now grab the paper plate and cut it in half, like a broken egg shell. Set one of the pieces aside for repeating the craft later.
- Assist your child on gluing the paper plate piece, towards the bottom of the torn paper design to give the look of the chick breaking out of it's "shell."
- The final step is to add a wiggle eyes and a triangle nose.
- And just like that, your Torn Paper Yellow Chick craft is complete! Set aside to let it all dry completely before displaying your child's hatching baby chick craft proudly to all see!


NEED MORE HELP DOWNLOADING OUR FREE PRINTABLES? PLEASE REFER TO OUR FAQ PAGE
If you've enjoyed our content or have any thoughts to share, we'd love to hear from you! Mention @gluedtomycrafts or tag #gluedtomycrafts on Instagram!