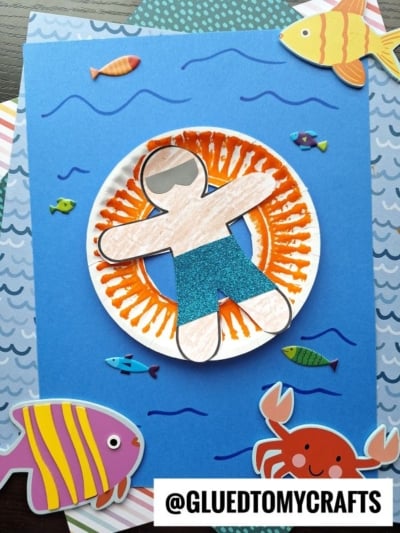
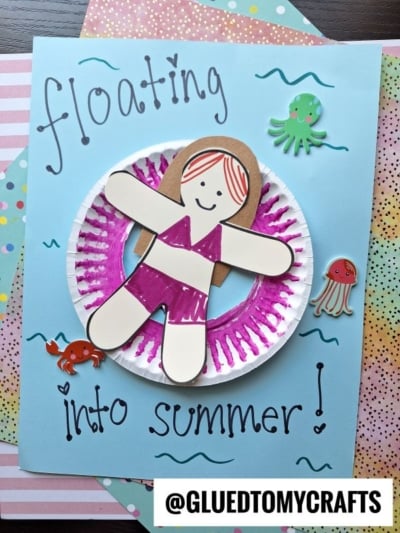
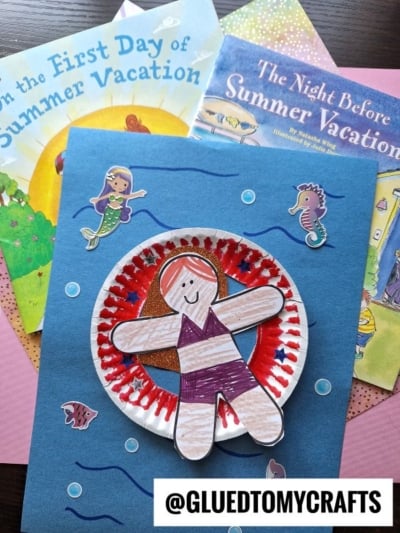
This paper pool floatie art project is the perfect way to get creative, have some quality time together this summer season!
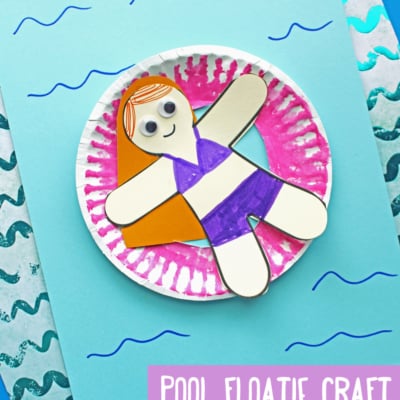
Are you looking for an engaging and fun activity to do with the kids this summer? Look no further! This paper pool floatie art project tutorial from us is sure to bring hours of creativity and entertainment!

Not only will children have a blast designing their own pool floatie out of a small paper plate, but they’ll also be learning about shapes, colors, textures, and construction in the process.
With materials as simple as a few sheets of colorful cardstock paper and scissors, you can create the ultimate piece of art that is sure to catch everyone’s attention this summer season.
Plus, this affordable activity won’t break your budget or leave tons of mess — so it’s great for educators teaching from home or even parents just wanting something fun and stress free to break up the summer boredom blues.
So grab those craft supplies, download our provided freebie and let’s start floatin’ towards our own paper plate pool floatie art pieces!

This project is perfect for moms who are homeschooling their children for summer vacation or teachers to present at arts & craft time; not to mention it’s easy enough for any crafter or creative minded person interested in entertaining young ones this summer break!
Craft Supplies:
- Free Printable – on our landing page
- Skin Tone Colored Cardstock Paper
- optional – Paper Scraps
- Crayons, Colored Pencils, Markers etc.
- Paper Craft Scissors
- Small Paper Plate
- Blue Cardstock Paper
- School Glue or Glue Stick
Directions:
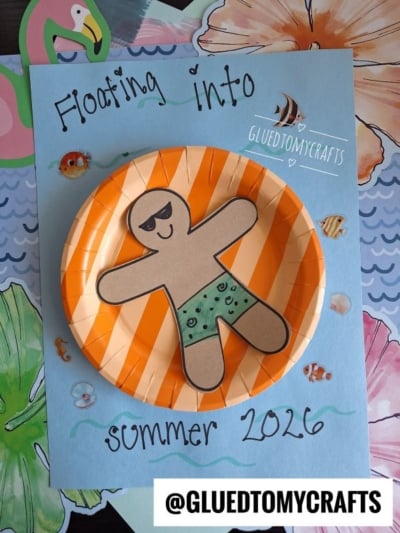
- First things first. We are going to download and print the FREE provided printable listed above. One print gives you two opportunities to recreate this craft.
- Use your choice of coloring medium to color in ONE of the body shapes. Go ahead and customize it however you like.
- Once done decorating it, use scissors to trim out the shape.
- Discard excess paper and set aside the paper piece for now.
- Now grab your small paper plate, the scissors and again, choice of coloring medium.
- Cut out a small circle from the center of the paper plate, to create the opening for the person to sit in. My best suggestion is to imagine a donut.
- Now go ahead and also decorate the paper plate inner tube however you like.
- When done, grab a single sheet of blue cardstock and choice of adhesive.
- Go ahead and glue the “paper plate pool float” to the center of your blue cardstock paper.
- Follow that up by gluing your decorated friend piece to the center of the float. You want it to look like she is floating and relaxing in it.
- At this point you can also add other embellishments {like fun pool themed stickers, glitter, rhinestones} that you see fit to really make it your own.
- Then display your pool floatie artwork proudly for all to see!
RELATED —> Jellyfish Suncatcher
If you are looking for even MORE easy kid craft ideas that go along with the summer season, be sure to check out these fun posts listed below!
Popsicle Stick Pool Lounging Friends
Popsicle Stick Pool Float Friends
Paper Plate Pool Floating Unicorn
Pool Noodle Crafts For Kids To Recreate
Popsicle Suncatcher Craft Idea

Paper Pool Floatie Art Project For Kids
This paper pool floatie art project is the perfect way to get creative, have some quality time together this summer season!
Here’s your checklist of supplies to bring this craft to life:
Prepare your creative haven by laying down a protective cover before the crafting magic begins!
Directions:
- First things first. We are going to download and print the FREE provided printable listed above. One print gives you two opportunities to recreate this craft.
- Use your choice of coloring medium to color in ONE of the body shapes. Go ahead and customize it however you like.
- Once done decorating it, use scissors to trim out the shape.
- Discard excess paper and set aside the paper piece for now.
- Now grab your small paper plate, the scissors and again, choice of coloring medium.
- Cut out a small circle from the center of the paper plate, to create the opening for the person to sit in. My best suggestion is to imagine a donut.
- Now go ahead and also decorate the paper plate inner tube however you like.
- When done, grab a single sheet of blue cardstock and choice of adhesive.
- Go ahead and glue the "paper plate pool float" to the center of your blue cardstock paper.
- Follow that up by gluing your decorated friend piece to the center of the float. You want it to look like she is floating and relaxing in it.
- At this point you can also add other embellishments {like fun pool themed stickers, glitter, rhinestones} that you see fit to really make it your own.
- Then display your pool floatie artwork proudly for all to see!


NEED MORE HELP DOWNLOADING OUR FREE PRINTABLES? PLEASE REFER TO OUR FAQ PAGE
If you've enjoyed our content or have any thoughts to share, we'd love to hear from you! Mention @gluedtomycrafts or tag #gluedtomycrafts on Instagram!