

Stained Glass Camping Lantern Craft Idea For Kids
Shine BRIGHT this summer with our latest tissue paper, stained glass lantern craft idea! It’s absolutely perfect for summer camps, family gatherings, VBS or just because “boredom buster” moments at home. The choice is yours!
Every finished mosaic paper camping lantern piece will be super unique in design and I just know you are going to love it as much as I love sharing it with you all!
Kids AND adults will LOVE making this camping lamp craft come to life. On that note – what are you waiting for? Let’s grab those craft supplies and create a beautiful stained glass camping light craft today! Find the provided template below, as well as all the steps in the full tutorial.
Happy crafting, my friends! Don’t forget to share pictures of your paper lantern creations with us! You can find us on Facebook or Instagram for easy tagging! I seriously can’t wait to see your GLOWING pieces in action! #gluedtomycrafts
RELATED —> Tissue Paper Campfire

Help your little ones get creative this weekend! Get them crafting their own unique stained glass camping lantern – a fun and colorful way to add some colors to your windows this summer!
Craft Supplies:
- Camping Lantern Printable
- White Cardstock Paper
- Coloring Pencils, Crayons or Markers
- Craft Scissors
- Clear Contact Paper
- Tissue Paper {any color you like!}
- Loose Craft Glitter
RELATED —> Stained Glass Fall Trees
Directions:
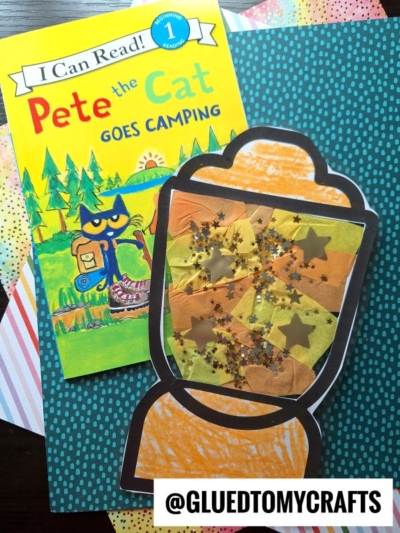
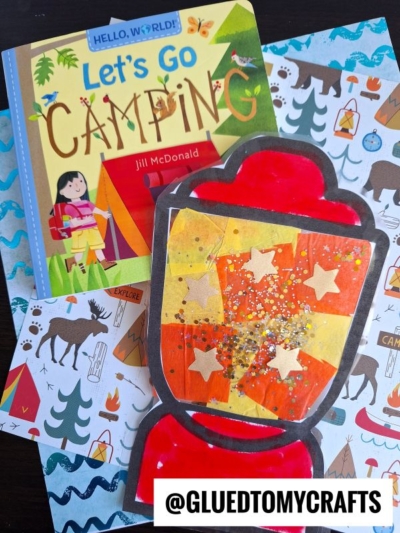
- First print out the FREE camping lantern template above. You will want one printable, per camping light craft.
- Next grab your choice of coloring utensil and color in the top & bottom section of the lantern design. You can color those two sections however you like but keep in mind that you want the center portion to remain blank.
- When done coloring, go ahead and grab your scissors & the decorated lantern printable.
- Trim out the design, as well as the inside portion of the lantern.
- Discard excess paper.
- Now grab your clear contact paper.
- Cut out TWO pieces that are bigger than the lantern cutout.
- Remove the backing from one piece of contact paper.
- Lay it on a flat surface.
- Place the lantern cutout, face down, on the contact paper.
- Next decorate the inside of their camping light however you like {I did various shades of orange, red and yellow in mine, as well as loose star shaped craft glitter.}
- Once you are done creating the contents, grab the second piece of contact paper.
- Peel off the backing and place it on top of the other piece of contact paper, moving your hand around to “squish” everything together.
- To finish off the Stained Glass Lantern Cup craft, use your scissors to trim out the cup/remove the excess contact paper.
- Then display proudly on a window with a little bit of clear tape!!!
RELATED —> Popsicle Stick Mug
We are your one-stop-shop when it comes those FUN, summer boredom buster craft ideas!!
Please be sure to check out our super popular Popsicle Stick Camping Mug, Popsicle Stick Smores and Cupcake Liner Palm Tree tutorials. All three of which are simply perfect to recreate this time of year!
We also have a great Facebook community where you can get crafty ideas as well! This is a great place to share pictures of your finished stained glass camp lanterns – hint hint!

Stained Glass Camping Lantern Craft Idea
Here’s your checklist of supplies to bring this craft to life:
Prepare your creative haven by laying down a protective cover before the crafting magic begins!
Directions:
- First print out our provided printable, in color, on a single sheet of white cardstock paper. You only need one print per craft.
- Next grab your choice of coloring utensil and color in the top & bottom section of the lantern design. You can color those two sections however you like but keep in mind that you want the center portion to remain blank.
- When done coloring, go ahead and grab your scissors & the decorated lantern printable.
- Trim out the design, as well as the inside portion of the lantern.
- Discard excess paper.
- Now grab your clear contact paper.
- Cut out TWO pieces that are bigger than the lantern cutout.
- Remove the backing from one piece of contact paper.
- Lay it on a flat surface.
- Place the lantern cutout, face down, on the contact paper.
- Next decorate the inside of their camping light however you like {I did various shades of orange, red and yellow in mine, as well as loose star shaped craft glitter.}
- Once you are done creating the contents, grab the second piece of contact paper.
- Peel off the backing and place it on top of the other piece of contact paper, moving your hand around to "squish" everything together.
- To finish off the Stained Glass Lantern Cup craft, use your scissors to trim out the cup/remove the excess contact paper.
- Then display proudly on a window with a little bit of clear tape!!!


NEED MORE HELP DOWNLOADING OUR FREE PRINTABLES? PLEASE REFER TO OUR FAQ PAGE
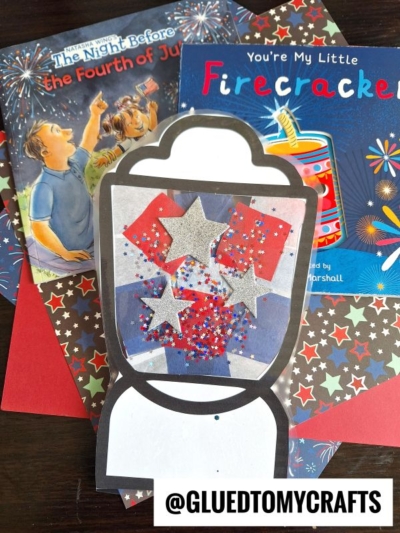
This craft idea is also perfect for OTHER holidays!

Change up the colors for CHRISTMAS!
