
Crafting with kids has so many amazing benefits! So why not add today’s popsicle stick hippo tutorial to your afternoon plans today?!
Keep scrolling for all the details on this simple no-prep hippopotamus kids craft idea!

Hippo Craft Idea For Kids
I can’t say it enough – I “heart” this new crafty idea that I came up with on the fly just now.
On that note – I honestly can’t believe that in over five years of blogging, I didn’t have ANY hippo themed DIY’s on Glued To My Crafts. I gotta change that ASAP – activating new goal! Till then – this popsicle stick hippo will have to do and I really hope you are encouraged to recreate it with your child today!
Our paper and wood craft stick hippopotamus is super easy to make and doubles as an extra cute pretend puppet piece, to play with as well. The project level on this one is simple and moderate. I highly suggest this art project idea for the preschool and up age group. If kids can glue some sticks together and cut some paper, they can do this one with little to no help! Plus it pairs nicely with a story book and/or zoo theme!
So ready, steady, go! All the details on this smiling and big tooth hippo friend can be found below in the full tutorial. I highly encourage you to make a whole “bloat” of them with your child {fun fact – a group of hippos is usually called a bloat, pod, or herd! Also hippopotamus comes from a Greek word that means “water horse”.} Once you are done crafting up your hippopotamus craft pieces, come shares pictures of your creations on our Facebook page so we can admire them from a far!
Happy crafting, my dear friends! I can’t wait to see your beautiful pieces in action! #gluedtomycrafts
RELATED —> Chalk Art Panda Bear


Craving some creative fun with the kids? Try making this adorable popsicle stick hippo craft! It’s sure to put a smile on their faces and it’s easy enough for any beginner crafter!
Craft Supplies:
- Jumbo Popsicle Sticks – 4 per craft
- Mini Popsicle Sticks – 2 per craft
- Low Temp Glue Gun
- Light Gray Craft Paint
- Paint Brush
- Small Paper Plate
- Craft Scissors
- Dark Gray Cardstock Paper
- White Cardstock Paper
- Black Sharpie Marker
- Large Wiggle Eyes – 2 per craft
Directions:
- First get the glue gun hot and ready.
- Assemble the base of your hippo friend by gluing FOUR jumbo popsicle sticks and TWO mini popsicle sticks together to look like a fence door {4 next to each other and the mini popsicle sticks across to secure in place.}
- Allow it to dry completely. Repeat for each hippo friend you want to make today.
- Now grab your craft paint, paper plate and form brush.
- Squirt some gray craft paint on the paper plate.
- Using the foam paint brush, paint the flat side of your popsicle stick shape completely gray.
- Set it aside to let it dry completely.
- While that is drying, go ahead and grab your sheets of cardstock paper, marker and scissors.
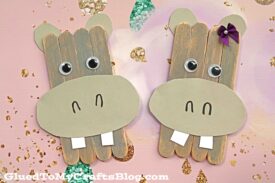
- Out of the gray cardstock, cut out a large oval shape nose/mouth for the hippo, as well as two ears.
- Out of the white cardstock cut out two large rectangle teeth.
- Now go ahead and glue ALL the paper pieces to the popsicle stick shape from earlier.
- Use the sharpie marker to draw on nostrils on the oval paper piece.
- To finish off the craft glue the two wiggle eyes in place so he can see.
- Add any other embellishments you see fit.
- Then let it dry completely before displaying proudly!!!
- Don’t forget to snap a few pictures of your finished popsicle stick hippopotamus creations to share with us! #gluedtomycrafts
RELATED –> Paper Plate Panda
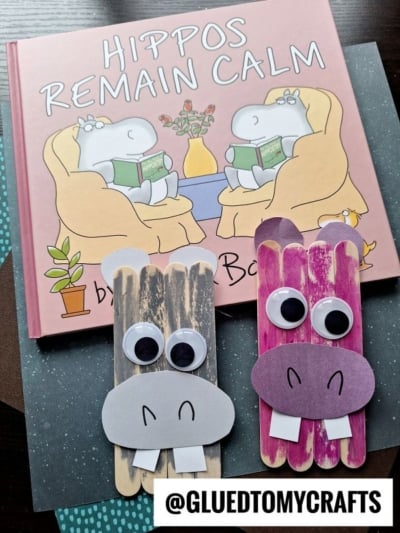

AFFILIATE LINK – PAIR OUR CRAFT IDEA WITH THIS BOOK RECOMMENDATION
We have the BEST kid craft tutorials on the internet {if I do say so myself!} Several of which are unique to us and first-seen-here!
Just check out our Popsicle Stick Panda Bear, Handprint Monkey Keepsake and Popsicle Stick Panda craft tutorials! All of which are instant creativity at your child’s fingerprints and sure to be loved! Better yet – pair either of them with today’s popsicle stick hippo tutorial and you are sure to have a “stumping” good time!
Happy crafting my friends!!! Hopefully your crafty plans are hippo-tastic because of this amazing art project idea you found on Glued To My Crafts just now!

Popsicle Stick Hippo Craft Idea
Here’s your checklist of supplies to bring this craft to life:
- 4 Jumbo Popsicle Sticks
- 2 Mini Popsicle Sticks
- Craft Paint
- Cardstock Paper
- 2 Wiggle Eyes
- Embellishments
Prepare your creative haven by laying down a protective cover before the crafting magic begins!
Directions:
- First get the glue gun hot and ready.
- Assemble the base of your hippo friend by gluing FOUR jumbo popsicle sticks and TWO mini popsicle sticks together to look like a fence door {4 next to each other and the mini popsicle sticks across to secure in place.}
- Allow it to dry completely. Repeat for each hippo friend you want to make today.
- Now grab your craft paint, paper plate and form brush.
- Squirt some gray craft paint on the paper plate.
- Using the foam paint brush, paint the flat side of your popsicle stick shape completely gray.
- Set it aside to let it dry completely.
- While that is drying, go ahead and grab your sheets of cardstock paper, marker and scissors.
- Out of the gray cardstock, cut out a large oval shape nose/mouth for the hippo, as well as two ears.
- Out of the white cardstock cut out two large rectangle teeth.
- Now go ahead and glue ALL the paper pieces to the popsicle stick shape from earlier.
- Use the sharpie marker to draw on nostrils on the oval paper piece.
- To finish off the craft glue the two wiggle eyes in place so he can see.
- Add any other embellishments you see fit.
- Then let it dry completely before displaying proudly!!!

CLICK HERE TO PRINT THE DIRECTIONS FOR THIS CRAFT