
We are blossoming your child’s imagination with our latest Paper Flower Chalk Art kid craft tutorial. Keep scrolling for all the details and free printable template below!

Flower Craft With Black Paper & Sidewalk Chalk
We’ve done it again on Glued To My Crafts! Our Chalk Art Peacock Idea is getting a very good response on Pinterest right now, so it got my crafty wheels spinning to come up with a NEW idea to share with you all. Instead of the peacock feather design like in the previous post, we are making some happy, colorful flower petals instead!
Dollar Tree and the Target Dollar Spot are both a great place to hit up for chalk, in large boxes with vibrant colors, for cheap!
With that being said, our super fun flower DIY is going to be rather inexpensive to recreate. All you need is a few pieces of chalk, black construction paper and our free smiling face printable listed below. That’s it! I could even see this idea being done easily with a large crowd like in a classroom, at summer camp and even birthday parties. Even adults can participate in this one too!
So what are we waiting for?! All the details and the free flower face printable can be found below. Don’t let this crafty abstract idea slip away. Bookmark it now and later this week, make some colorful “one-of-a-kind” chalk art flowers with the kids & then show off those colorful creations, with pride, with us! Happy crafting, my dear friends!!!
RELATED —> Paper & Chalk Baby Bird

This fun chalk art flower on black paper craft is perfect for kids! It’s a great way to teach them about color and blending.
Craft Supplies:
- Flower Printable {on our spring landing page}
- White Cardstock Paper
- Yellow Crayon
- Scissors
- Black Construction Paper
- Sidewalk Chalk
- Baby Wipes
- Adhesive
Directions:
- First things first – grab our free flower face printable, listed above in the supply list.
- Next, go ahead and find it on your computer, right click and print the file on a single sheet of white cardstock paper. One print will give you TWO flowers so you will be able to do the chalk art craft TWICE. Print as many as you like but only use our file for personal use only please.
- Now that you have the printable, go ahead and color in one of the flower faces with a yellow crayon {or marker.}
- When done coloring in the circle, use the scissors to trim it out.
- Set aside the leftover paper piece with the other face in it, so you can repeat the craft later!
- Now grab a single sheet of black cardstock and your various pieces of colored chalk.
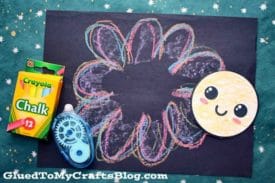
- Make several line “petal shapes” going outward from the center of the paper {see our image for example} to make the flower. Add as many lines and colors that you like. You want it to be nice and “full” though.
- Use baby wipes to clean off excess chalk from fingers and hands.
- When done with the chalk, go ahead and grab your circle head cutout from earlier & the glue stick.
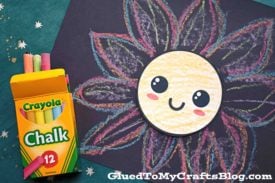
- Glue the smiling flower head to the center of your chalk art design you just made.
- Add any other embellishments you see fit {maybe some glitter or small rhinestone stickers!}
- Then display proudly for all to see!
- Repeat the steps above, the same way, for the second flower piece leftover from earlier!
RELATED —> Paint Splat Tulip

At Glued To My Crafts, we have a “knack” for stepping outside the traditional. It’s kind-of what we strive to do with our website.
So before you leave, come check out our popular Pool Lounging Friends, All The Fish In The Sea and Food Truck craft posts. All three are super unique and sure to impress the crafty fingers that recreate them!

Chalk Art Flower On Black Paper
Here’s your checklist of supplies to bring this craft to life:
Prepare your creative haven by laying down a protective cover before the crafting magic begins!
Directions:
- First print out our provided printable, in color, on a single sheet of white cardstock paper. You only need one print per craft.Cardstock Paper
- Now that you have the printable, go ahead and color in one of the flower faces with a yellow crayon {or marker.}
- When done coloring in the circle, use the scissors to trim it out.
- Set aside the leftover paper piece with the other face in it, so you can repeat the craft later!
- Now grab a single sheet of black cardstock and your various pieces of colored chalk.
- Make several line "petal shapes" going outward from the center of the paper {see our image for example} to make the flower. Add as many lines and colors that you like. You want it to be nice and "full" though.Sidewalk Chalk

- Use baby wipes to clean off excess chalk from fingers and hands.
- When done with the chalk, go ahead and grab your circle head cutout from earlier & the glue stick.
- Glue the smiling flower head to the center of your chalk art design you just made.
- Add any other embellishments you see fit {maybe some glitter or small rhinestone stickers!}
- Then display proudly for all to see!
- Repeat the steps above, the same way, for the second flower piece leftover from earlier!

NEED MORE HELP DOWNLOADING OUR FREE PRINTABLES? PLEASE REFER TO OUR FAQ PAGE