Get creative with your kids this holiday season! Try out this fun and easy paper and chalk art Santa craft idea. Perfect for making keepsakes or decorations!

This easy holiday craft is perfect for kids and adults to recreate during the Christmas season. With our tutorial, you will be able to create a Santa inspired art piece using white sidewalk chalk and paper!

Many of the materials I used today in this chalk art Santa beard tutorial can be found at your local dollar store or even the grocery store. No need to pull out your hair and head to a fancy craft store with the crowds. We made it super simple and rather affordable – as always!
So friends – don’t let this crafty idea slip away! Christmas will be over before you know it and this unique Christmas craft idea NEEDS to be done with your child! Then show off those creations, with pride, with us! We love seeing those pics so tag us on Facebook or use our #gluedtomycrafts in the description for us to see!
Happy crafting, my dear friends! I can’t wait to see your paper and chalk Santa beard creations!


Kids can create a fun and festive Santa beard craft using white chalk on black cardstock paper. This is a great way to add some extra Christmas cheer to your home this season.
Craft Supplies:
- Small Paper Plate
- Scissors
- Skin Tone Craft Paint
- Paint Brush
- Black Cardstock Paper
- Red Cardstock Paper
- White Cardstock Paper
- White Chalk
- Baby Wipes
- Adhesive
- Stapler
- Small Wiggle Eyes
Directions:
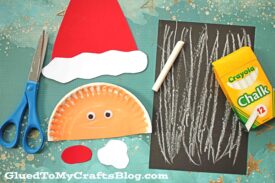
- First things first – grab your small paper plate and scissors.
- Cut the paper plate, straight down the center, into TWO equal halves.
- Reserve one half for today’s Santa craft and save the other for a rainy day.
- Now grab your skin tone craft paint and foam paint brush.
- Squirt some paint in the middle of the paper plate half and move it around with the foam paint brush, until the paper plate is completely covered.
- When done painting, set aside the paper plate to allow it to dry completely.
- Now grab your black cardstock and the scissors again.
- Fold the black cardstock paper in half and open it back up.
- Use scissors to again to cut straight up the center, to create two equal pieces.
- Reserve one black paper piece for today’s craft and save the other for another day.
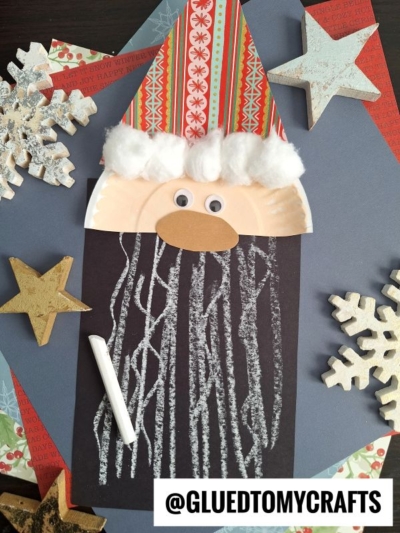
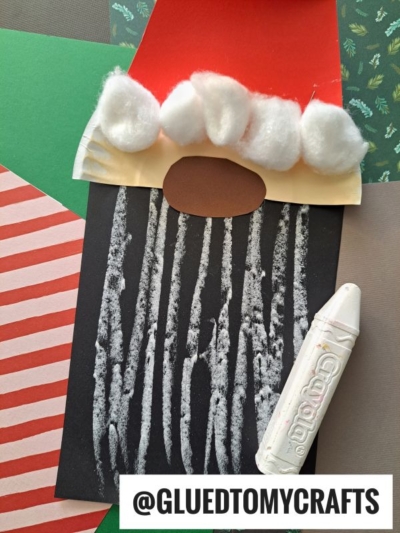
- Now grab your white chalk, Make several lines, all over the black cardstock, to recreate Santa’s beard. Add as much or as little as you like.
- When done with the chalk, set aside the paper piece and clean your hands off with a few baby wipes.
- Now grab your red and white cardstock paper.
- Cut out a large Santa hat, Santa’s nose and a few white elements for his cap.
- Once you have all your paper pieces cut out and the paper plate is dry to touch, it’s time to assemble your craft! Go ahead and grab all your paper pieces, the glue, wiggle eyes and stapler.
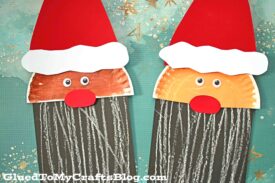
- Start off by stapling the painted paper plate half to the top of the black cardstock with the white chalk lines.
- Follow that up by adding the hat on top of that, then the nose and of course, the small wiggles eyes so he can see.
- Add any other embellishments you see fit {maybe some glitter or some holiday stickers for a festive look.}
- Then display your custom one-of-a-kind paper chalk art Santa piece proudly for all to see!
- Don’t forget to share pictures of your bearded Santa craft with us on your social media sites! #gluedtomycrafts
RELATED —> Popsicle Stick Santa

At Glued To My Crafts, we have a “knack” for stepping outside the craft box – especially around the holidays! It’s kind-of what we strive to do with our website and present to our readers, on a daily basis!
So before you leave our wonderful site, please check out our popular Snowman Sleigh, Stocking House and Fork Painted Santa Beard holiday craft posts!
All three are super unique to us and sure to impress the crafty fingers that recreate them today!

Chalk Art Santa Craft Idea For Kids
Get creative with your kids this holiday season! Try out this fun and easy paper and chalk art Santa craft idea. Perfect for making keepsakes or decorations!
Here’s your checklist of supplies to bring this craft to life:
Prepare your creative haven by laying down a protective cover before the crafting magic begins!
Directions:
- First things first - grab your small paper plate and scissors.
- Cut the paper plate, straight down the center, into TWO equal halves.
- Reserve one half for today's Santa craft and save the other for a rainy day.
- Now grab your skin tone craft paint and foam paint brush.
- Squirt some paint in the middle of the paper plate half and move it around with the foam paint brush, until the paper plate is completely covered.
- When done painting, set aside the paper plate to allow it to dry completely.
- Now grab your black cardstock and the scissors again.
- Fold the black cardstock paper in half and open it back up.
- Use scissors to again to cut straight up the center, to create two equal pieces.
- Reserve one black paper piece for today's craft and save the other for another day.
- Now grab your white chalk, Make several lines, all over the black cardstock, to recreate Santa's beard. Add as much or as little as you like.
- When done with the chalk, set aside the paper piece and clean your hands off with a few baby wipes.
- Now grab your red and white cardstock paper.
- Cut out a large Santa hat, Santa's nose and a few white elements for his cap.
- Once you have all your paper pieces cut out and the paper plate is dry to touch, it's time to assemble your craft! Go ahead and grab all your paper pieces, the glue, wiggle eyes and stapler.

- Start off by stapling the painted paper plate half to the top of the black cardstock with the white chalk lines.
- Follow that up by adding the hat on top of that, then the nose and of course, the small wiggles eyes so he can see.
- Add any other embellishments you see fit {maybe some glitter or some holiday stickers for a festive look.}
- Then display your custom one-of-a-kind paper chalk art Santa piece proudly for all to see!
CLICK HERE TO PRINT THE DIRECTIONS FOR THIS CRAFT
If you've enjoyed our content or have any thoughts to share, we'd love to hear from you! Mention @gluedtomycrafts or tag #gluedtomycrafts on Instagram!