Glued To My Crafts

Join thousands of others who have gotten GLUED to our craft tutorials!

  • Home
  • Safety Guidelines
  • Seasonal Themes
    • New Years
    • Valentine’s Day
    • St. Patrick’s Day
    • Spring
    • Easter
    • Mother’s Day
    • Summer
    • Father’s Day
    • Patriotic
    • Halloween
    • Thanksgiving
    • Fall
    • Winter
    • Christmas
    • Snowmen
    • Story Time
  • About Us
  • Amazon Storefront
  • Monthly Themes
    • January Craft Ideas
    • February Craft Ideas
    • March Craft Ideas
    • April Craft Ideas
    • May Craft Ideas
    • June Craft Ideas
    • July Craft Ideas
    • August Craft Ideas
    • September Crafts
    • October Crafts
    • November Crafts
    • December Crafts
  • Collection Posts
    • 20+ Creative Paper Bag Craft Ideas for Kids to Enjoy Today
    • 20+ Plastic Egg Stamp Crafts for Spring Fun
    • 50+ Creative Thumbprint Craft Ideas for Spring Fun
    • Craft Ideas for Kids Using Egg Stickers
    • Thumbs Up! 50+ Creative Thumbprint Crafts for Kids
    • 40+ Insect Craft Ideas For Kids
    • 50+ Craft Ideas For Kids Using A Plastic Fork As A Paint Brush
    • 30+ Puffy Paint Craft Ideas For Kids To Try Today!
    • 20+ Fun and Easy Paper Bowl Crafts for Kids
    • Pete The Cat Craft Ideas: Fun & Easy Projects for Kids
    • Transform Coffee Filters into 40+ Stunning DIY Projects
    • Transform Crepe Paper Streamers into 60+ Stunning Crafts
    • Pie Server Stamped Craft Ideas Kids Will Adore
    • Paint Splat Pie Craft Idea For Kids

Easy Paper Plate Snowman Sleigh Craft for Kids

When engaging in craft activities, it is important for young children to have adult supervision at ALL times. It is also recommended to use supplies that are suitable for your child's age. Feel free to modify materials or steps to meet your specific requirements. Please refer to our safety guidelines for more information.

As an Amazon Associate I earn from qualifying purchases. This post may contain affiliate links. For more information, please see our disclosure policy.

UPDATE FOR 2026 - To reduce storage costs and download fees, we recently made some changes to our website. The password for all our files this year is GLUEDTOMYCRAFTS2026. No sign-up is required to download our free printables! You can enjoy our printables without creating an account or paying for Box.com. Simply follow the download instructions on our FAQ PAGE.

This craft is perfect for the winter season! Kids will love creating a fun snowman sleigh using a paper plate.
SKIP THE FLUFF AND PRINT THE DIRECTIONS
Paper Plate Snowman Sleigh - Kid Craft

Paper Plate Snowman Sleigh - Kid Craft

Looking for a delightful way to spark creativity and holiday cheer with your little ones? You have found the perfect winter activity.

This adorable paper plate snowman sleigh craft brings the magic of the season right to your kitchen table. With just a few simple supplies and a sprinkle of imagination, kids of all ages can build their very own festive masterpiece.

Whether you need a weekend activity, a classroom project, or a fun way to make memories together, this project hits all the right marks. We will walk you through exactly how to turn everyday materials into a cute, display-worthy decoration. Grab your supplies, roll up your sleeves, and let’s dive into one of our favorite easy holiday crafts!

Paper Plate Snowman Sleigh - Kid Craft

Before the crafting magic begins, you need to gather your materials. Prepare your creative haven by laying down a protective cover or old newspaper over your table. This makes cleanup a breeze!

Craft Supplies:

Here is your checklist of supplies to bring this craft to life:

  • Large Paper Plate – 1 per craft
  • Craft Scissors
  • Craft Paint
  • Paint Brush
  • White Cardstock Paper
  • Pencil or Pen
  • Black Cardstock Paper
  • Gray Cardstock Paper
  • Sharpie Markers
  • School Glue
  • Stapler

Directions:

Ready to build your sleigh? Follow these simple steps to guide your kids through this fun and festive project.

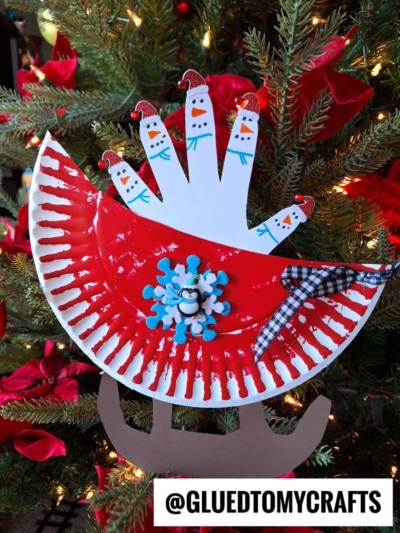
  1. First things first – grab your scissors and large paper plate. Cut the plate in half, straight up. Save one half for today’s craft and put the other aside for a rainy day!
  2. Now that you have your paper plate half, you will want to cut a slight curve out on the straight edge side, that will give the paper sleigh more definition. Think of Santa’s sleigh and where we sits when you are cutting. Just don’t cut too much off {in that case – the second paper plate half piece will come in handy!}
  3. Let’s get to the paint step! Squirt a small amount of paint on the paper plate half and have children use a paint brush, to move the paint all around until the piece is completely covered. Set aside to let it dry completely.
  4. Next grab the white cardstock, pencil and scissors. Trace your child’s hand on the paper. Now trim that out with scissors. Use the black cardstock and various Sharpie markers to give each finger a “snowman” look. Set aside.
  5. Now grab the gray cardstock. Cut out the bottom of the sleigh. Two sticks and the curved part on the bottom.
  6. To finish off the Paper Plate Handprint Snowman Sleigh – simply staple the gray cardstock pieces in place and add ANY other embellishments you see fit. I added a bow and some glitter glue, but some Christmas stickers would be great too!
  7. Once your craft is complete, it deserves a prime spot in your home! Display it proudly for everyone to see throughout the winter season. You can punch a small hole in the top of the sleigh, thread a piece of festive ribbon through it, and hang it on your Christmas tree as an oversized ornament. Alternatively, add a magnet to the back and stick it on your refrigerator to showcase your child’s hard work.

Fun Variations to Try:

The beauty of easy holiday crafts lies in their versatility. You can easily adapt this project to fit different themes or age groups.

Instead of drawing snowmen on the handprint, you could turn the fingers into a family of reindeer. Simply use brown cardstock for the handprint, add some googly eyes, and glue a tiny red pom-pom to the thumb for a Rudolph-inspired look.

If you want to skip the paint altogether to avoid a mess, let the kids cover the paper plate half in torn pieces of red and green tissue paper. They can use school glue to stick the tissue paper down, creating a beautiful stained-glass effect for their sleigh.

RELATED —> Paper Plate Snowman House

A painted red paper plate craft shaped like a cardinal bird sits on a book titled Don’t Let the Pigeon Drive the Sleigh! Nearby is a handprint snowman craft, plus festive holiday decorations and a cheerful paper plate snowman.

We believe every child should enjoy at least one hands-on project this holiday season. You simply cannot argue with the value of extra family time spent making one-of-a-kind creations.

We hope this paper plate snowman sleigh brings plenty of joy to your home or classroom. If you decide to give this tutorial a try, we would love to see how your sleighs turn out! Gather your materials, set up your crafting station, and join your kids in the fun. When you are done, snap a picture and share it with us by tagging our accounts on Instagram. Happy crafting!

stacey-signature-2023

Paper Plate Snowman Sleigh - Kid Craft
PRINT

Paper Plate Snowman Sleigh Craft

This craft is perfect for the winter season! Kids will love creating a fun snowman sleigh using a paper plate.

Here’s your checklist of supplies to bring this craft to life:

  • 1 Large Paper Plate
  • Craft Paint
  • Cardstock Paper
  • Scissors
  • Paint Brush
  • Pencil or Pen
  • Sharpie Markers
  • School Glue
  • Stapler
  • Christmas Book Recommendations - link to our Amazon shop

Prepare your creative haven by laying down a protective cover before the crafting magic begins!

Directions:

  • First things first - grab your scissors and large paper plate.
  • Cut the plate in half, straight up. Save one half for today's craft and put the other aside for a rainy day!
  • Now that you have your paper plate half, you will want to cut a slight curve out on the straight edge side, that will give the paper sleigh more definition. Think of Santa's sleigh and where we sits when you are cutting. Just don't cut too much off {in that case - the second paper plate half piece will come in handy!}
  • Let's get to the paint step! Squirt a small amount of paint on the paper plate half and have children use a paint brush, to move the paint all around until the piece is completely covered.
  • Set aside to let it dry completely.
  • Next grab the white cardstock, pencil and scissors.
  • Trace your child's hand on the paper. Now trim that out with scissors.
  • Use the black cardstock and various Sharpie markers to give each finger a "snowman" look.
  • Now grab the gray cardstock. Cut out the bottom of the sleigh. Two sticks and the curved part on the bottom.
  • To finish off the Paper Plate Snowman Sleigh - simply staple the gray cardstock pieces in place and add ANY other embellishments you see fit.
  • Then display it proudly for ALL to see throughout the season!
    Paper Plate Snowman Sleigh - Kid Craft
MINI-HEARTS-page-separator-logo-gluedtomycrafts

CLICK HERE TO PRINT THE DIRECTIONS FOR THIS CRAFT

If you've enjoyed our content or have any thoughts to share, we'd love to hear from you! Mention @gluedtomycrafts or tag #gluedtomycrafts on Instagram!

Craft Activity Safety Guidelines:

Always Ensure Adult Supervision - Young children should be supervised at all times when engaging in craft activities. This is essential to keep them safe and ensure materials are used correctly. Use Age-Appropriate Supplies - Choose craft supplies that are suitable for your child’s age. Check labels for recommendations and avoid items with small parts or sharp edges for younger children. Modify as Needed - Feel free to adapt materials or steps to meet your child's abilities and safety needs. For example, substitute scissors with safety scissors if necessary. Keep an Eye on Allergies - Be mindful of potential allergens in craft materials like glue, paint, or certain fabrics. Opt for non-toxic and hypoallergenic options whenever possible. Organize and Secure Supplies - Keep all craft tools and materials organized. Store sharp objects, small parts, and potentially hazardous items out of reach when not in use. Following these guidelines will ensure that crafts remain fun, creative, and, most importantly, safe for everyone involved!


OUR PRIVACY POLICY

OUR COPYRIGHT POLICY

  • Email
  • Facebook
  • Instagram
  • Pinterest
  • Twitter
  • YouTube

LOOKING FOR SOMETHING?

EXPLORE OUR SITE:

© 2012–2026 Glued To My Crafts
All activities should be supervised by an adult at all times. Please refer to our safety guidelines for more information.


Please note that all the content of the website, including printables, are for classroom and personal use only. This means that any digital item you download from our site can be used for non-commercial use only. We kindly request that you do not reproduce or sell our creations. We appreciate your understanding and cooperation in respecting our content and intellectual property rights.

Accessibility Adjustments

Powered by OneTap

How long do you want to hide the toolbar?
Hide Toolbar Duration
Select your accessibility profile
Vision Impaired Mode
Enhances website's visuals
Seizure Safe Profile
Clear flashes & reduces color
ADHD Friendly Mode
Focused browsing, distraction-free
Blindness Mode
Reduces distractions, improves focus
Epilepsy Safe Mode
Dims colors and stops blinking
Content Modules
Font Size

Default

Line Height

Default

Color Modules
Orientation Modules