Have you ever seen such an adorable craft?! Inspired by the “friends” that make Santa’s sleigh fly high in the sky on Christmas night, today I present to YOU our Paper Flying Reindeer kid craft idea!
It’s a mixed media art piece that is perfect for your holiday kid crafting plans! Keep scrolling for the FULL details, my friends!
Paper Plate Flying Handprint Reindeer – Christmas Kid Craft
We want you to FLY HIGH with us this holiday season! That’s why we have another great kid craft idea to share on Glued To My Crafts today. This time we are taking a simple paper plate, cotton pads and some paper embellishments to make a FLYING REINDEER come to life! Just like the real ones that help pull Santa’s sleigh on Christmas eve!
My favorite part is the handprint reindeer – what is yours?! Hopefully you like the overall craft and plan to recreate it with your child today! If you do, please share pictures with us! It really makes our day to see the tutorials come to life!
Well, my friends… I’ll let you get to it! Find the full tutorial below! Happy crafting!!! Don’t forget to FOLLOW US ON FACEBOOK so you never miss a new tutorial from us! #gluedtomycrafts
PAIR YOUR REINDEER PAPER PLATE CRAFT WITH —> Paper Plate Snowman Sleigh – Kid Craft Idea For Winter
Paper Flying Reindeer Supplies:
- Large Paper Plate – one makes TWO crafts
- Basic Craft Scissors
- Cotton Pads {or cotton balls}
- School Glue
- Pencil or Pen
- Brown Cardstock Paper
- Green Cardstock Paper
- Red Cardstock Paper
- Black Cardstock Paper
- Gold Cardstock Paper
- Wiggle Eyes – two per craft
- Red Sequins – one per craft
- Gold Pipe Cleaner – one per craft
- Hand-Held Office Stapler
Directions:
- First things first – take your large paper plate and cut it in half. Straight up the center to create TWO equal pieces.
- Use one half for today’s craft and save the other for a rainy day.
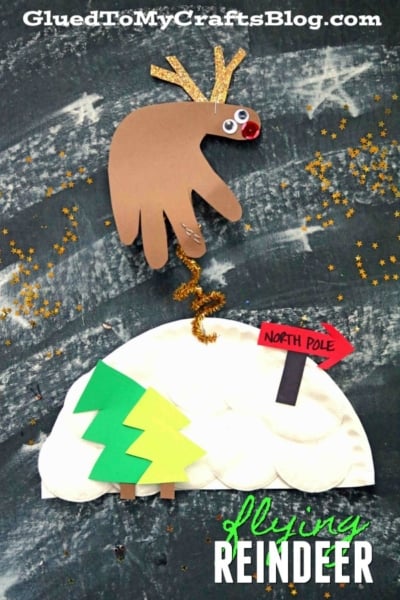
- Now that you have your blank paper plate piece, it’s time to make the “mountain of snow.” Go ahead and use the school glue to cover your paper piece completely in cotton pads {or cotton balls} to make the snow. When done covering it, set aside.
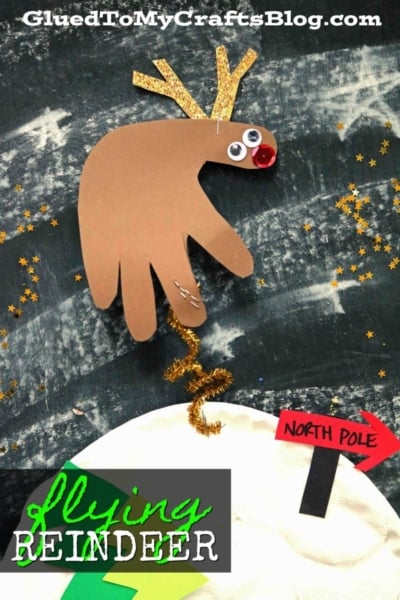
- Next grab the brown cardstock, pencil and scissors. Trace one of your child’s hands on the paper and trim it out with scissors.
- Add embellishments to your newly made handprint to give it the look of a reindeer. Wiggle eyes, red sequin nose and of course – gold antlers! Set aside when done.
- Out of the remaining cardstock, cut out a few trees and a North Pole sign. Set aside.
- Grab your gold pipe cleaner and scissors. Cut the pipe cleaner in half {save one half for a rainy day!}
- Take the pipe cleaner half and curl it with your pencil you used earlier.
- Now go ahead and staple your curled pipe cleaner to the bottom of their handprint reindeer, followed by stapling it to the paper plate snow piece. You want it to look like the reindeer is floating in the air.
- Finally, to finish the Flying Reindeer craft, glue on the other paper embellishments to the paper plate and admire your hard work! This type of craft is best displayed on a flat surface 🙂
PAIR YOUR FINISHED CRAFT WITH OUR —> Handprint Snowmen Poem Keepsake
Paper Plate Flying Handprint Reindeer Craft
Supplies:
- Large Paper Plate - one makes TWO crafts
- Basic Craft Scissors
- Cotton Pads {or cotton balls}
- School Glue
- Pencil or Pen
- Brown Cardstock Paper
- Green Cardstock Paper
- Red Cardstock Paper
- Black Cardstock Paper
- Gold Cardstock Paper
- Wiggle Eyes - two per craft
- Red Sequins - one per craft
- Gold Pipe Cleaner - one per craft
- Hand-Held Office Stapler
Instructions:
- First things first - take your large paper plate and cut it in half. Straight up the center to create TWO equal pieces.
- Use one half for today's craft and save the other for a rainy day.
- Now that you have your blank paper plate piece, it's time to make the "mountain of snow." Go ahead and use the school glue to cover your paper piece completely in cotton pads {or cotton balls} to make the snow. When done covering it, set aside.
- Next grab the brown cardstock, pencil and scissors. Trace one of your child's hands on the paper and trim it out with scissors.
- Add embellishments to your newly made handprint to give it the look of a reindeer. Wiggle eyes, red sequin nose and of course - gold antlers! Set aside when done.
- Out of the remaining cardstock, cut out a few trees and a North Pole sign. Set aside.
- Grab your gold pipe cleaner and scissors. Cut the pipe cleaner in half {save one half for a rainy day!}
- Take the pipe cleaner half and curl it with your pencil you used earlier.
- Now go ahead and staple your curled pipe cleaner to the bottom of their handprint reindeer, followed by stapling it to the paper plate snow piece. You want it to look like the reindeer is floating in the air.
- Finally, to finish the Flying Reindeer craft, glue on the other paper embellishments to the paper plate and admire your hard work! This type of craft is best displayed on a flat surface 🙂

Love this craft? Have a question or comment? Please don't be shy! I love hearing from you and I promise I will respond as soon as possible.