
Isn’t this Paper Plate Reindeer Car craft idea super fun?! You won’t be believe how we “made” the red nose on this Christmas themed tutorial come to life!
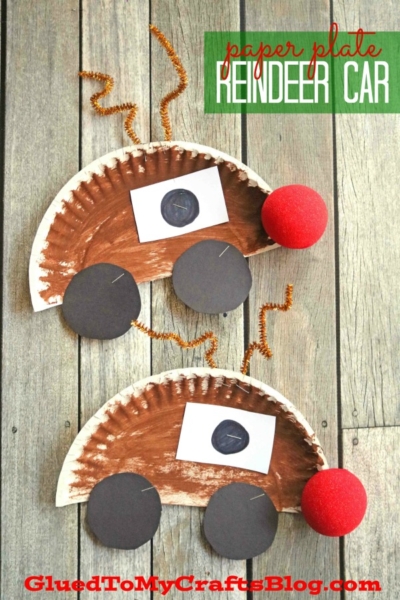
This is such a fun, easy and festive Christmas kids craft idea! All you need are some paper plates, craft paint, red clown noses and a few other supplies. Be sure to check out the video tutorial to see how it’s done.
The countdown is on! We want YOU to get crafty with us this upcoming holiday season!!!
At Glued To My Crafts, it’s our mission to make it EXTRA easy and fun, with no added stress! So if you are looking for an idea outside the traditional, as well as something that the kids will love, I’m proud to say today’s Paper Plate Rudolph Car tutorial is just what you are looking for this Christmas season!!
A few weeks ago I found these foam “clown noses” in the Christmas aisles of Hobby Lobby. Although I had no real idea on what I was going to do with them, in the cart they went.
And boy am I glad I’m grabbed them. With the premade slit in the clown noses, it was the perfect embellishment to slip on a paper plate half and make a “Rudolph” red nose reindeer car come to life within minutes!
The full tutorial is below and I hope you love it as much as I do! Happy crafting and don’t forget to share this tutorial with your friends and family too! #gluedtomycrafts
RELATED —> Handprint Elf Craft Idea

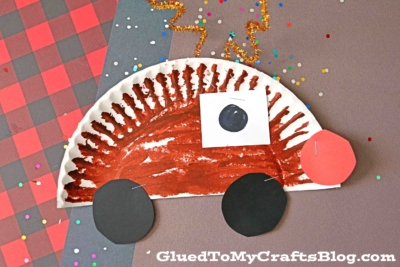
Paper Plate Reindeer Car
This is a super fun, easy and perfect Christmas kids craft idea! We even incorporated clown noses. Your little ones will love this one!
Craft Supplies:
- Large Paper Plate – 1 per craft
- Craft Scissors
- Brown Craft Paint
- Paint Brush
- Gold Pipe Cleaner – 1 per craft
- Red Clown Nose – 1 per craft
- White Cardstock Paper
- Black Cardstock Paper
- School Glue and/or Stapler
- Black Marker
Directions:
- First things first – cut your LARGE paper plate in half. You only need ONE paper plate half per Rudolph car.
- Next up – paint the paper plate half completely brown with a paint brush. Set aside your painted piece to let it dry completely.
- Now it’s time for making the paper embellishments! Grab all your paper, scissors and pencil.
- Cut out circular wheels, a window etc. for your car.
- Once the paper plate is dry and you have everything cut out, it’s time to start assembling your reindeer car.
- Glue/staple the cardstock embellishments in place on the paper plate.
- Use the black Sharpie marker to draw on a simple eye in the cardstock window.
- Fold your gold pipe cleaner in half and staple it to the paper plate for antlers.
- The last step is open up the clown nose {one per car} and slip it to the front of the paper plate car.
- Finally – if desired, add anything else you like for that custom reindeer car look, before displaying proudly!
RELATED —> Popsicle Stick Christmas Truck

Make your holidays EXTRAORDINARY with the help of Glued To My Crafts! We have TONS of Christmas themed tutorials to get you inspired!
A few of our favorites is Footprint Tree Car, Charlie Brown Christmas Tree and Snowman Magnets craft tutorials. Be sure to check them out and let us know what you think of them!
Don’t forget to also share pictures of your creations using our special branded hashtag #gluedtomycrafts for us to find & see!

Paper Plate Rudolph The Red Nose Reindeer Car
Here’s your checklist of supplies to bring this craft to life:
- 1 Large Paper Plate
- Craft Paint
- 1 Pipe Cleaner
- 1 Red Clown Nose
- Cardstock Paper
Prepare your creative haven by laying down a protective cover before the crafting magic begins!
Directions:
- First things first - cut your LARGE paper plate in half. You only need ONE paper plate half per Rudolph car.
- Next up - paint the paper plate half completely brown with a paint brush. Set aside your painted piece to let it dry completely.
- Now it's time for making the paper embellishments! Grab all your paper, scissors and pencil.
- Cut out circular wheels, a window etc. for your car.
- Once the paper plate is dry and you have everything cut out, it's time to start assembling your reindeer car.
- Glue/staple the cardstock embellishments in place on the paper plate.
- Use the black Sharpie marker to draw on a simple eye in the cardstock window.
- Fold your gold pipe cleaner in half and staple it to the paper plate for antlers.
- The last step is open up the clown nose {one per car} and slip it to the front of the paper plate car.
- Finally - if desired, add anything else you like for that custom reindeer car look, before displaying proudly!

CLICK HERE TO PRINT THE DIRECTIONS FOR THIS CRAFT