Glued To My Crafts

Join thousands of others who have gotten GLUED to our craft tutorials!

  • Home
  • Privacy Policy
  • Craft Safety Guidelines
  • Seasonal Themes
    • New Years
    • Valentine’s Day
    • St. Patrick’s Day
    • Spring
    • Easter
    • Mother’s Day
    • Summer
    • Father’s Day
    • Patriotic
    • Halloween
    • Thanksgiving
    • Fall
    • Winter
    • Christmas
    • Snowmen
    • Story Time
  • About Us
  • Our Amazon Storefront
  • Monthly Themes
    • January Craft Ideas
    • February Craft Ideas
    • March Craft Ideas
    • April Craft Ideas
    • May Craft Ideas
    • June Craft Ideas
    • July Craft Ideas
    • August Craft Ideas
    • September Crafts
    • October Crafts
    • November Crafts
    • December Crafts

Popsicle Stick Wizard Hat w/Yarn Beard – Craft Idea

When engaging in craft activities, it is important for young children to have adult supervision at ALL times. It is also recommended to use supplies that are suitable for your child's age. Feel free to modify materials or steps to meet your specific requirements. Please refer to our safety guidelines for more information.

As an Amazon Associate I earn from qualifying purchases. This post may contain affiliate links. For more information, please see our disclosure policy.

UPDATE FOR 2026 - To reduce storage costs and download fees, we recently made some changes to our website. The password for all our files this year is GLUEDTOMYCRAFTS2026. No sign-up is required to download our free printables! You can enjoy our printables without creating an account or paying for Box.com. Simply follow the download instructions on our FAQ PAGE.

Craft yourself a magical Halloween with this fun popsicle stick wizard hat! Invite your littles to put their creative imaginations to work as they weave and braid the yarn for their very own special wizard's beard.
SKIP THE FLUFF AND PRINT THE DIRECTIONS
Popsicle Stick Wizard Hat w/Yarn Beard Kid Craft

Where are my Harry Potter fans at?! We hope our Popsicle Stick Wizard Hat w/Yarn Beard tutorial inspires YOU today!

Popsicle Stick Wizard Hat w/Yarn Beard Kid Craft

Today’s Wizard Hat craft tutorial is something I thought of with the Harry Potter fans in mind {I hope you like it and see the vision like I do!}

I’ve taken the basic framework of our past popsicle stick crafts {just a simple triangle shape} but this time I added some “wizard” embellishments to bring it to life! And as always – it’s super easy for any skill level to recreate with basic supplies!!!

So please be inspired by my latest gnome craft tutorial. All of which, you can find below in the full tutorial from us!

Happy crafting my friends! Don’t forget to share pictures of your wizard hat creations with us! You can ALWAYS tag us on Instagram for easy sharing! I can’t wait to see what you make with your young crafter today! #gluedtomycrafts

Popsicle Stick Wizard Hat w/Yarn Beard Kid Craft

Are you loking for a fun and extra MAGICAL craft project for kids to tackle today? We are going to show you how to make a make a wizard hat and beard craft within minutes!

Craft Supplies:

  • Jumbo Popsicle Sticks – 3 per craft
  • School Glue
  • Craft Paint {blue or purple}
  • Paper Plate
  • Paint Brush
  • Craft Scissors
  • Colored Cardstock Paper
  • Skin Tone Cardstock Paper
  • White Craft Yarn
  • Yellow Star Stickers

Directions:

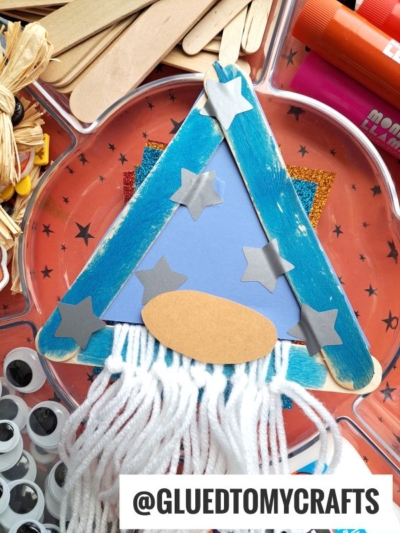
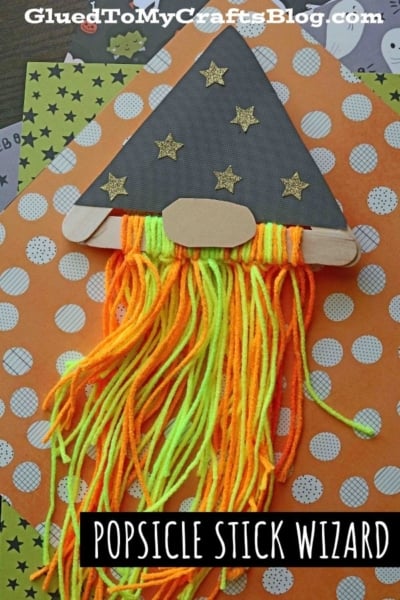
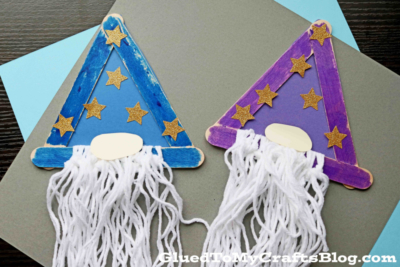
  • First things first – we are going to start off by gluing together the wood hat shape. Glue THREE jumbo popsicle sticks together in a simple triangle formation. You will want ONE assembled popsicle stick shape PER wizard craft.
  • Set aside to let it dry a bit.
  • When ready – go ahead and paint your craft stick triangle shape.
  • Once again, set it aside to let it dry completely.
  • While that is drying, cut out a triangle piece from some cardstock paper, that will fit inside the popsicle stick triangle shape you just made.
  • You should also at this time cut out a small oval shaped nose {from the skin tone cardstock paper} for the wizard as well.
  • Once the popsicle stick shape is dry enough, it’s time for the yarn beard! Grab the white yarn and scissors.
  • Cut SEVERAL long strips of yarn, that will be the “beard” of the craft. This step could vary on how thick you want the beard to be. I would say 20-30 long pieces is a good amount.
  • Next go ahead and TIE ALL the pieces of white yarn strands to ONE side of your popsicle stick triangle shape, in a line. You want them to be facing OUTWARD {like a beard} from the triangle shape. Repeat/add as much yarn as you like, until you have the look you like.
  • If need be – trim down the secured down yarn with your scissors.
  • Finally – grab your cardstock paper pieces from earlier and the school glue.
  • Flip your popsicle stick piece over {so the painted side is facing download} and glue the triangle shape in place.
  • Now flip over the piece again and glue down the oval cutout, right on top of the yarn beard. You want it to look like his nose.
  • The last step is to add the star stickers on the hat design, to create the “wizard” look.
  • Add other embellishments you see fit like glitter, rhinestones etc.
  • Set it all aside to let it dry completely before displaying your wizard friend proudly for all to see!

RELATED —> Paper Plate Witch Hat

Popsicle Stick Wizard Hat w/Yarn Beard Kid Craft

Don’t let the crafty fun stop here with today’s popsicle stick wizard hat tutorial!

Check out our Rapunzel’s Castle and Popsicle Stick Llama craft posts for more DIY fun for the kids!!!

stacey-signature-2023

Popsicle Stick Wizard Hat w/Yarn Beard Kid Craft
PRINT

Popsicle Stick Wizard Hat w/Yarn Beard - Craft Idea

Craft yourself a magical Halloween with this fun popsicle stick wizard hat! Invite your littles to put their creative imaginations to work as they weave and braid the yarn for their very own special wizard's beard.

Here’s your checklist of supplies to bring this craft to life:

  • 3 Jumbo Popsicle Sticks
  • Craft Paint
  • Cardstock Paper
  • Star Stickers
  • Craft Yarn
  • School Glue
  • 1 Small Paper Plate
  • 1 Foam Paint Brush
  • 1 Scissors
  • Halloween Book Recommendations - link to our Amazon shop

Prepare your creative haven by laying down a protective cover before the crafting magic begins!

Directions:

  • First things first - we are going to start off by gluing together the wood hat shape. Glue THREE jumbo popsicle sticks together in a simple triangle formation. You will want ONE assembled popsicle stick shape PER wizard craft.
  • Set aside to let it dry a bit.
  • When ready - go ahead and paint your craft stick triangle shape.
  • Once again, set it aside to let it dry completely.
  • While that is drying, cut out a triangle piece from some cardstock paper, that will fit inside the popsicle stick triangle shape you just made.
  • You should also at this time cut out a small oval shaped nose {from the skin tone cardstock paper} for the wizard as well.
  • Once the popsicle stick shape is dry enough, it's time for the yarn beard! Grab the white yarn and scissors.
  • Cut SEVERAL long strips of yarn, that will be the "beard" of the craft. This step could vary on how thick you want the beard to be. I would say 20-30 long pieces is a good amount.
  • Next go ahead and TIE ALL the pieces of white yarn strands to ONE side of your popsicle stick triangle shape, in a line. You want them to be facing OUTWARD {like a beard} from the triangle shape. Repeat/add as much yarn as you like, until you have the look you like.
  • If need be - trim down the secured down yarn with your scissors.
  • Finally - grab your cardstock paper pieces from earlier and the school glue.
  • Flip your popsicle stick piece over {so the painted side is facing download} and glue the triangle shape in place.
  • Now flip over the piece again and glue down the oval cutout, right on top of the yarn beard. You want it to look like his nose.
  • The last step is to add the star stickers on the hat design, to create the "wizard" look.
  • Add other embellishments you see fit like glitter, rhinestones etc.
  • Set it all aside to let it dry completely before displaying proudly!
    Popsicle Stick Wizard Hat w/Yarn Beard Kid Craft
MINI-HEARTS-page-separator-logo-gluedtomycrafts

CLICK HERE TO PRINT THE DIRECTIONS FOR THIS CRAFT

If you've enjoyed our content or have any thoughts to share, we'd love to hear from you! Mention @gluedtomycrafts or tag #gluedtomycrafts on Instagram!

Craft Activity Safety Guidelines:

Always Ensure Adult Supervision - Young children should be supervised at all times when engaging in craft activities. This is essential to keep them safe and ensure materials are used correctly. Use Age-Appropriate Supplies - Choose craft supplies that are suitable for your child’s age. Check labels for recommendations and avoid items with small parts or sharp edges for younger children. Modify as Needed - Feel free to adapt materials or steps to meet your child's abilities and safety needs. For example, substitute scissors with safety scissors if necessary. Keep an Eye on Allergies - Be mindful of potential allergens in craft materials like glue, paint, or certain fabrics. Opt for non-toxic and hypoallergenic options whenever possible. Organize and Secure Supplies - Keep all craft tools and materials organized. Store sharp objects, small parts, and potentially hazardous items out of reach when not in use. Following these guidelines will ensure that crafts remain fun, creative, and, most importantly, safe for everyone involved!


OUR PRIVACY POLICY

OUR COPYRIGHT POLICY

  • Email
  • Facebook
  • Instagram
  • Pinterest
  • Twitter
  • YouTube

LOOKING FOR SOMETHING?

EXPLORE OUR SITE:

TRENDING TODAY:

  • A pink hand-shaped bookmark with red heart stickers and star confetti surrounds a round note that reads a heartfelt message about love and reading. The image is from GluedToMyCraftsBlog.com. Handprint Bookmark Keepsake: A Gift That Holds Your Spot
  • A handmade Valentine’s Day craft featuring a red rose made of torn paper, two green handprint leaves, a glue bottle, heart decorations, and a message: “LOOK WHAT I MADE - A ROSE THAT WON’T FADE! WISHING YOU LOVE THIS VALENTINE’S DAY!”. Torn Paper Rose Card Craft Tutorial for Valentine’s Day
  • A colorful craft project featuring a yellow felt moon, sparkly stars, and heart shapes, with glue and a heartfelt message. Torn Paper Love You To The Moon and Back Card Craft Idea For Kids
  • A handmade card with a rocket drawing, hearts, and messages of love. Felt hearts and an envelope are around it. Handprint Rocket Keepsake - I Love You Because
  • A colorful paper craft featuring a red and pink painted paper plate with yellow circles in the center, green handprint cutouts as leaves, surrounded by craft supplies, heart decorations, and paint bottles. Paint Splat Valentine's Day Flower Craft Idea
  • A vibrant Valentine's Day craft showcasing a torn-paper bumblebee with googly eyes on a white sheet, accompanied by the text "MY VALENTINE!" The scene is decorated with felt hearts, heart-shaped gems, and patterned papers, with a glue bottle and crafting supplies adding to the creative atmosphere. Torn Paper Bee My Valentine Card Craft Idea For Valentine's Day
  • A flat lay of handmade Valentine’s Day cards and decorations, including paper flowers, felt hearts, an envelope, and printed cards with romantic poems, arranged on a gray and pink background. Capture Memories With These 6 Handprint Flower Poems
  • Flat lay of a torn paper dandelion craft featuring a white sheet with a black dandelion outline. Torn yellow, pink, and purple paper pieces are glued to the dandelion head, simulating seeds. Surrounding the craft are Elmer's glue, felt hearts, paper flowers, and patterned scrapbook paper. The text 'MAKING WISHES, ONE PIECE OF PAPER AT A TIME.' and 'GluedToMyCraftsBlog.com' are printed on the white sheet. Torn Paper Dandelion Craft: Making Wishes, One Piece at a Time
  • A playful torn paper cactus craft with hearts and flowers. Includes glue and felt hearts. Torn Paper Cactus Card: A Sweet Mother's Day Craft
  • A colorful handprint craft made from purple paper with glitter edges sits on a multicolored polka dot background. A round tag with a poem is attached below, tied with red and white string. Flowers are visible in the corner. Easy Handprint Flower Craft with Poem – Perfect Spring DIY for Kids

© 2012–2026 Glued To My Crafts
All activities should be supervised by an adult at all times. Please refer to our safety guidelines for more information.


Please note that all the content of the website, including printables, are for classroom and personal use only. This means that any digital item you download from our site can be used for non-commercial use only. We kindly request that you do not reproduce or sell our creations. We appreciate your understanding and cooperation in respecting our content and intellectual property rights.

Accessibility Adjustments

Powered by OneTap

How long do you want to hide the toolbar?
Hide Toolbar Duration
Select your accessibility profile
Vision Impaired Mode
Enhances website's visuals
Seizure Safe Profile
Clear flashes & reduces color
ADHD Friendly Mode
Focused browsing, distraction-free
Blindness Mode
Reduces distractions, improves focus
Epilepsy Safe Mode
Dims colors and stops blinking
Content Modules
Font Size

Default

Line Height

Default

Color Modules
Orientation Modules