It's a melt-free DIY to make this summer!
It’s a melt-free craft idea to make this summer with your child! Check out our “magical” Popsicle Stick Unicorn Ice Cream Cone craft below and recreate your own!

Unicorns are STILL very popular these days and I’m always trying to brainstorm the NEXT BEST THING for Glued To My Crafts.
So recently I had summer on my mind, when I came up with today’s Popsicle Stick Unicorn Ice Cream Cone kids craft idea!
It’s basically MASHING a whole bunch of my favorite things into ONE awesome tutorial. Popsicle sticks, unicorns, glitter AND ice cream! All of which are melt-free but still super fun & extra magical!
I hope YOU like my latest DIY unicorn ice cream craft idea and are inspired to recreate it today, as well! It’s simple perfect for kids AND adults to make TOGETHER! You can find ALL the details you need to know to start right now, below in the full tutorial! Happy crafting, my friends!

This is a great kids craft idea that will keep them busy and cool this summer. All you need are popsicle sticks, some glue, and some imagination! Come see how to make these adorable unicorn ice cream cones today.
Craft Supplies:
- Jumbo Popsicle Sticks – 3 per craft
- School Glue
- Small Paper Plate
- Craft Scissors
- Cardstock Paper
- Glitter Cardstock Paper
- Small Decorative Flowers
- Sharpie Markers
Directions:
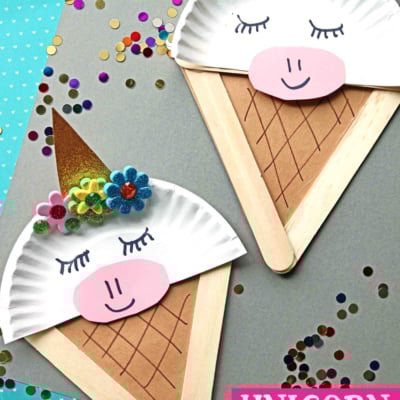
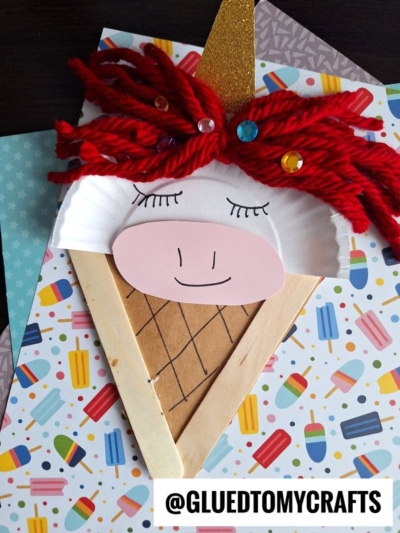
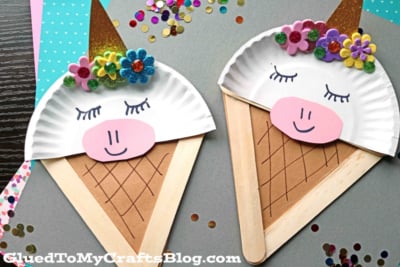
- First is building the ice cream cone from your wood craft sticks. Glue THREE popsicle sticks together in a triangle formation. You will want ONE popsicle stick shape PER unicorn ice cream cone craft.
- Set it aside to let it dry a bit.
- While that is drying, cut out a triangle piece from the tan cardstock, that will fit inside the popsicle stick shape.
- Once the popsicle stick shape is dry enough, glue the tan cardstock piece to it.
- If desired – use a marker to draw lines on the tan cardstock piece, to give the “cone” some dimension.
- Set the decorated shape aside again.
- Now grab the small paper plate and scissors.
- Cut the paper plate in half, straight up the center to make TWO equal pieces.
- Take one half for your ice cream craft and set the other aside.
- Next up – grab all your pieces of paper and the scissors again.
- Cut out a triangle horn and oval shaped nose for the craft.
- Now we are ready to assemble. Just like stacking a real ice cream cone, glue the half paper plate and cardstock cutouts, to the triangle popsicle stick shape you made earlier.
- Finally – when it’s all together, glue some small flowers for the unicorn’s hair {also known as the sprinkles!} on top and use the markers to draw on the final touches.
- At this point, you can add other embellishments you see fit like glitter, rhinestones etc.
- Set it all aside to let it dry completely before displaying proudly!
- Don’t forget to share pictures of your unique popsicle stick unicorn ice cream cone piece on your social media sites! #gluedtomycrafts
RELATED —> Cotton Ball Unicorn Cupcake

HAVE YOU HEARD? WE ABSOLUTELY LOVE SHARING UNICORN CRAFT TUTORIALS ON GLUED TO MY CRAFTS!
So on that note – don’t let the fun stop here with today’s ice cream craft tutorial! Be sure to check out our Unicorn Horns, Cupcake Liner Unicorn and Paper Bowl Unicorn craft posts! All of which would pair nicely with today’s theme – hint hint!

Popsicle Stick Unicorn Ice Cream Cone Craft
It's a melt-free DIY to make this summer!
Here’s your checklist of supplies to bring this craft to life:
- 3 Jumbo Popsicle Sticks
- Cardstock Paper
- 1 Small Paper Plate
- Embellishments
- School Glue
- 1 Scissors
Prepare your creative haven by laying down a protective cover before the crafting magic begins!
Directions:
- First is building the ice cream cone from your wood craft sticks. Glue THREE popsicle sticks together in a triangle formation. You will want ONE popsicle stick shape PER unicorn ice cream cone craft.
- Set it aside to let it dry a bit.
- While that is drying, cut out a triangle piece from the tan cardstock, that will fit inside the popsicle stick shape.
- Once the popsicle stick shape is dry enough, glue the tan cardstock piece to it.
- If desired - use a marker to draw lines on the tan cardstock piece, to give the "cone" some dimension.
- Set the decorated shape aside again.
- Now grab the small paper plate and scissors.
- Cut the paper plate in half, straight up the center to make TWO equal pieces.
- Take one half for your ice cream craft and set the other aside.
- Next up - grab all your pieces of paper and the scissors again.
- Cut out a triangle horn and oval shaped nose for the craft.
- Now we are ready to assemble. Just like stacking a real ice cream cone, glue the half paper plate and cardstock cutouts, to the triangle popsicle stick shape you made earlier.
- Finally - when it's all together, glue some small flowers for the unicorn's hair {also known as the sprinkles!} on top and use the markers to draw on the final touches.
- At this point, you can add other embellishments you see fit like glitter, rhinestones etc.
- Set it all aside to let it dry completely before displaying proudly!

CLICK HERE TO PRINT THE DIRECTIONS FOR THIS CRAFT
If you've enjoyed our content or have any thoughts to share, we'd love to hear from you! Mention @gluedtomycrafts or tag #gluedtomycrafts on Instagram!