
Are you looking for a fun and easy craft idea for kids to recreate during Reading Across America week? Then give this paper plate Thing 1 & 2 craft a try today!

These mischievous Thing 1 and 2 paper plate pieces are simply perfect for pretend play pieces, a fun activity to complete while you read “The Cat in the Hat” aloud or even ornaments for your child’s bedroom door!
Oh my goodness! The readers of Glued To My Crafts are LOVING our Dr. Seuss themed posts right now!
And in true fashion, I can’t let the fun stop there. The wheels are spinning and I recently came up with another Seuss-themed kid craft idea that is perfect for a classroom setting since it doesn’t take many supplies and/or steps!
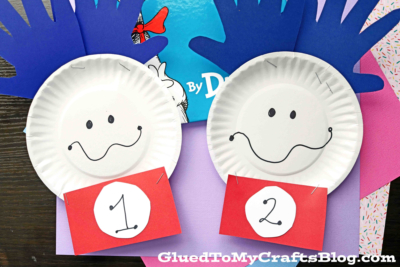
Mischievous things may be happening in the book BUT not here on Glued To My Crafts! These Paper Plate Thing 1 and 2 friends are perfect for pretend play pieces, reading tools or just because! Did I mention they make for awesome keepsakes as well with those adorable handprints as hair?!
So whatever you decide to do with your beautiful handmade pieces – I hope you enjoy making them and reading some Dr. Seuss themed books afterwards. Happy crafting, my friends!!!
RELATED —> Paper Bag Cat In The Hat Puppet

These Paper Plate Thing 1 and 2 friends are perfect for pretend play pieces, reading tools or just because!
Craft Supplies:
- TWO Large or Small White Paper Plates
- Black Sharpie Marker
- Blue Cardstock Paper
- Red Cardstock Paper
- White Cardstock Paper
- Basic Craft Scissors
- Pencil or Pen
- Stapler/Glue Stick
- Embellishments
Directions:
- First grab your TWO white paper plates and black Sharpie marker.
- Draw on a simple silly face to the center of each paper plate. Set aside.
- Now grab your blue cardstock, pencil and scissors.
- Trace both of your child’s hands onto the blue cardstock.
- Trim out each traced handprint design with the scissors.
- With the remaining cardstock {red and white} cut out TWO simple RED rectangles for the bodies of Thing 1 & 2, as well as TWO circles from the white.
- Take the black marker and write 1 & 2 on the white circles.
- To finish off the Paper Plate Things 1 & 2 – have children staple and glue their paper pieces in place {the handprints are the hair element of your craft} as well as any other embellishments {like rhinestones and more glitter} where they see fit.
- Then display proudly!
RELATED —> Popsicle Stick Thing 1 & 2

At Glued To My Crafts, we share wonderful ways to share in family fun!
Love this Thing 1 & 2 Craft idea? Be sure to check out our Cat in the Hat Puppet and Paint Splat Truffula Trees posts for another creative idea in honor of Dr Seuss!!!
We also have our Paper Plate Cat In The Hat tutorial that is ALWAYS a hit this time of year! Have fun my friends!

Paper Plate Thing 1 & 2 Craft
Here’s your checklist of supplies to bring this craft to life:
Prepare your creative haven by laying down a protective cover before the crafting magic begins!
Directions:
- First grab your TWO white paper plates and black Sharpie marker.
- Draw on a simple silly face to the center of each paper plate. Set aside.
- Now grab your blue cardstock, pencil and scissors.
- Trace both of your child's hands onto the blue cardstock.
- Trim out each traced handprint design with the scissors.
- With the remaining cardstock {red and white} cut out TWO simple RED rectangles for the bodies of Thing 1 & 2, as well as TWO circles from the white.
- Take the black marker and write 1 & 2 on the white circles.
- To finish off the Paper Plate Things 1 & 2 – have children staple and glue their paper pieces in place {the handprints are the hair element of your craft} as well as any other embellishments {like rhinestones and more glitter} where they see fit.
- Then display proudly!

CLICK HERE TO PRINT THE DIRECTIONS FOR THIS CRAFT