Glued To My Crafts

Join thousands of others who have gotten GLUED to our craft tutorials!

  • Home
  • Privacy Policy
  • Craft Safety Guidelines
  • Seasonal Themes
    • New Years
    • Valentine’s Day
    • St. Patrick’s Day
    • Spring
    • Easter
    • Mother’s Day
    • Summer
    • Father’s Day
    • Patriotic
    • Halloween
    • Thanksgiving
    • Fall
    • Winter
    • Christmas
    • Snowmen
    • Story Time
  • About Us
  • Our Amazon Storefront
  • Monthly Themes
    • January Craft Ideas
    • February Craft Ideas
    • March Craft Ideas
    • April Craft Ideas
    • May Craft Ideas
    • June Craft Ideas
    • July Craft Ideas
    • August Craft Ideas
    • September Crafts
    • October Crafts
    • November Crafts
    • December Crafts

Paint Splat Truffula Trees – Lorax Craft Idea

When engaging in craft activities, it is important for young children to have adult supervision at ALL times. It is also recommended to use supplies that are suitable for your child's age. Feel free to modify materials or steps to meet your specific requirements. Please refer to our safety guidelines for more information.

As an Amazon Associate I earn from qualifying purchases. This post may contain affiliate links. For more information, please see our disclosure policy.

UPDATE FOR 2026 - To reduce storage costs and download fees, we recently made some changes to our website. The password for all our files this year is GLUEDTOMYCRAFTS2026. No sign-up is required to download our free printables! You can enjoy our printables without creating an account or paying for Box.com. Simply follow the download instructions on our FAQ PAGE.

Kids will LOVE recreating these treesĀ in honor of the Dr. Seuss classic "The Lorax."
SKIP THE FLUFF AND PRINT THE DIRECTIONS
A copy of The Lorax by Dr. Seuss sits on colored paper, next to a paper plate decorated with colorful paint splatters and a craft stick, resembling paint splat Truffula trees. Text reads Paint Splat Truffula Tree.

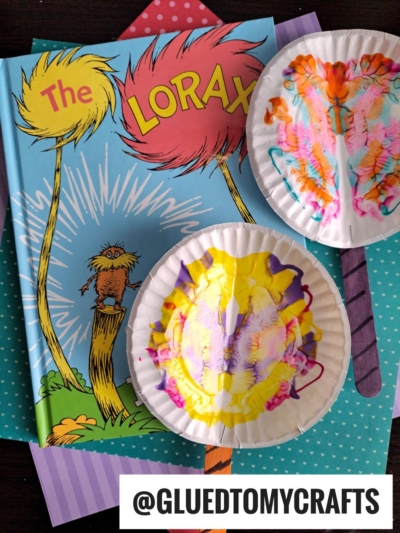
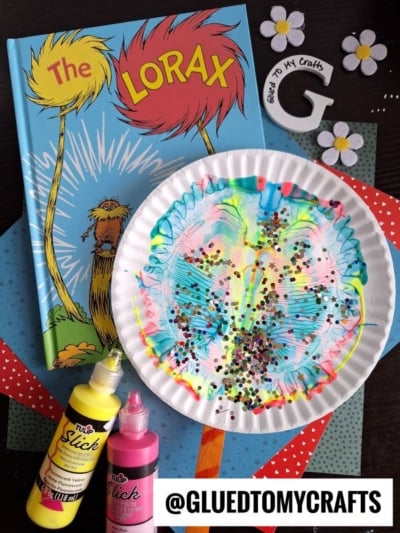
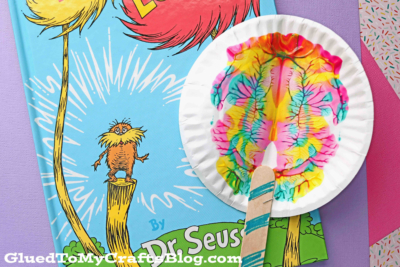
Unleash your creativity and make life a little more magical – craft yourself some Paint Splat Truffula Trees inspired by The Lorax!

A copy of The Lorax by Dr. Seuss sits on colored paper, next to a paper plate decorated with colorful paint splatters and a craft stick, resembling paint splat Truffula trees. Text reads Paint Splat Truffula Tree.

Truffula Trees Craft Idea For Kids

Kids will LOVE recreating these Paint Splat Truffula TreesĀ in honor of the Dr. Seuss classic “The Lorax.“

With no two being alike, it’s a Lorax inspired craft that is extra fun to make in a group setting and compare your finished masterpiece with others {hint hint – teachers!}

At Glued To My Crafts we absolutely LOVE paint splat tutorials. It’s a great abstract art process for kids to take a hold of and make some symmetrical masterpieces out of! It’s just a matter of squirting some paint on a piece of paper, squishing it together and admiring your hard work when you open it all up again!

So without further ado, you will find the FULL tutorial below, that was inspired by the book and movie “The Lorax.” Our rainbow colored Truffula trees are just as colorful and vibrant, so be sure to give it a try today! Happy crafting, my friends!

RELATED —> Popsicle Stick Lorax

A copy of The Lorax by Dr. Seuss sits on colored paper, next to a paper plate decorated with colorful paint splatters and a craft stick, resembling paint splat Truffula trees.

Just because we’re stuck indoors doesn’t mean we can’t have fun and be creative! Here’s a great craft idea for the kids – paint splat truffula trees inspired by The Lorax!

Craft Supplies:

  • Paper Plates – one per tree craft
  • Tulip Puffy Paint
  • Jumbo Popsicle Sticks
  • Tacky Glue
  • Baby Wipes
  • optional materials – glitter, sequins, rhinestones etc.

Directions:

  • Please make sure you have a good working area that can get dirty because paint will squeeze out of the sides of this craft!!!
  • First fold your paper plate in half {one per tree that you want to make.}
  • Unfold and squirt some paint on one side of the paper plate {I like the Tulip Puffy Paint for this particular step since it’s in a nice controlled squirt bottle} Be sure to keep the paint inside the paper plate and not place too much down.
  • Once the paint is down, go ahead and fold/squish your paper plate together again.
  • Be sure to rub your hand all over the folded piece, so the paint will cover your the inside nicely {paint WILL more than likely squeeze out the sides, so be sure to pay attention to that and clean up with baby wipes!}
  • Now carefully unfold your piece to reveal your colorful TREE design inside.
  • To finish the Paper Plate Paint Splat TruffulaĀ TreeĀ – glue a jumbo popsicle stick to the plate {if desired, you can use markers to decorate the popsicle sticks before hand!}
  • Set aside your crafty pieces, to let them dry completely before displaying proudly.
  • If you like – you can also add glitter on top of the wet paint for an even more fun look!

RELATED —> Paint Splat Unicorn Hair

Three colorful, paint-splattered paper plates with jumbo craft stick handles, resembling paint splat Truffula trees, are arranged on a pastel patchwork background alongside four bottles of brightly colored craft paint.

Oh, the places you can go with ALL the posts you find on Glued To My Crafts!

We LOVE Dr. Seuss on Glued To My Crafts! Be sure to also check out our Paper Bag LoraxĀ and Popsicle Stick Cat In The Hat craft posts!

You can also check out our HUGE Dr Seuss roundup collection post for tons of ideas in ONE place! #gluedtomycrafts

stacey-signature-2023

A copy of The Lorax by Dr. Seuss sits on colored paper, next to a paper plate decorated with colorful paint splatters and a craft stick, resembling paint splat Truffula trees. Text reads Paint Splat Truffula Tree.
PRINT

Paint Splat Truffula Trees - Lorax Craft Idea

Kids will LOVE recreating these treesĀ in honor of the Dr. Seuss classic "The Lorax."

Here’s your checklist of supplies to bring this craft to life:

  • 1 Large Paper Plate
  • Tulip Puffy Paint
  • 1 Jumbo Popsicle Stick
  • Embellishments
  • School Glue
  • Baby Wipes

Prepare your creative haven by laying down a protective cover before the crafting magic begins!

Directions:

  • Please make sure you have a good working area that can get dirty because paint will squeeze out of the sides of this craft!!!
  • First fold your paper plate in half {one per tree that you want to make.}
  • Unfold and squirt some paint on one side of the paper plate. Be sure to keep the paint inside theĀ paper plate and not place too much down.
  • Once the paint is down, go ahead and fold/squish your paper plate together again.
  • Be sure to rub your hand all over the folded piece, so the paint will cover your the inside nicely {paint WILL more than likely squeeze out the sides, so be sure to pay attention to that and clean up with baby wipes!}
  • Now carefully unfold your piece to reveal your colorfulĀ TREE design inside.
  • To finish the Paper Plate Paint Splat TruffulaĀ TreeĀ - glue a jumbo popsicle stick to the center of the decorated plate {if desired, you can use markers to decorate the popsicle stick before hand!}
  • Set aside your crafty pieces, to let them dry completely before displaying proudly.
    A copy of The Lorax by Dr. Seuss sits on colored paper, next to a paper plate decorated with colorful paint splatters and a craft stick, resembling paint splat Truffula trees.
MINI-HEARTS-page-separator-logo-gluedtomycrafts

CLICK HERE TO PRINT THE DIRECTIONS FOR THIS CRAFT

If you've enjoyed our content or have any thoughts to share, we'd love to hear from you! Mention @gluedtomycrafts or tag #gluedtomycrafts on Instagram!

Craft Activity Safety Guidelines:

Always Ensure Adult Supervision - Young children should be supervised at all times when engaging in craft activities. This is essential to keep them safe and ensure materials are used correctly. Use Age-Appropriate Supplies - Choose craft supplies that are suitable for your child’s age. Check labels for recommendations and avoid items with small parts or sharp edges for younger children. Modify as Needed - Feel free to adapt materials or steps to meet your child's abilities and safety needs. For example, substitute scissors with safety scissors if necessary. Keep an Eye on Allergies - Be mindful of potential allergens in craft materials like glue, paint, or certain fabrics. Opt for non-toxic and hypoallergenic options whenever possible. Organize and Secure Supplies - Keep all craft tools and materials organized. Store sharp objects, small parts, and potentially hazardous items out of reach when not in use. Following these guidelines will ensure that crafts remain fun, creative, and, most importantly, safe for everyone involved!


OUR PRIVACY POLICY

OUR COPYRIGHT POLICY

  • Email
  • Facebook
  • Instagram
  • Pinterest
  • Twitter
  • YouTube

LOOKING FOR SOMETHING?

EXPLORE OUR SITE:

TRENDING TODAY:

  • A pink hand-shaped bookmark with red heart stickers and star confetti surrounds a round note that reads a heartfelt message about love and reading. The image is from GluedToMyCraftsBlog.com. Handprint Bookmark Keepsake: A Gift That Holds Your Spot
  • A handmade Valentine’s Day craft featuring a red rose made of torn paper, two green handprint leaves, a glue bottle, heart decorations, and a message: ā€œLOOK WHAT I MADE - A ROSE THAT WON’T FADE! WISHING YOU LOVE THIS VALENTINE’S DAY!ā€. Torn Paper Rose Card Craft Tutorial for Valentine’s Day
  • A colorful craft project featuring a yellow felt moon, sparkly stars, and heart shapes, with glue and a heartfelt message. Torn Paper Love You To The Moon and Back Card Craft Idea For Kids
  • A handmade card with a rocket drawing, hearts, and messages of love. Felt hearts and an envelope are around it. Handprint Rocket Keepsake - I Love You Because
  • A colorful paper craft featuring a red and pink painted paper plate with yellow circles in the center, green handprint cutouts as leaves, surrounded by craft supplies, heart decorations, and paint bottles. Paint Splat Valentine's Day Flower Craft Idea
  • A vibrant Valentine's Day craft showcasing a torn-paper bumblebee with googly eyes on a white sheet, accompanied by the text "MY VALENTINE!" The scene is decorated with felt hearts, heart-shaped gems, and patterned papers, with a glue bottle and crafting supplies adding to the creative atmosphere. Torn Paper Bee My Valentine Card Craft Idea For Valentine's Day
  • A flat lay of handmade Valentine’s Day cards and decorations, including paper flowers, felt hearts, an envelope, and printed cards with romantic poems, arranged on a gray and pink background. Capture Memories With These 6 Handprint Flower Poems
  • Flat lay of a torn paper dandelion craft featuring a white sheet with a black dandelion outline. Torn yellow, pink, and purple paper pieces are glued to the dandelion head, simulating seeds. Surrounding the craft are Elmer's glue, felt hearts, paper flowers, and patterned scrapbook paper. The text 'MAKING WISHES, ONE PIECE OF PAPER AT A TIME.' and 'GluedToMyCraftsBlog.com' are printed on the white sheet. Torn Paper Dandelion Craft: Making Wishes, One Piece at a Time
  • A playful torn paper cactus craft with hearts and flowers. Includes glue and felt hearts. Torn Paper Cactus Card: A Sweet Mother's Day Craft
  • A colorful handprint craft made from purple paper with glitter edges sits on a multicolored polka dot background. A round tag with a poem is attached below, tied with red and white string. Flowers are visible in the corner. Easy Handprint Flower Craft with Poem – Perfect Spring DIY for Kids

© 2012–2026 Glued To My Crafts
All activities should be supervised by an adult at all times. Please refer to our safety guidelines for more information.


Please note that all the content of the website, including printables, are for classroom and personal use only. This means that any digital item you download from our site can be used for non-commercial use only. We kindly request that you do not reproduce or sell our creations. We appreciate your understanding and cooperation in respecting our content and intellectual property rights.

Accessibility Adjustments

Powered by OneTap

How long do you want to hide the toolbar?
Hide Toolbar Duration
Select your accessibility profile
Vision Impaired Mode
Enhances website's visuals
Seizure Safe Profile
Clear flashes & reduces color
ADHD Friendly Mode
Focused browsing, distraction-free
Blindness Mode
Reduces distractions, improves focus
Epilepsy Safe Mode
Dims colors and stops blinking
Content Modules
Font Size

Default

Line Height

Default

Color Modules
Orientation Modules