Although the character is portrayed as grumpy in the book & movie, he’s actually really charming in this craft.
Looking for a kid-friendly craft to celebrate Read Across America next week? This Paper Plate Lorax craft tutorial is perfect!

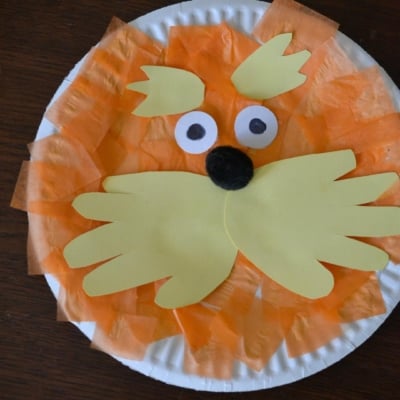
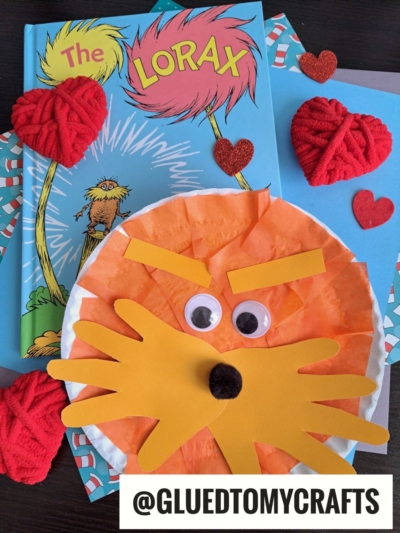
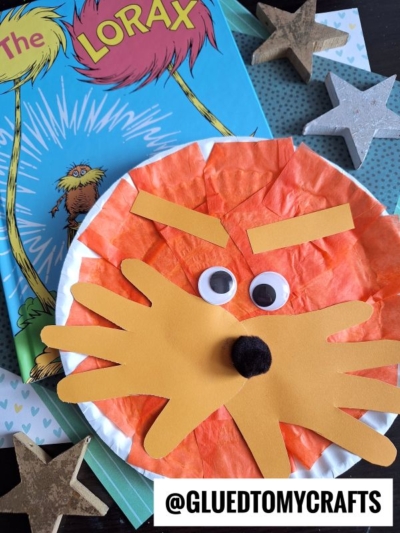
With Dr. Seuss’ birthday right around the corner {this upcoming March 2nd} I’m coming at ya with our Paper Plate Lorax kid craft idea! My personal favorite element is the handprint BEARD!
As always – this kid friendly craft has simple supplies and is easy for children of ALL ages. Plus it takes less than an hour from start to finish. Perfect for those afternoons where you just NEED something to keep the kids entertained!
So what are you waiting for??! Although the Lorax is portrayed as grumpy in the book/movie – he’s really charming in this craft. So grab those craft supplies and make one up today! Happy crafting my friends!

All you need for this handprint Lorax craft is paper plates, tissue paper, cardstock paper, and a little bit of imagination. So round up the kiddos and get ready for some fun!
Craft Supplies:
- Large Paper Plate – 1 per craft
- Orange Tissue Paper
- School Glue
- Yellow Cardstock Paper
- White Cardstock Paper
- Small Brown Pom Pom
- Black Sharpie Marker
- Craft Scissors
Directions:
- First cut/tear your orange tissue paper into small squares. {If you don’t have tissue paper, construction paper works well too}
- Next slather glue all over the paper plate.
- Place the tissue paper and paper plate in front of your child. Ask them to cover the entire plate with the tissue paper.
- Once completely covered, set aside to let it dry.
- Now comes the fun – making the handprint cutouts. Have your child place their hands on the yellow cardstock.
- Trace their hands and cut out the handprints.
- With the left over cardstock, cut out two pieces for the eyebrows of the Lorax.
- With the white cardstock, cut out two circles for the eyes and add a dot in the center for the pupil.
- To finish the Paper Plate and Tissue Paper Lorax craft, glue all the pieces onto the tissue paper covered plate. The handprints will be the mustache of the Lorax, while the brown pom pom will be the nose and the smaller yellow cutouts the eyebrows. And you are done!
- Set it aside, to let it dry completely before you display proudly for ALL to see!
- Don’t forget to share pictures with us your paper Lorax friend on your various social media sites! #gluedtomycrafts
RELATED —> Handprint Lorax Keepsake
Do you love our Paper Plate Lorax post? Well be sure to check out our Paint Splat Truffula Trees craft post as well!
It’s just as fun as today’s Dr. Seuss inspired craft post but with a fun paint marbling element that is sure to be a real winner after story time!!!

Paper Plate Lorax w/Handprint Beard Craft Idea
Although the character is portrayed as grumpy in the book & movie, he’s actually really charming in this craft.
Here’s your checklist of supplies to bring this craft to life:
- 1 Large Paper Plate
- Tissue Paper orange
- Cardstock Paper yellow and white
- 1 Craft Pom Poms brown
- School Glue
Prepare your creative haven by laying down a protective cover before the crafting magic begins!
Directions:
- First cut/tear your orange tissue paper into small squares.Tissue Paper
- Next slather glue all over the paper plate.1 Large Paper Plate
- Place the tissue paper and paper plate in front of your child. Ask them to cover the entire plate with the tissue paper.
- Once completely covered, set aside to let it dry.
- Now comes the fun – making the handprint cutouts. Have your child place their hands on the yellow cardstock.Cardstock Paper
- Trace their hands and cut out the handprints.
- With the left over cardstock, cut out two pieces for the eyebrows of the Lorax.
- With the white cardstock, cut out two circles for the eyes and add a dot in the center for the pupil.
- To finish the Paper Plate and Tissue Paper Lorax craft, glue all the pieces onto the tissue paper covered plate. The handprints will be the mustache of the Lorax, while the brown pom pom will be the nose and the smaller yellow cutouts the eyebrows.1 Craft Pom Poms
- Set it aside, to let it dry completely before you display proudly for ALL to see!


CLICK HERE TO PRINT THE DIRECTIONS FOR THIS CRAFT
If you've enjoyed our content or have any thoughts to share, we'd love to hear from you! Mention @gluedtomycrafts or tag #gluedtomycrafts on Instagram!