
No two snowflakes are alike, so why not make your Christmas ornaments one-of-a-kind too?
This easy tutorial will show you how to put together some puzzle piece snowflake ornaments that will be sure to impress!

Add a little bit of personality to your Christmas tree this year with some one-of-a-kind snowflake ornaments.
This easy tutorial will show you how to make ornament snowflakes using recycled puzzle pieces. So grab your supplies and get started!
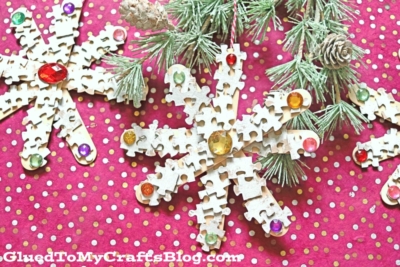
No two snowflakes are alike and with today’s popsicle stick & puzzle piece ornament tutorial, you and your child can pull together some one-of-a-kind pieces in no time! Then use your beautiful snowflake ornament creations on the Christmas tree, as gift tags on your presents or just gift them away as is!
You won’t believe how SIMPLE it is to pull these puzzle snowflake tags together and I have a feeling these keepsakes will be making their appearance on Christmas trees for years to come!
So check out the full tutorial below for the “how-to” to make your own puzzle piece snowflake ornament today and then get ready to be impressed with your hard work!
Happy crafting and decorating for the holidays, my friends! Please don’t forget to share pictures of your snowflake ornaments made from recycled puzzle pieces, on our Facebook page to admire! #gluedtomycrafts
RELATED: Applesauce Ornaments and Christmas Mail Truck

These one-of-a-kind snowflake ornaments are easy and fun to make with your kids! Easy to make and will add a touch of whimsy to your winter décor.
Craft Supplies:
- Jumbo Popsicle Sticks – 4 per craft
- Hot Glue Gun or Thick Tacky Glue
- Small Puzzle Pieces
- White Craft Paint
- Foam Paint Brush
- Small Paper Plate
- Small, Loose Craft Rhinestones
- Twine/Ribbon
Directions:
- First have children assemble the base of their snowflakes by gluing FOUR popsicle sticks together to look like a star.
- Set aside to let it dry.
- Repeat for each piece you want to make.
- Now grab your puzzle pieces, small paper plate and white craft paint.
- Squirt the craft paint on the paper plate.
- Have children paint their puzzle pieces completely white {or any other color they like.}
- Again, set them all aside to let it dry completely.
- Repeat for each puzzle piece you will be adding to the ornament.
- Once your popsicle stick shapes and puzzle pieces are completely dry, it’s time to assemble!
- One by one, glue your puzzle pieces onto the popsicle stick shape. You can overlap them or just place a single layer.
- To finish off the Puzzle Piece Snowflake Ornament – grab your rhinestones and glue those on top of the puzzle pieces to give your snowflakes some “sparkle.”
- Once done, set it all aside to let it dry completely before displaying proudly!
- For displaying – glue some string to the back for easy hanging on the tree or adding to gift packages!
- Don’t forget to share pictures with us of your one-of-a-mind DIY snowflake ornaments on your various social media sites! #gluedtomycrafts
RELATED —> Puzzle Piece Wreath

If you are looking for more holiday craft ideas to tackle this month, be sure to check out these great post below, on Glued To My Crafts right now!
And as always – if our post inspired you, please share a picture on our Facebook page so we can see your awesome work! We love seeing these ideas come to life!!!
- Mixed Media Santa In The Chimney
- Woofing You A Merry Christmas
- Paper Plate Christmas Gnome
- Festive Reindeer Star
- Paper Plate Grinch
- Paper Plate Christmas Wreath
- Paper Plate Snowflake
- Chalk Art Snowy Day

Puzzle Piece Snowflake Ornament Craft Idea
Here’s your checklist of supplies to bring this craft to life:
- 4 Jumbo Popsicle Sticks
- Small Recycled Puzzle Pieces
- Craft Paint
- Rhinestone Stickers
- Twine or Ribbon
Prepare your creative haven by laying down a protective cover before the crafting magic begins!
Directions:
- First have children assemble the base of their snowflakes by gluing FOUR popsicle sticks together to look like a star.
- Set aside to let it dry.
- Repeat for each piece you want to make.
- Now grab your puzzle pieces, small paper plate and white craft paint.
- Squirt the craft paint on the paper plate.
- Have children paint their puzzle pieces completely white {or any other color they like.}
- Again, set them all aside to let it dry completely.
- Repeat for each puzzle piece you will be adding to the ornament.
- Once your popsicle stick shapes and puzzle pieces are completely dry, it's time to assemble! One by one, glue your puzzle pieces onto the popsicle stick shape. You can overlap them or just place a single layer.
- To finish off the Puzzle Piece Snowflake Ornaments - grab your rhinestones and glue those on top of the puzzle pieces to give your snowflakes some "sparkle."
- Once done, set it all aside to let it dry completely before displaying proudly!
- For displaying - glue some string to the back for easy hanging on the tree or adding to gift packages!

Grab our favorite books via our Amazon affiliate link! In our Amazon storefront you will find books, toys and craft supplies we absolutely love using for our Glued To My Crafts tutorials!