
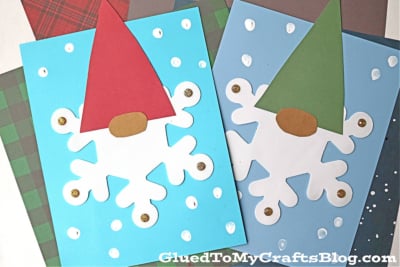
These snowflake gnomes are a perfect craft for kids to enjoy! There’s no denying, snowflakes make everything cuter. Make these adorable and fun foam snowflake gnomes this winter season!

Snowflake Winter Gnome Art Project Using Craft Foam
Hi friends! Do you by chance have a few leftover craft foam snowflakes in your holiday stash right now?
Perhaps you are like me and picked up a pack at Dollar Tree recently {or cough cough – last year!} but honestly had no clue what you were going to use them for?
Well worry no more because I have the absolute PERFECT last minute craft idea that you literally pull together RIGHT NOW without even double thinking it. Other than the white craft foam snowflake shapes themselves, all you need is a few pieces of colored paper, white paint, a glue stick, your trusty scissors and a few small rhinestones to pull it off. I’m telling you, it’s that’s easy to do. Not to mention, super awesome {and unique} to show off all season long!
So enough chit chat from me because Christmas is right around the corner and I just know you want to get those crafts knocked out with the kids today! Keep scrolling for the 5-minute tutorial and get ready to pull it off just as fast as we did!
RELATED —> Snowman Snowflake Ornament

These adorable foam snowflake gnomes are perfect for kids to craft this winter! With just a few simple supplies, you can make these fun winter gnomes in no time!
Craft Supplies:
- Craft Foam Snowflake Shapes – 1 per craft
- Cardstock Paper
- Craft Scissors
- Take Runner or Glue Stick
- Small Rhinestone Glitters
- White Craft Paint
- Small Paper Plate
- Baby Wipes
Directions:
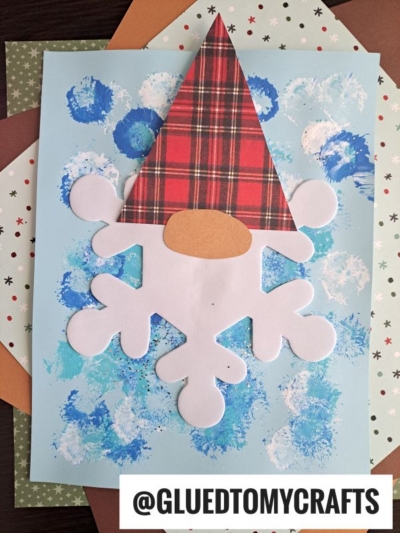
- First things first – glue ONE snowflake craft foam shape in the middle of the blue cardstock paper.
- Next up, grab your remaining sheets of cardstock paper and cut out a large triangle hat and small oval nose.
- Go ahead and glue those in place, on the snowflake shape. Start with the hat, then the nose.
- Now go ahead and grab the white craft paint and your paper plate.
- Squirt a small amount on the plate and dip your finger in it.
- Go ahead and make “snow” dots all around the snowflake design.
- Use baby wipes to clean off paint from fingers {as well as getting a quick wash at the sink!}
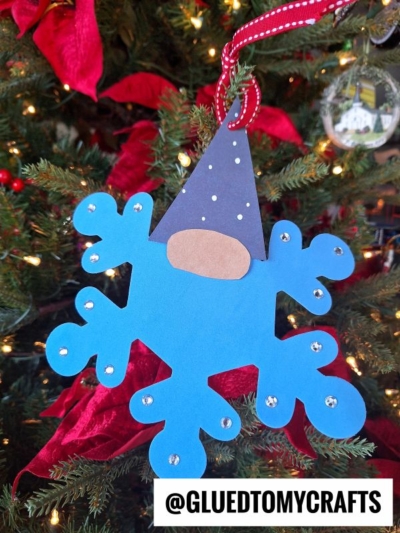
- To finish off the craft foam snowflake gnome tutorial, simple add a few small rhinestone stickers on the exposed tips of the snowflake.
- At this point in time you can also add other embellishments like glitter glue, small holiday stickers etc. to really make it your own!
- Then when done, display it proudly! And that’s it! Admire your hard work because I bet it turned out awesome!
RELATED —> Lollipop Photo Frame Ornament

AFFILIATE LINK – PAIR OUR CRAFT IDEA WITH THIS BOOK RECOMMENDATION
If you are looking for more holiday craft ideas to tackle before the holiday is over, be sure to check out these great post below, on Glued To My Crafts right now!
And as always – if our snowflake gnome post inspired you, please share a picture on our Facebook page so we can see your awesome work! We love seeing these ideas come to life!!!
- Popsicle Stick Snowflake Wreath
- Woofing You A Merry Christmas
- Paper Plate Christmas Gnome
- Festive Reindeer Star
- Paper Plate Grinch
- Toilet Roll Snowflake Stamp
- Paper Plate Snowflake
- Chalk Art Snowy Day
- Puzzle Piece Snowflake
- Handprint Snowflake Ornament

Craft Foam Snowflake Gnome
Here’s your checklist of supplies to bring this craft to life:
- 1 Foam Snowflake Shapes
- Cardstock Paper
- Rhinestone Stickers
- Craft Paint
Prepare your creative haven by laying down a protective cover before the crafting magic begins!
Directions:
- First things first - glue ONE snowflake craft foam shape in the middle of the blue cardstock paper.1 Foam Snowflake Shapes
- Next up, grab your remaining sheets of cardstock paper and cut out a large triangle hat and small oval nose.Cardstock Paper
- Go ahead and glue those in place, on the snowflake shape. Start with the hat, then the nose.
- Now go ahead and grab the white craft paint and your paper plate.
- Squirt a small amount on the plate and dip your finger in it.
- Go ahead and make "snow" dots all around the snowflake design.Craft Paint
- Use baby wipes to clean off paint from fingers {as well as getting a quick wash at the sink!}
- To finish off the craft foam snowflake gnome tutorial, simple add a few small rhinestone stickers on the exposed tips of the snowflake.Rhinestone Stickers
- At this point in time you can also add other embellishments like glitter glue, small holiday stickers etc. to really make it your own!
- Then when done, display it proudly! And that's it! Admire your hard work because I bet it turned out awesome!

CLICK HERE TO PRINT THE DIRECTIONS FOR THIS CRAFT