You can use our castle craft idea as a sweet keepsake, party decor or even for some magical pretend play fun afterwards!
A little sparkle and princess flair – it’s time to make your home a little more magical this time of year!
With complete customization at your child’s fingertips, they can be either an HGTV guru and go all out on their version of a popsicle stick princess castle or keep it simple with just a few embellishments here & there.

Keeping kids entertained and inspired can sometimes feel like a creative challenge. But with a dash of imagination and everyday crafting supplies, you can spark endless joy. Today’s “popsicle stick princess castle” tutorial is the perfect project to encourage creativity, develop fine motor skills, and make magical memories with your little ones.
This step-by-step guide will have your children crafting their very own princess castle in no time. Best of all, the materials are affordable, and the activity is both simple and fun, making it an ideal project for both parents and kids.

This fun and easy kid craft is perfect for any little girl who loves princesses! With just a few supplies, you can create a sweet keepsake or party decoration that will be cherished for years to come.
Craft Supplies:
Gather these basic materials before you begin. Most can be found at home or any nearby craft store:
- Jumbo Popsicle Sticks – 3 per craft
- School Glue
- Pink Craft Paint
- Paint Brush
- Small Paper Plate
- Pink Scrapbook Paper
- Glitter Cardstock Paper
- Brown Cardstock Paper
- Scissors
- Black Marker
- Embellishments
Directions:
Follow these simple steps, whether you’re crafting as a family or planning a weekend activity with a group of kids.
- Start by gathering three jumbo popsicle sticks and glue them together to form a simple triangle.
- Set the triangle aside to dry. Repeat this step for each princess house craft you’d like to make.
- Once the glue has dried enough to handle, grab your popsicle stick triangle, craft paint, a paper plate, and a paintbrush.
- Squeeze some craft paint onto the paper plate, and use the paintbrush to completely cover one side of the popsicle stick triangle.
- Let the painted triangle dry completely before moving on to the next step.
- Next, take your cardstock and scissors. Cut a large triangle from either scrapbook paper or colored cardstock that will fit perfectly inside the painted popsicle stick frame.
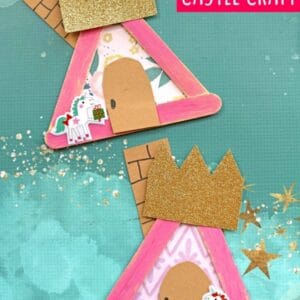
- From brown cardstock, cut out a door and a chimney. Use a black Sharpie to draw a doorknob on the door and add “bricks” to the chimney for extra detail.
- Using gold glitter cardstock, cut out a crown-shaped piece to serve as the roof of your princess house.
- Now it’s time to assemble! Gather all your paper pieces, the painted popsicle stick triangle, and some school glue.
- Start by gluing the cardstock triangle to the back of the painted popsicle stick frame.
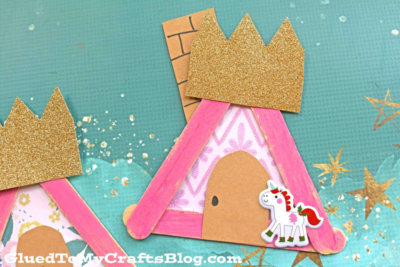
- Attach the crown-shaped roof to the top front of the popsicle stick frame.
- Add the door, chimney, and any additional details like windows.
- Finish off your craft by decorating it with Halloween stickers to give your popsicle stick princess house a festive touch.
- Allow the finished creation to dry completely before putting it on display. Show off your craft stick castle proudly in your home!
- Don’t forget to share your masterpiece with us on social media using #gluedtomycrafts!
RELATED —> Handprint Princess Dress
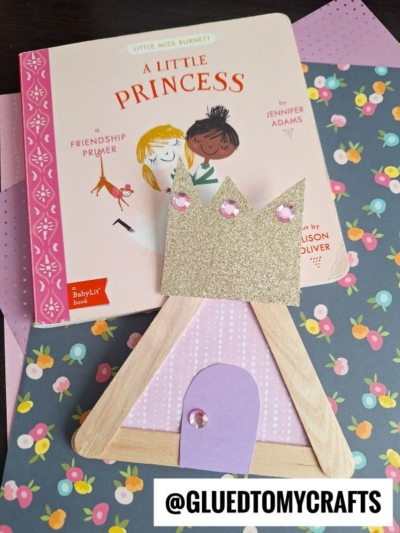

AFFILIATE LINK – PAIR OUR CRAFT IDEA WITH THIS BOOK RECOMMENDATION
Be sure to check out these fun kid craft ideas, from Glued To My Crafts, that are also fit for a princess to recreate today! Then pair them with today’s popsicle stick princess castle tutorial – hint hint!
- Clothespin Fairies
- Popsicle Stick Garden Fairies
- Clothespin Mermaids
- Popsicle Stick Mermaid Tails
- Popsicle Stick Mermaid
- Popsicle Stick Princess Puppet
- Paper Plate Princess
- Paper Gingerbread Princesses

Popsicle Stick Princess Castle Craft Idea
You can use our castle craft idea as a sweet keepsake, party decor or even for some magical pretend play fun afterwards!
Here’s your checklist of supplies to bring this craft to life:
- 3 Jumbo Popsicle Sticks
- Craft Paint
- Cardstock Paper
- Scrapbook Paper
- Embellishments
- School Glue
- 1 Scissors
Prepare your creative haven by laying down a protective cover before the crafting magic begins!
Directions:
- Start by gathering three jumbo popsicle sticks and glue them together to form a simple triangle.
- Set the triangle aside to dry. Repeat this step for each princess house craft you'd like to make.
- Once the glue has dried enough to handle, grab your popsicle stick triangle, craft paint, a paper plate, and a paintbrush.
- Squeeze some craft paint onto the paper plate, and use the paintbrush to completely cover one side of the popsicle stick triangle.
- Let the painted triangle dry completely before moving on to the next step.
- Next, take your cardstock and scissors. Cut a large triangle from either scrapbook paper or colored cardstock that will fit perfectly inside the painted popsicle stick frame.
- From brown cardstock, cut out a door and a chimney. Use a black Sharpie to draw a doorknob on the door and add "bricks" to the chimney for extra detail.
- Using gold glitter cardstock, cut out a crown-shaped piece to serve as the roof of your princess house.
- Now it's time to assemble! Gather all your paper pieces, the painted popsicle stick triangle, and some school glue.
- Start by gluing the cardstock triangle to the back of the painted popsicle stick frame.
- Attach the crown-shaped roof to the top front of the popsicle stick frame.
- Add the door, chimney, and any additional details like windows.
- Finish off your craft by decorating it with Halloween stickers to give your popsicle stick princess house a festive touch.
- Allow the finished creation to dry completely before putting it on display. Show off your craft stick castle proudly in your home!
- Don’t forget to share your masterpiece with us on social media using #gluedtomycrafts!

CLICK HERE TO PRINT THE DIRECTIONS FOR THIS CRAFT
If you've enjoyed our content or have any thoughts to share, we'd love to hear from you! Mention @gluedtomycrafts or tag #gluedtomycrafts on Instagram!