These beautiful creations can be used as home decor, puppet play fun or even on the Christmas tree as an ornament!

Are you looking for a fun and engaging craft activity to do with the kids? Look no further! Our latest craft stick princess tutorial is the perfect way to encourage creativity and imaginations in children of all ages!

Calling all little princes and princesses! Get ready to let your creativity rule with this adorable popsicle stick princess craft idea!
From designing a royal gown to decorating a majestic crown, this DIY project will transport your little one into their very own fairytale kingdom.
So grab your glue, paint, and imagination, and watch as their artistic skills unfold right in front of your eyes! Happy crafting, my friends!
RELATED: Popsicle Stick Castle and Handprint Princess Dress

Not only is it quick and easy to assemble – requiring minimal supplies – but your little ones will love spending time designing their very own royal puppet masterpiece!
Craft Supplies:
- Jumbo Popsicle Sticks – 3 per craft
- School Glue
- Cardstock Paper
- Scissors
- Craft Paint {any color you like!}
- Paint Brush
- Paper Plate
- Wiggle Eyes
- Small Rhinestones
- Sharpie Markers
Directions:
- First grab three jumbo popsicle sticks {three per princess craft} and glue them together to look like a triangle. This is the body of your princess.
- Set aside to let it dry completely.
- Repeat for each craft piece you want to make.
- Once dry – have children paint their popsicle stick design however they like. Simply squirt the paint on the paper plate and hand over the paint brush.
- When done painting, set aside the triangle shape to let it dry completely.
- While those are drying, grab your cardstock and cut a triangle that will fit inside the popsicle stick design. This will be the princess’ body and dress design.
- At this time you should also grab the other cardstock paper and cut out a circular head, along with hair and a pretty crown for the fairy princess {be sure to draw on facial characteristics with your markers!}
- To finish off the Popsicle Stick Princess – have children glue their paper pieces in place and top off with any other embellishments they see fit.
- Once done, set aside to let it dry completely before displaying proudly!
- Don’t forget to share pictures with us on your various social media sites! #gluedtomycrafts or @gluedtomycrafts
RELATED —> Paper Plate Princess Castle

AFFILIATE LINK – PAIR OUR CRAFT IDEA WITH THIS BOOK RECOMMENDATION
If you are looking for something to pair along with today’s popsicle stick princess craft tutorial, be sure to check out these fun and simple kid craft ideas on Glued To My Crafts, that are also fit for any age princess to recreate today!!!
- Clothespin Fairies
- Popsicle Stick Garden Fairies
- Gingerbread Cookie Princess
- Clothespin Mermaids
- Popsicle Stick Mermaid Tails
- Popsicle Stick Mermaid
- Christmas Fairy House
- Paper Plate Princess

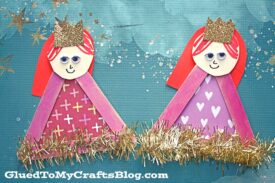
Popsicle Stick Princess Craft Idea For Kids
These beautiful creations can be used as home decor, puppet play fun or even on the Christmas tree as an ornament!
Here’s your checklist of supplies to bring this craft to life:
- 3 Jumbo Popsicle Sticks
- Craft Paint
- Cardstock Paper
- 2 Small Wiggle Eyes
- Embellishments
- School Glue
- 1 Scissors
Prepare your creative haven by laying down a protective cover before the crafting magic begins!
Directions:
- First grab three jumbo popsicle sticks {three per princess craft} and glue them together to look like a triangle. This is the body of your princess.
- Set aside to let it dry completely.
- Repeat for each craft piece you want to make.
- Once dry - have children paint their popsicle stick design however they like. Simply squirt the paint on the paper plate and hand over the paint brush.
- When done painting, set aside the triangle shape to let it dry completely.
- While those are drying, grab your cardstock and cut a triangle that will fit inside the popsicle stick design. This will be the princess' body and dress design.
- At this time you should also grab the other cardstock paper and cut out a circular head, along with hair and a pretty crown for the fairy princess {be sure to draw on facial characteristics with your markers!}
- To finish off the Popsicle Stick Princess – have children glue their paper pieces in place and top off with any other embellishments they see fit.
- Once done, set aside to let it dry completely before displaying proudly!

CLICK HERE TO PRINT THE DIRECTIONS FOR THIS CRAFT
If you've enjoyed our content or have any thoughts to share, we'd love to hear from you! Mention @gluedtomycrafts or tag #gluedtomycrafts on Instagram!