This craft is perfect for any little girl who dreams of being a princess. With just a few simple supplies, you can help her bring her dream to life. Plus, this project is a great way to teach kids about the power of imagination. Let’s get crafting!

Paper Plate Castle Craft
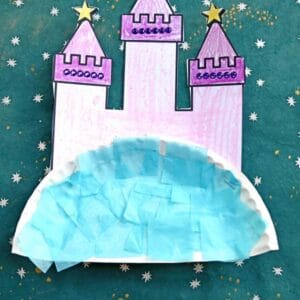
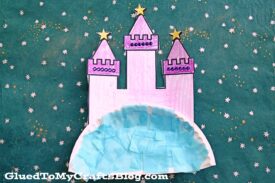
At Glued To My Crafts we hoping to inspire YOU to dream BIG and celebrate those little girls in your life with our latest & greatest Princess Castle In The Sky kid craft idea!
To complete this princess themed paper craft idea all you need is a large paper plate, blue tissue paper and our FREE castle house printable to make it come together within minutes! We are talking very basic craft supplies you probably already have on hand right now!
Then you can use our inexpensive and pretty simple kid craft idea as a sweet keepsake, party decor or even for some magical pretend play fun. Whatever you do – we hope you have fun making it! You can find all the crafty details and free file below!
Happy crafting and remember to dream BIG! Don’t forget to share pictures with us by tagging our account on Instagram. We can’t wait to see those awesome paper plate fairy tale castles from a far! #gluedtomycrafts
RELATED —> Handprint Princess Dress

This kids craft idea is perfect for any little girl who dreams of being a princess. With just a few simple supplies, she can make her very own Paper Plate Princess Castle In The Sky. And to sweeten the deal, we’ve included a free printable to make even easier to recreate!
Craft Supplies:
- Castle Printable – on our landing page
- White Cardstock Paper
- Crayons, Markers or Coloring Pencils
- Scissors
- School Glue
- Stapler
- Large Paper Plate
- Light Blue Tissue Paper
- Embellishments
Directions:
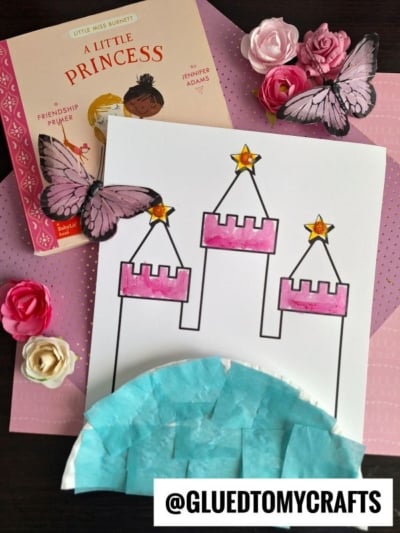
- First things first – print the FREE princess castle printable listed above. You only need to print one castle shape, on a single sheet of white cardstock, per craft. Print as many as you like!
- Next go ahead and color in the castle design however you like! Go to town with the crayons, markers and coloring pencils!
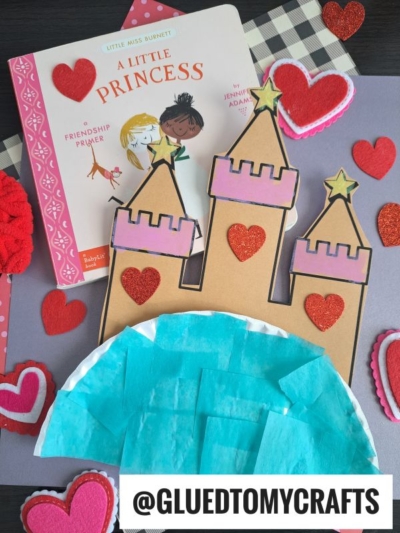
- At this point in time, you can also add your rhinestones, stickers etc. to the castle design.
- When done decorating the castle, grab your scissors.
- Trim out the decorated castle shape.
- Discard excess paper and set aside the castle piece till later.
- Next up, grab ONE large paper plate and cut it into two equal pieces. Straight up the center.
- Reserve one half for today’s craft and save the other for a rainy day!
- Now grab your blue tissue paper.
- Cut a small amount of 2×2″ squares out of it.
- Grab your paper plate half and cover it in school glue.
- Take the tissue paper squares and lay them on the paper plate to create a “cloud” for your craft.
- Finally – the last step. Grab all your paper pieces and hand-held stapler.
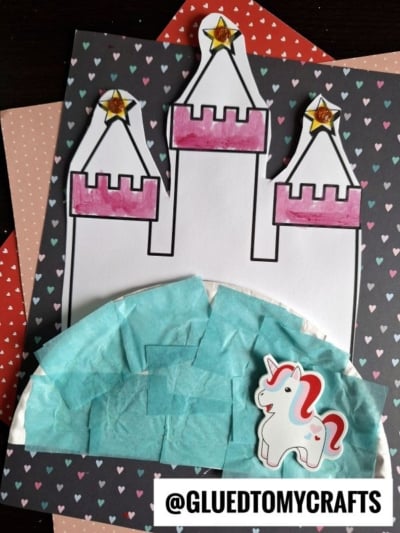
- Staple the castle shape to the back of the tissue paper covered paper plate.
- And that’s it! Add other embellishments you see fit before displaying your Paper Castle Craft Piece proudly for ALL to see!
RELATED —> Paper Plate Sand Castle Craft
If you are looking for even MORE easy princess themed kid craft ideas, be sure to check out these fun posts listed below.
- Clothespin Fairies
- Popsicle Stick Garden Fairies
- Clothespin Mermaids
- Popsicle Stick Mermaid
- Craft Stick Turkey Ballerinas
- Popsicle Stick Princess Castle
- Gingerbread Princesses
- Popsicle Stick Princess Puppet
- Handprint Frog Keepsake
- Sand Castle Art Project

Paper Plate Princess Castle Craft Idea
Here’s your checklist of supplies to bring this craft to life:
- 1 Large Paper Plate
- Tissue Paper Blue
- Cardstock Paper White
- CASTLE Printable Landing Page
- Embellishments
Prepare your creative haven by laying down a protective cover before the crafting magic begins!
Directions:
- First print out our provided printable, in color, on a single sheet of white cardstock paper. You only need one print per craft.
- Next go ahead and color in the castle design however you like! Go to town with the crayons, markers and coloring pencils!
- At this point in time, you can also add your rhinestones, stickers etc. to the castle design.
- When done decorating the castle, grab your scissors.
- Trim out the decorated castle shape.
- Discard excess paper and set aside the castle piece till later.
- Next up, grab ONE large paper plate and cut it into two equal pieces. Straight up the center.
- Reserve one half for today's craft and save the other for a rainy day!
- Now grab your blue tissue paper.
- Cut a small amount of 2x2" squares out of it.
- Grab your paper plate half and cover it in school glue.
- Take the tissue paper squares and lay them on the paper plate to create a "cloud" for your craft.
- Finally - the last step. Grab all your paper pieces and hand-held stapler.
- Staple the castle shape to the back of the tissue paper covered paper plate.
- And that's it! Add other embellishments you see fit before displaying your Paper Castle Craft Piece proudly for ALL to see!


NEED MORE HELP DOWNLOADING OUR FREE PRINTABLES? PLEASE REFER TO OUR FAQ PAGE